Building scalable multi-purpose AI agents: Orchestrating Multi-Agent Systems with Strands Agents and Chainlit

We can build simple AI agents that handle specific tasks quite easily today. But what about building AI systems that can handle multiple domains effectively? One approach is to create a single monolithic agent that tries to do everything, but this quickly runs into problems of context pollution, maintenance complexity, and scaling limitations. In this article, we’ll show a production-ready pattern for building multi-purpose AI systems using an orchestrator architecture that coordinates domain-specific agents.

The idea is simple: Don’t build one agent to rule them all instead, create specialized agents that excel in their domains and coordinate them through an intelligent orchestrator. The solution is an orchestrator agent that routes requests to specialized sub-agents, each with focused expertise and dedicated tools. Think of it as a smart router that understands intent and delegates accordingly.

That’s the core of the Orchestrator Pattern for multi-agent systems:

User Query → Orchestrator Agent → Specialized Agent(s) → Orchestrator → Response

For our example we have three specialized agents:

  1. Weather Agent: Expert in meteorological data and weather patterns. It uses external weather APIs to fetch historical and current weather data.
  2. Logistics Agent: Specialist in supply chain and shipping operations. Fake logistics data is generated to simulate shipment tracking, route optimization, and delivery performance analysis.
  3. Production Agent: Focused on manufacturing operations and production metrics. Also, fake production data is generated to analyze production KPIs.

That’s the architecture in a nutshell:

┌─────────────────────────────────────────────┐
│          Orchestrator Agent                 │
│  (Routes & Synthesizes)                 │
└────────┬─────────┬─────────┬────────────────┘
         │         │         │
    ┌────▼────┐ ┌──▼─────┐ ┌─▼─────────┐
    │ Weather │ │Logistic│ │Production │
    │  Agent  │ │ Agent  │ │  Agent    │
    └────┬────┘ └──┬─────┘ └┬──────────┘
         │         │        │
    ┌────▼────┐ ┌──▼─────┐ ┌▼──────────┐
    │External │ │Database│ │ Database  │
    │   API   │ │ Tools  │ │  Tools    │
    └─────────┘ └────────┘ └───────────┘

The tech stack includes:

  • AWS Bedrock with Claude 4.5 Sonnet for agent reasoning
  • Strands Agents framework for agent orchestration
  • Chainlit for the conversational UI
  • FastAPI for the async backend
  • PostgreSQL for storing conversation history and domain data

The orchestrator’s job is simple but critical: understand the user’s intent and route to the right specialist(s).

MAIN_SYSTEM_PROMPT = """You are an intelligent orchestrator agent 
responsible for routing user requests to specialized sub-agents 
based on their domain expertise.

## Available Specialized Agents

### 1. Production Agent
**Domain**: Manufacturing operations, production metrics, quality control
**Handles**: Production KPIs, machine performance, downtime analysis

### 2. Logistics Agent
**Domain**: Supply chain, shipping, transportation operations
**Handles**: Shipment tracking, route optimization, delivery performance

### 3. Weather Agent
**Domain**: Meteorological data and weather patterns
**Handles**: Historical weather, atmospheric conditions, climate trends

## Your Decision Process
1. Analyze the request for key terms and domains
2. Determine scope (single vs multi-domain)
3. Route to appropriate agent(s)
4. Synthesize results when multiple agents are involved
"""

The orchestrator receives specialized agents as tools:

def get_orchestrator_tools() -> List[Any]:
    from tools.logistics.agent import logistics_assistant
    from tools.production.agent import production_assistant
    from tools.weather.agent import weather_assistant

    tools = [
        calculator,
        think,
        current_time,
        AgentCoreCodeInterpreter(region=AWS_REGION).code_interpreter,
        logistics_assistant,  # Specialized agent as tool
        production_assistant,  # Specialized agent as tool
        weather_assistant     # Specialized agent as tool
    ]
    return tools

Each specialized agent follows a consistent pattern. Here’s the weather agent:

@tool
@stream_to_step("weather_assistant")
async def weather_assistant(query: str):
    """
    A research assistant specialized in weather topics with streaming support.
    """
    try:
        tools = [
            calculator,
            think,
            current_time,
            AgentCoreCodeInterpreter(region=AWS_REGION).code_interpreter
        ]
        # Domain-specific tools
        tools += WeatherTools(latitude=MY_LATITUDE, longitude=MY_LONGITUDE).get_tools()

        research_agent = get_agent(
            system_prompt=WEATHER_ASSISTANT_PROMPT,
            tools=tools
        )

        async for token in research_agent.stream_async(query):
            yield token

    except Exception as e:
        yield f"Error in research assistant: {str(e)}"

Each agent has access to domain-specific tools. For example, the weather agent uses external APIs:

class WeatherTools:
    def __init__(self, latitude: float, longitude: float):
        self.latitude = latitude
        self.longitude = longitude

    def get_tools(self) -> List[tool]:
        @tool
        def get_hourly_weather_data(from_date: date, to_date: date) -> MeteoData:
            """Get hourly weather data for a specific date range."""
            url = (f"https://api.open-meteo.com/v1/forecast?"
                   f"latitude={self.latitude}&longitude={self.longitude}&"
                   f"hourly=temperature_2m,relative_humidity_2m...")
            response = requests.get(url)
            return parse_weather_response(response.json())
        
        return [get_hourly_weather_data]

The logistics and production agents use synthetic data generators for demonstration:

class LogisticsTools:
    def get_tools(self) -> List[tool]:
        @tool
        def get_logistics_data(
            from_date: date,
            to_date: date,
            origins: Optional[List[str]] = None,
            destinations: Optional[List[str]] = None,
        ) -> LogisticsDataset:
            """Generate synthetic logistics shipment data."""
            # Generate realistic shipment data with delays, costs, routes
            records = generate_synthetic_shipments(...)
            return LogisticsDataset(records=records, aggregates=...)
        
        return [get_logistics_data]

For UI we’re going to use Chainlit. The Chainlit integration provides real-time visibility into agent execution:

class LoggingHooks(HookProvider):
    async def before_tool(self, event: BeforeToolCallEvent) -> None:
        step = cl.Step(name=f"{event.tool_use['name']}", type="tool")
        await step.send()
        cl.user_session.set(f"step_{event.tool_use['name']}", step)

    async def after_tool(self, event: AfterToolCallEvent) -> None:
        step = cl.user_session.get(f"step_{event.tool_use['name']}")
        if step:
            await step.update()

@cl.on_message
async def handle_message(message: cl.Message):
    agent = cl.user_session.get("agent")
    message_history = cl.user_session.get("message_history")
    message_history.append({"role": "user", "content": message.content})
    
    response = await agent.run_async(message.content)
    await cl.Message(content=response).send()

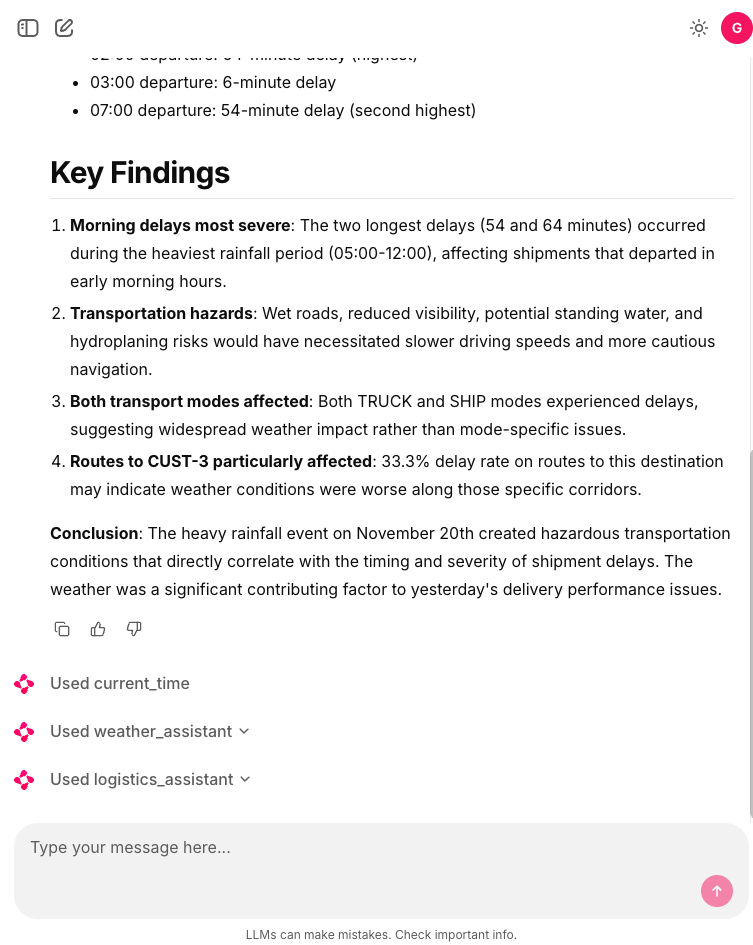
This creates a transparent experience where users see:

  • Which agent is handling their request
  • What tools are being invoked
  • Real-time streaming of responses

Now we can handle a variety of user queries: For example:

User: “What was the average temperature last week?”

Flow:

  1. Orchestrator identifies weather domain
  2. Routes to weather_assistant
  3. Weather agent calls get_hourly_weather_data
  4. Analyzes and returns formatted response

Or multi-domain queries:

User: “Did weather conditions affect our shipment delays yesterday?”

Flow:

  1. Orchestrator identifies weather + logistics domains
  2. Routes to weather_assistant for climate data
  3. Routes to logistics_assistant for shipment data
  4. Synthesizes correlation analysis
  5. Returns unified insight

And complex analytics:

User: “Analyze production efficiency trends and correlate with weather and logistics performance based in yesterday’s data.”

Flow:

  1. Orchestrator coordinates all three agents
  2. Production agent retrieves manufacturing KPIs
  3. Weather agent provides environmental data
  4. Logistics agent supplies delivery metrics
  5. Orchestrator synthesizes multi-domain analysis

This architecture scales naturally in multiple dimensions. We can easily add new specialized agents without disrupting existing functionality. WE only need to create the new agent and register it as a tool with the orchestratortrator prompt with new domain description. That’s it.

The orchestrator pattern transforms multi-domain AI from a monolithic challenge into a composable architecture. Each agent focuses on what it does best, while the orchestrator provides intelligent coordination.

Full code in my github.

Handling M1 problems in Python local development using Docker

I’ve got a new laptop. One MacbookPro with M1 processor. The battery performance is impressive and the performance is very good but not all are good things. M1 processor has a different architecture. Now we’re using arm64 instead of x86_64.

The problem is when we need to compile. We need to take into account this. With python I normally use pyenv to manage different python version in my laptop and I create one virtualenv per project to isolate my environment. It worked like a charm, but now I’m facing problems due to the M1 architecture. For example to install a specific python version with pyenv I need to compile it. Also when I install a pip package and it provides a binary it must be available the M1 version.

This kind of problems are a bit frustrating. Apple provide us rosetta to use x86 binaries but a simple pip install xxx turns into a nightmare. For me, it’s not assumable. I want to deploy projects to production not become an expert in low level architectures. So, Docker is my friend.

My solution to avoid this kind of problems is Docker. Now I’m not using pyenv. If I need a python interpreter I build a Docker image. Instead of virtualenv I create a container.

PyCharm also allows me to use the docker interpreter without any problem.

That’s my python Dockerfile:

FROM python:3.9.6 AS base

ENV APP_HOME=/src
ENV APP_USER=appuser

RUN groupadd -r $APP_USER && \
    useradd -r -g $APP_USER -d $APP_HOME -s /sbin/nologin -c "Docker image user" $APP_USER

WORKDIR $APP_HOME

ENV TZ 'Europe/Madrid'
RUN echo $TZ > /etc/timezone && \
apt-get update && apt-get install --no-install-recommends \
    -y tzdata && \
    rm /etc/localtime && \
    ln -snf /usr/share/zoneinfo/$TZ /etc/localtime && \
    dpkg-reconfigure -f noninteractive tzdata && \
    apt-get clean

RUN pip install --upgrade pip

FROM base

ENV PYTHONDONTWRITEBYTECODE 1
ENV PYTHONUNBUFFERED 1

WORKDIR $APP_HOME

COPY requirements.txt .
RUN pip install -r requirements.txt

ADD src .

RUN chown -R $APP_USER:$APP_USER $APP_HOME

USER $APP_USER

I can build my container:

docker build -t demo .

Now I can add interpreter in pycharm using my demo:latest image

If I need to add a pip dependency i cannot do using pip install locally. I’ve two options: Add the dependency within requirements.txt and build again the image or run pip inside docker container ("with docker run -it –rm …"). To organize those script we can easily create a package.json file.

{
  "name": "flaskdemo",
  "version": "1.0.0",
  "description": "",
  "main": "index.js",
  "scripts": {
    "test": "echo \"Error: no test specified\" && exit 1",
    "docker_local_build": "docker build -t $npm_package_name .",
    "freeze": "docker run -it --rm -v \"$PWD\"/src:/src $npm_package_name python -m pip freeze > requirements.txt",
    "local": "npm run docker_local_build && npm run freeze",
    "python": "docker run -it --rm -v $PWD/src:/src $npm_package_name:latest",
    "bash": "docker run -it --rm -v $PWD/src:/src $npm_package_name:latest bash"
  },
  "author": {
    "name": "Gonzalo Ayuso",
    "email": "gonzalo123@gmail.com",
    "url": "https://gonzalo123.com"
  },
  "license": "MIT"
}

Extra

There’s another problem with M1. Maybe you don’t need to face it but if you build a docker container with a M1 laptop and you try to deploy this container in linux server (not a arm64 server) your containers doesn’t work. To solve it you need to build your containers with the correct architecture. Docker allows us to do that. For example:

docker buildx build --platform linux/amd64 -t gonzalo123/demo:prodution .

https://github.com/gonzalo123/docker.py

Playing with lambda, serverless and Python

Couple of weeks ago I attended to serverless course. I’ve played with lambdas from time to time (basically when AWS forced me to use them) but without knowing exactly what I was doing. After this course I know how to work with the serverless framework and I understand better lambda world. Today I want to hack a little bit and create a simple Python service to obtain random numbers. Let’s start

We don’t need Flask to create lambdas but as I’m very comfortable with it so we’ll use it here.
Basically I follow the steps that I’ve read here.

from flask import Flask

app = Flask(__name__)


@app.route("/", methods=["GET"])
def hello():
    return "Hello from lambda"


if __name__ == '__main__':
    app.run()

And serverless yaml to configure the service

service: random

plugins:
  - serverless-wsgi
  - serverless-python-requirements
  - serverless-pseudo-parameters

custom:
  defaultRegion: eu-central-1
  defaultStage: dev
  wsgi:
    app: app.app
    packRequirements: false
  pythonRequirements:
    dockerizePip: non-linux

provider:
  name: aws
  runtime: python3.7
  region: ${opt:region, self:custom.defaultRegion}
  stage: ${opt:stage, self:custom.defaultStage}

functions:
  home:
    handler: wsgi_handler.handler
    events:
      - http: GET /

We’re going to use serverless plugins. We need to install them:

npx serverless plugin install -n serverless-wsgi
npx serverless plugin install -n serverless-python-requirements
npx serverless plugin install -n serverless-pseudo-parameters

And that’s all. Our “Hello world” lambda service with Python and Flask is up and running.
Now We’re going to create a “more complex” service. We’re going to return a random number with random.randint function.
randint requires two parameters: start, end. We’re going to pass the end parameter to our service. The start value will be parameterized. I’ll parameterize it only because I want to play with AWS’s Parameter Store (SSM). It’s just an excuse.

Let’s start with the service:

from random import randint
from flask import Flask, jsonify
import boto3
from ssm_parameter_store import SSMParameterStore

import os
from dotenv import load_dotenv

current_dir = os.path.dirname(os.path.abspath(__file__))
load_dotenv(dotenv_path="{}/.env".format(current_dir))

app = Flask(__name__)

app.config.update(
    STORE=SSMParameterStore(
        prefix="{}/{}".format(os.environ.get('ssm_prefix'), os.environ.get('stage')),
        ssm_client=boto3.client('ssm', region_name=os.environ.get('region')),
        ttl=int(os.environ.get('ssm_ttl'))
    )
)


@app.route("/", methods=["GET"])
def hello():
    return "Hello from lambda"


@app.route("/random/<int:to_int>", methods=["GET"])
def get_random_quote(to_int):
    from_int = app.config['STORE']['from_int']
    return jsonify(randint(from_int, to_int))


if __name__ == '__main__':
    app.run()

Now the serverless configuration. I can use only one function, handling all routes and letting Flask do the job.

functions:
  app:
    handler: wsgi_handler.handler
    events:
      - http: ANY /
      - http: 'ANY {proxy+}'

But in this example I want to create two different functions. Only for fun (and to use different role statements and different logs in cloudwatch).

service: random

plugins:
  - serverless-wsgi
  - serverless-python-requirements
  - serverless-pseudo-parameters
  - serverless-iam-roles-per-function

custom:
  defaultRegion: eu-central-1
  defaultStage: dev
  wsgi:
    app: app.app
    packRequirements: false
  pythonRequirements:
    dockerizePip: non-linux

provider:
  name: aws
  runtime: python3.7
  region: ${opt:region, self:custom.defaultRegion}
  stage: ${opt:stage, self:custom.defaultStage}
  memorySize: 128
  environment:
    region: ${self:provider.region}
    stage: ${self:provider.stage}

functions:
  app:
    handler: wsgi_handler.handler
    events:
      - http: ANY /
      - http: 'ANY {proxy+}'
    iamRoleStatements:
      - Effect: Allow
        Action: ssm:DescribeParameters
        Resource: arn:aws:ssm:${self:provider.region}:#{AWS::AccountId}:*
      - Effect: Allow
        Action: ssm:GetParameter
        Resource: arn:aws:ssm:${self:provider.region}:#{AWS::AccountId}:parameter/random/*
  home:
    handler: wsgi_handler.handler
    events:
      - http: GET /

And that’s all. “npx serverless deploy” and my random generator is running.

Web console with node.js

Continuing with my experiments of node.js, this time I want to create a Web console. The idea is simple. I want to send a few command to the server and I display the output inside the browser. I can do it entirely with PHP but I want to send the output to the browser as fast as they appear without waiting for the end of the command. OK we can do it flushing the output in the server but this solution normally crashes if we keep the application open for a long time. WebSockets again to the rescue. If we need a cross-browser implementation we need the socket.io library. Let’s start:

The node server is a simple websocket server. In this example we will launch each command with spawn function (require(‘child_process’).spawn) and send the output within the websoket. Simple and pretty straightforward.

var sys   = require('sys'),
http  = require('http'),
url   = require('url'),
spawn = require('child_process').spawn,
ws    = require('./ws.js');

var availableComands = ['ls', 'ps', 'uptime', 'tail', 'cat'];
ws.createServer(function(websocket) {
    websocket.on('connect', function(resource) {
        var parsedUrl = url.parse(resource, true);
        var rawCmd = parsedUrl.query.cmd;
        var cmd = rawCmd.split(" ");
        if (cmd[0] == 'help') {
            websocket.write("Available comands: \n");
            for (i=0;i<availableComands.length;i++) {
                websocket.write(availableComands[i]);
                if (i< availableComands.length - 1) {
                    websocket.write(", ");
                }
            }
            websocket.write("\n");

            websocket.end();
        } else if (availableComands.indexOf(cmd[0]) >= 0) {
            if (cmd.length > 1) {
                options = cmd.slice(1);
            } else {
                options = [];
            }
            
            try {
                var process = spawn(cmd[0], options);
            } catch(err) {
                console.log(err);
                websocket.write("ERROR");
            }

            websocket.on('end', function() {
                process.kill();
            });

            process.stdout.on('data', function(data) {
                websocket.write(data);
            });

            process.stdout.on('end', function() {
                websocket.end();
            });
        } else {
             websocket.write("Comand not available. Type help for available comands\n");
             websocket.end();
        }
    });
  
}).listen(8880, '127.0.0.1');

The web client is similar than the example of my previous post

var timeout = 5000;
var wsServer = '127.0.0.1:8880';

var ws;


function cleanString(string) {
    return string.replace(/&/g,"&amp;").replace(/</g,"&lt;").replace(/>/g,"&gt;");
}


function pad(n) {
    return ("0" + n).slice(-2);
}

var cmdHistory = [];
function send(msg) {
    if (msg == 'clear') {
        $('#log').html('');
        return;
    }
    try {
        ws = new WebSocket('ws://' + wsServer + '?cmd=' + msg);
        $('#toolbar').css('background', '#933');
        $('#socketStatus').html("working ... [<a href='#' onClick='quit()'>X</a>]");
        cmdHistory.push(msg);
        $('#log').append("<div class='cmd'>" + msg + "</div>");
        console.log("startWs:");
    } catch (err) {
        console.log(err);
        setTimeout(startWs, timeout);
    }

    ws.onmessage = function(event) {
        $('#log').append(util.toStaticHTML(event.data));
        window.scrollBy(0, 100000000000000000);
    };

    ws.onclose = function(){
        //console.log("ws.onclose");
        $('#toolbar').css('background', '#65A33F');
        $('#socketStatus').html('Type your comand:');
    }
}

function quit() {
    ws.close();
    window.scrollBy(0, 100000000000000000);
}
util = {
  urlRE: /https?:\/\/([-\w\.]+)+(:\d+)?(\/([^\s]*(\?\S+)?)?)?/g, 

  //  html sanitizer 
  toStaticHTML: function(inputHtml) {
    inputHtml = inputHtml.toString();
    return inputHtml.replace(/&/g, "&amp;")
                    .replace(/</g, "&lt;")
                    .replace("/n", "<br/>")
                    .replace(/>/g, "&gt;");
  }, 

  //pads n with zeros on the left,
  //digits is minimum length of output
  //zeroPad(3, 5); returns "005"
  //zeroPad(2, 500); returns "500"
  zeroPad: function (digits, n) {
    n = n.toString();
    while (n.length < digits) 
      n = '0' + n;
    return n;
  },

  //it is almost 8 o'clock PM here
  //timeString(new Date); returns "19:49"
  timeString: function (date) {
    var minutes = date.getMinutes().toString();
    var hours = date.getHours().toString();
    return this.zeroPad(2, hours) + ":" + this.zeroPad(2, minutes);
  },

  //does the argument only contain whitespace?
  isBlank: function(text) {
    var blank = /^\s*$/;
    return (text.match(blank) !== null);
  }
};
$(document).ready(function() {
  //submit new messages when the user hits enter if the message isnt blank
  $("#entry").keypress(function (e) {
    console.log(e);
    if (e.keyCode != 13 /* Return */) return;
    var msg = $("#entry").attr("value").replace("\n", "");
    if (!util.isBlank(msg)) send(msg);
    $("#entry").attr("value", ""); // clear the entry field.
  });
});

And that’s all. In fact we don’t need any line of PHP to perform this web console. Last year I tried to do something similar with PHP but it was a big mess. With node those kind of jobs are trivial. I don’t know if node.js is the future or is just another hype, but it’s easy. And cool. Really cool.

You can see the full code at Github here. Anyway you must take care if you run this application on your host. You are letting user to execute raw unix commands. A bit of security layer would be necessary.