PHP/Lumen data source for Grafana

Today I need to integrate a third party service into Grafana. I cannot access directly to the service’s database, so I will integrate via JSON datasource. Grafana allows us to build custom data sources but in this case I don’t need to create a new one. I can use the simple JSON datasource

grafana-cli plugins install grafana-simple-json-datasource

Now I need to create one REST server to serve the data that our JSON datasource needs. According to the documentation we need three routes:

  • GET / should return 200 ok.
  • POST /search used by the find metric options on the query tab in panels.
  • POST /query should return metrics based on input.
  • POST /annotations should return annotations.

We’re going to create a PHP/Lumen server. Basically the routes of the application are those ones:

<?php

use Laravel\Lumen\Routing\Router;
use App\Http\Middleware;
use Laravel\Lumen\Application;
use Dotenv\Dotenv;
use App\Http\Handlers;

require_once __DIR__ . '/../vendor/autoload.php';

(Dotenv::create(__DIR__ . '/../env/local'))->load();

$app = new Application(dirname(__DIR__));
$app->middleware([
    Middleware\CorsMiddleware::class,
]);

$app->router->group(['middleware' => Middleware\AuthMiddleware::class], function (Router $router) {
    $router->get('/', Handlers\HelloHandler::class);
    $router->post('/search', Handlers\SearchHandler::class);
    $router->post('/query', Handlers\QueryHandler::class);
    $router->post('/annotations', Handlers\AnnotationHandler::class);
});

return $app;

We need to take care with CORS. I will use the Middleware that I normally use in those cases

<?php

namespace App\Http\Middleware;

use Closure;

class CorsMiddleware
{
    public function handle($request, Closure $next)
    {
        $headers = [
            'Access-Control-Allow-Origin'      => 'http://localhost:3000',
            'Access-Control-Allow-Methods'     => 'POST, GET, OPTIONS, PUT, DELETE',
            'Access-Control-Allow-Credentials' => 'true',
            'Access-Control-Max-Age'           => '86400',
            'Access-Control-Allow-Headers'     => 'accept, content-type, Content-Type, Authorization, X-Requested-With',
        ];

        if ($request->isMethod('OPTIONS')) {
            return response()->json('{"method":"OPTIONS"}', 200, $headers);
        }

        $response = $next($request);
        foreach ($headers as $key => $value) {
            $response->header($key, $value);
        }

        return $response;
    }
}

I’ll use also a basic authentication so we’ll use a simple Http Basic Authentication middleware

<?php

namespace App\Http\Middleware;

use Closure;
use Illuminate\Http\Request;

class AuthMiddleware
{
    const NAME = 'auth.web';

    public function handle(Request $request, Closure $next)
    {
        if ($request->getUser() != env('HTTP_USER') || $request->getPassword() != env('HTTP_PASS')) {
            $headers = ['WWW-Authenticate' => 'Basic'];

            return response('Unauthorized', 401, $headers);
        }

        return $next($request);
    }
}

HelloHandler is a dummy route that the datasource needs to check the connection. We only need to answer with a 200-OK

<?php
namespace App\Http\Handlers;

class HelloHandler
{
    public function __invoke()
    {
        return "Ok";
    }
}

SearchHandler will return the list of available metrics that we´ll use within our grafana panels. They aren’t strictly necessary. We can return an empty array and use later one metric that it isn’t defined here (it’s only to fill the combo that grafana shows us)

<?php
namespace App\Http\Handlers;

class SearchHandler
{
    public function __invoke()
    {
        return [25, 50, 100];
    }
}
```

QueryHandler is an important one. Here we'll return the datapoints that we´ll show in grafana. For testing purposes I've created one handler that read the metric, and the date from and date to that grafana sends to the backend and return a random values for several metrics and fixed ones to the rest. It's basically to see something in grafana. Later, in the real life project, I'll query the database and return real data.
 

<?php

namespace App\Http\Handlers;

use Illuminate\Http\Request;

class QueryHandler
{
    public function __invoke(Request $request)
    {
        $json   = $request->json();
        $range  = $json->get('range');
        $target = $json->get('targets')[0]['target'];

        $tz   = new \DateTimeZone('Europe/Madrid');
        $from = \DateTimeImmutable::createFromFormat("Y-m-d\TH:i:s.uP", $range['from'], $tz);
        $to   = \DateTimeImmutable::createFromFormat("Y-m-d\TH:i:s.uP", $range['to'], $tz);

        return ['target' => $target, 'datapoints' => $this->getDataPoints($from, $to, $target)];
    }

    private function getDataPoints($from, $to, $target)
    {
        $interval = new \DateInterval('PT1H');
        $period   = new \DatePeriod($from, $interval, $to->add($interval));

        $dataPoints = [];
        foreach ($period as $date) {
            $value        = $target > 50 ? rand(0, 100) : $target;
            $dataPoints[] = [$value, strtotime($date->format('Y-m-d H:i:sP')) * 1000];
        }

        return $dataPoints;
    }
}

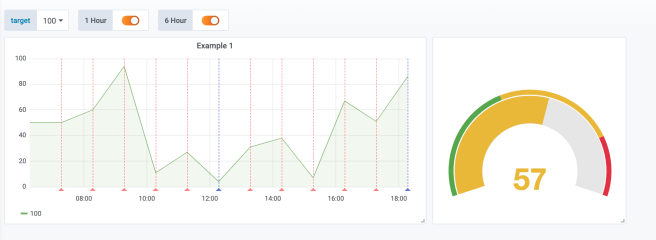
Also I’ll like to use annotations. It’s something similar. AnnotationHandler will handle this request. For this test I’ve created two types of annotations: One each hour and another one each 6 hours

<?php

namespace App\Http\Handlers;

use Illuminate\Http\Request;

class AnnotationHandler
{
    public function __invoke(Request $request)
    {
        $json       = $request->json();
        $annotation = $json->get('annotation');
        $range      = $json->get('range');
  
        return $this->getAnnotations($annotation, $range);
    }

    private function getAnnotations($annotation, $range)
    {
        return $this->getValues($range, 'PT' . $annotation['query'] . 'H');
    }


    private function getValues($range, $int)
    {
        $tz   = new \DateTimeZone('Europe/Madrid');
        $from = \DateTimeImmutable::createFromFormat("Y-m-d\TH:i:s.uP", $range['from'], $tz);
        $to   = \DateTimeImmutable::createFromFormat("Y-m-d\TH:i:s.uP", $range['to'], $tz);

        $annotation = [
            'name'       => $int,
            'enabled'    => true,
            'datasource' => "gonzalo datasource",
            'showLine'   => true,
        ];

        $interval = new \DateInterval($int);
        $period   = new \DatePeriod($from, $interval, $to->add($interval));

        $annotations = [];
        foreach ($period as $date) {
            $annotations[] = ['annotation' => $annotation, "title" => "H " . $date->format('H'), "time" => strtotime($date->format('Y-m-d H:i:sP')) * 1000, 'text' => "teeext"];
        }

        return $annotations;
    }
}

And that’s all. I’ve also put the whole example in a docker-compose file to test it

version: '2'

services:
  nginx:
    image: gonzalo123.nginx
    restart: always
    ports:
      - "80:80"
    build:
      context: ./src
      dockerfile: .docker/Dockerfile-nginx
    volumes:
      - ./src/api:/code/src
  api:
    image: gonzalo123.api
    restart: always
    build:
      context: ./src
      dockerfile: .docker/Dockerfile-lumen-dev
    environment:
      XDEBUG_CONFIG: remote_host=${MY_IP}
    volumes:
      - ./src/api:/code/src
  grafana:
    image: gonzalo123.grafana
    build:
      context: ./src
      dockerfile: .docker/Dockerfile-grafana
    restart: always
    environment:
      - GF_SECURITY_ADMIN_USER=${GF_SECURITY_ADMIN_USER}
      - GF_SECURITY_ADMIN_PASSWORD=${GF_SECURITY_ADMIN_PASSWORD}
      - GF_USERS_DEFAULT_THEME=${GF_USERS_DEFAULT_THEME}
      - GF_USERS_ALLOW_SIGN_UP=${GF_USERS_ALLOW_SIGN_UP}
      - GF_USERS_ALLOW_ORG_CREATE=${GF_USERS_ALLOW_ORG_CREATE}
      - GF_AUTH_ANONYMOUS_ENABLED=${GF_AUTH_ANONYMOUS_ENABLED}
      - GF_INSTALL_PLUGINS=${GF_INSTALL_PLUGINS}
    ports:
      - "3000:3000"
    volumes:
      - grafana-db:/var/lib/grafana
      - grafana-log:/var/log/grafana
      - grafana-conf:/etc/grafana
volumes:
  grafana-db:
    driver: local
  grafana-log:
    driver: local
  grafana-conf:
    driver: local

Here you can see the example in action:

Full code in my github
Working with SAPUI5 locally (part 3). Adding more services in Docker

In the previous project we moved one project to docker. The idea was to move exactly the same functionality (even without touching anything within the source code). Now we’re going to add more services. Yes, I know, it looks like overenginering (it’s exactly overenginering, indeed), but I want to build something with different services working together. Let start.

We’re going to change a little bit our original project. Now our frontend will only have one button. This button will increment the number of clicks but we’re going to persists this information in a PostgreSQL database. Also, instead of incrementing the counter in the backend, our backend will emit one event to a RabbitMQ message broker. We’ll have one worker service listening to this event and this worker will persist the information. The communication between the worker and the frontend (to show the incremented value), will be via websockets.

With those premises we are going to need:

  • Frontend: UI5 application
  • Backend: PHP/lumen application
  • Worker: nodejs application which is listening to a RabbitMQ event and serving the websocket server (using socket.io)
  • Nginx server
  • PosgreSQL database.
  • RabbitMQ message broker.

As the previous examples, our PHP backend will be server via Nginx and PHP-FPM.

Here we can see to docker-compose file to set up all the services

version: '3.4'

services:
  nginx:
    image: gonzalo123.nginx
    restart: always
    ports:
    - "8080:80"
    build:
      context: ./src
      dockerfile: .docker/Dockerfile-nginx
    volumes:
    - ./src/backend:/code/src
    - ./src/.docker/web/site.conf:/etc/nginx/conf.d/default.conf
    networks:
    - app-network
  api:
    image: gonzalo123.api
    restart: always
    build:
      context: ./src
      dockerfile: .docker/Dockerfile-lumen-dev
    environment:
      XDEBUG_CONFIG: remote_host=${MY_IP}
    volumes:
    - ./src/backend:/code/src
    networks:
    - app-network
  ui5:
    image: gonzalo123.ui5
    ports:
    - "8000:8000"
    restart: always
    volumes:
    - ./src/frontend:/code/src
    build:
      context: ./src
      dockerfile: .docker/Dockerfile-ui5
    networks:
    - app-network
  io:
    image: gonzalo123.io
    ports:
    - "9999:9999"
    restart: always
    volumes:
    - ./src/io:/code/src
    build:
      context: ./src
      dockerfile: .docker/Dockerfile-io
    networks:
    - app-network
  pg:
    image: gonzalo123.pg
    restart: always
    ports:
    - "5432:5432"
    build:
      context: ./src
      dockerfile: .docker/Dockerfile-pg
    environment:
      POSTGRES_PASSWORD: ${POSTGRES_PASSWORD}
      POSTGRES_USER: ${POSTGRES_USER}
      POSTGRES_DB: ${POSTGRES_DB}
      PGDATA: /var/lib/postgresql/data/pgdata
    networks:
    - app-network
  rabbit:
    image: rabbitmq:3-management
    container_name: gonzalo123.rabbit
    restart: always
    ports:
    - "15672:15672"
    - "5672:5672"
    environment:
      RABBITMQ_ERLANG_COOKIE:
      RABBITMQ_DEFAULT_VHOST: /
      RABBITMQ_DEFAULT_USER: ${RABBITMQ_DEFAULT_USER}
      RABBITMQ_DEFAULT_PASS: ${RABBITMQ_DEFAULT_PASS}
    networks:
    - app-network
networks:
  app-network:
    driver: bridge

We’re going to use the same docker files than in the previous post but we also need new ones for worker, database server and message queue:

Worker:

FROM node:alpine

EXPOSE 8000

WORKDIR /code/src
COPY ./io .
RUN npm install
ENTRYPOINT ["npm", "run", "serve"]

The worker script is simple script that serves the socket.io server and emits a websocket within every message to the RabbitMQ queue.

var amqp = require('amqp'),
  httpServer = require('http').createServer(),
  io = require('socket.io')(httpServer, {
    origins: '*:*',
  }),
  pg = require('pg')
;

require('dotenv').config();
var pgClient = new pg.Client(process.env.DB_DSN);

rabbitMq = amqp.createConnection({
  host: process.env.RABBIT_HOST,
  port: process.env.RABBIT_PORT,
  login: process.env.RABBIT_USER,
  password: process.env.RABBIT_PASS,
});

var sql = 'SELECT clickCount FROM docker.clicks';

// Please don't do this. Use lazy connections
// I'm 'lazy' to do it in this POC 🙂
pgClient.connect(function(err) {
  io.on('connection', function() {
    pgClient.query(sql, function(err, result) {
      var count = result.rows[0]['clickcount'];
      io.emit('click', {count: count});
    });

  });

  rabbitMq.on('ready', function() {
    var queue = rabbitMq.queue('ui5');
    queue.bind('#');

    queue.subscribe(function(message) {
      pgClient.query(sql, function(err, result) {
        var count = parseInt(result.rows[0]['clickcount']);
        count = count + parseInt(message.data.toString('utf8'));
        pgClient.query('UPDATE docker.clicks SET clickCount = $1', [count],
          function(err) {
            io.emit('click', {count: count});
          });
      });
    });
  });
});

httpServer.listen(process.env.IO_PORT);

Database server:

FROM postgres:9.6-alpine
COPY pg/init.sql /docker-entrypoint-initdb.d/

As we can see we’re going to generate the database estructure in the first build

CREATE SCHEMA docker;

CREATE TABLE docker.clicks (
clickCount numeric(8) NOT NULL
);

ALTER TABLE docker.clicks
OWNER TO username;

INSERT INTO docker.clicks(clickCount) values (0);

With the RabbitMQ server we’re going to use the official docker image so we don’t need to create one Dockerfile

We also have changed a little bit our Nginx configuration. We want to use Nginx to serve backend and also socket.io server. That’s because we don’t want to expose different ports to internet.

server {
    listen 80;
    index index.php index.html;
    server_name localhost;
    error_log  /var/log/nginx/error.log;
    access_log /var/log/nginx/access.log;
    root /code/src/www;

    location /socket.io/ {
        proxy_http_version 1.1;
        proxy_set_header Upgrade $http_upgrade;
        proxy_set_header Connection "upgrade";
        proxy_pass "http://io:9999";
    }

    location / {
        try_files $uri $uri/ /index.php?$query_string;
    }

    location ~ \.php$ {
        try_files $uri =404;
        fastcgi_split_path_info ^(.+\.php)(/.+)$;
        fastcgi_pass api:9000;
        fastcgi_index index.php;
        include fastcgi_params;
        fastcgi_param SCRIPT_FILENAME $document_root$fastcgi_script_name;
        fastcgi_param PATH_INFO $fastcgi_path_info;
    }
}

To avoid CORS issues we can also use SCP destination (the localneo proxy in this example), to serve socket.io also. So we need to:

  • change our neo-app.json file
  • "routes": [
        ...
        {
          "path": "/socket.io",
          "target": {
            "type": "destination",
            "name": "SOCKETIO"
          },
          "description": "SOCKETIO"
        }
      ],
    

    And basically that’s all. Here also we can use a “production” docker-copose file without exposing all ports and mapping the filesystem to our local machine (useful when we’re developing)

    version: '3.4'
    
    services:
      nginx:
        image: gonzalo123.nginx
        restart: always
        build:
          context: ./src
          dockerfile: .docker/Dockerfile-nginx
        networks:
        - app-network
      api:
        image: gonzalo123.api
        restart: always
        build:
          context: ./src
          dockerfile: .docker/Dockerfile-lumen
        networks:
        - app-network
      ui5:
        image: gonzalo123.ui5
        ports:
        - "80:8000"
        restart: always
        volumes:
        - ./src/frontend:/code/src
        build:
          context: ./src
          dockerfile: .docker/Dockerfile-ui5
        networks:
        - app-network
      io:
        image: gonzalo123.io
        restart: always
        build:
          context: ./src
          dockerfile: .docker/Dockerfile-io
        networks:
        - app-network
      pg:
        image: gonzalo123.pg
        restart: always
        build:
          context: ./src
          dockerfile: .docker/Dockerfile-pg
        environment:
          POSTGRES_PASSWORD: ${POSTGRES_PASSWORD}
          POSTGRES_USER: ${POSTGRES_USER}
          POSTGRES_DB: ${POSTGRES_DB}
          PGDATA: /var/lib/postgresql/data/pgdata
        networks:
        - app-network
      rabbit:
        image: rabbitmq:3-management
        restart: always
        environment:
          RABBITMQ_ERLANG_COOKIE:
          RABBITMQ_DEFAULT_VHOST: /
          RABBITMQ_DEFAULT_USER: ${RABBITMQ_DEFAULT_USER}
          RABBITMQ_DEFAULT_PASS: ${RABBITMQ_DEFAULT_PASS}
        networks:
        - app-network
    networks:
      app-network:
        driver: bridge
    

    And that’s all. The full project is available in my github account

    Working with SAPUI5 locally (part 2). Now with docker

    In the first part I spoke about how to build our working environment to work with UI5 locally instead of using WebIDE. Now, in this second part of the post, we’ll see how to do it using docker to set up our environment.

    I’ll use docker-compose to set up the project. Basically, as I explain in the first part, the project has two parts. One backend and one frontned. We’re going to use exactly the same code for the frontend and for the backend.

    The frontend is build over a localneo. As it’s a node application we’ll use a node:alpine base host

    FROM node:alpine
    
    EXPOSE 8000
    
    WORKDIR /code/src
    COPY ./frontend .
    RUN npm install
    ENTRYPOINT ["npm", "run", "serve"]
    

    In docker-compose we only need to map the port that we´ll expose in our host and since we want this project in our depelopemet process, we also will map the volume to avoid to re-generate our container each time we change the code.

    ...
      ui5:
        image: gonzalo123.ui5
        ports:
        - "8000:8000"
        restart: always
        build:
          context: ./src
          dockerfile: .docker/Dockerfile-ui5
        volumes:
        - ./src/frontend:/code/src
        networks:
        - api-network
    

    The backend is a PHP application. We can set up a PHP application using different architectures. In this project we’ll use nginx and PHP-FPM.

    for nginx we’ll use the following Dockerfile

    FROM  nginx:1.13-alpine
    
    EXPOSE 80
    
    COPY ./.docker/web/site.conf /etc/nginx/conf.d/default.conf
    COPY ./backend /code/src
    

    And for the PHP host the following one (with xdebug to enable debugging and breakpoints):

    FROM php:7.1-fpm
    
    ENV PHP_XDEBUG_REMOTE_ENABLE 1
    
    RUN apt-get update && apt-get install -my \
        git \
        libghc-zlib-dev && \
        apt-get clean
    
    RUN apt-get install -y libpq-dev \
        && docker-php-ext-configure pgsql -with-pgsql=/usr/local/pgsql \
        && docker-php-ext-install pdo pdo_pgsql pgsql opcache zip
    
    RUN curl -sS https://getcomposer.org/installer | php -- --install-dir=/usr/local/bin --filename=composer
    
    RUN composer global require "laravel/lumen-installer"
    ENV PATH ~/.composer/vendor/bin:$PATH
    
    COPY ./backend /code/src
    

    And basically that’s all. Here the full docker-compose file

    version: '3.4'
    
    services:
      nginx:
        image: gonzalo123.nginx
        restart: always
        ports:
        - "8080:80"
        build:
          context: ./src
          dockerfile: .docker/Dockerfile-nginx
        volumes:
        - ./src/backend:/code/src
        - ./src/.docker/web/site.conf:/etc/nginx/conf.d/default.conf
        networks:
        - api-network
      api:
        image: gonzalo123.api
        restart: always
        build:
          context: ./src
          dockerfile: .docker/Dockerfile-lumen-dev
        environment:
          XDEBUG_CONFIG: remote_host=${MY_IP}
        volumes:
        - ./src/backend:/code/src
        networks:
        - api-network
      ui5:
        image: gonzalo123.ui5
        ports:
        - "8000:8000"
        restart: always
        build:
          context: ./src
          dockerfile: .docker/Dockerfile-ui5
        networks:
        - api-network
    
    networks:
      api-network:
        driver: bridge
    

    If we want to use this project you only need to:

    • clone the repo fron github
    • run ./ui5 up

    With this configuration we’re exposing two ports 8080 for the frontend and 8000 for the backend. We also are mapping our local filesystem to containers to avoid to regenerate our containers each time we change the code.

    We also can have a variation. A “production” version of our docker-compose file. I put production between quotation marks because normally we aren’t going to use localneo as a production server (please don’t do it). We’ll use SCP to host the frontend.

    This configuration is just an example without filesystem mapping, without xdebug in the backend and without exposing the backend externally (Only the frontend can use it)

    version: '3.4'
    
    services:
      nginx:
        image: gonzalo123.nginx
        restart: always
        build:
          context: ./src
          dockerfile: .docker/Dockerfile-nginx
        networks:
        - api-network
      api:
        image: gonzalo123.api
        restart: always
        build:
          context: ./src
          dockerfile: .docker/Dockerfile-lumen
        networks:
        - api-network
      ui5:
        image: gonzalo123.ui5
        ports:
        - "8000:8000"
        restart: always
        build:
          context: ./src
          dockerfile: .docker/Dockerfile-ui5
        networks:
        - api-network
    
    networks:
      api-network:
        driver: bridge
    

    And that’s all. You can see the all the source code in my github account

    Working with SAPUI5 locally and deploying in SCP

    When I work with SAPUI5 projects I normally use WebIDE. WebIDE is a great tool but I’m more confortable working locally with my local IDE.
    I’ve this idea in my mind but I never find the time slot to work on it. Finally, after finding this project from Holger Schäfer in github, I realized how easy it’s and I started to work with this project and adapt it to my needs.

    The base of this project is localneo. Localneo starts a http server based on neo-app.json file. That means we’re going to use the same configuration than we’ve in production (in SCP). Of course we’ll need destinations. We only need one extra file called destination.json where we’ll set up our destinations (it creates one http proxy, nothing else).

    In this project I’ll create a simple example application that works with one API server.

    The backend

    I’ll use in this example one PHP/Lumen application:

    $app->router->group(['prefix' => '/api', 'middleware' => Middleware\AuthMiddleware::NAME], function (Router $route) {
        $route->get('/', Handlers\HomeHandler::class);
        $route->post('/', Handlers\HomeHandler::class);
    });
    

    Basically it has two routes. In fact both routes are the same. One accept POST request and another one GET requests.
    They’ll answer with the current date in a json file

    namespace App\Http\Handlers;
    
    class HomeHandler
    {
        public function __invoke()
        {
            return ['date' => (new \DateTime())->format('c')];
        }
    }
    

    Both routes are under one middleware to provide the authentication.

    namespace App\Http\Middleware;
    
    use Closure;
    use Illuminate\Http\Request;
    
    class AuthMiddleware
    {
        public const NAME = 'auth';
    
        public function handle(Request $request, Closure $next)
        {
            $user = $request->getUser();
            $pass = $request->getPassword();
    
            if (!$this->validateDestinationCredentials($user, $pass)) {
                $headers = ['WWW-Authenticate' => 'Basic'];
    
                return response('Backend Login', 401, $headers);
            }
    
            $authorizationHeader = $request->header('Authorization2');
            if (!$this->validateApplicationToken($authorizationHeader)) {
                return response('Invalid token ', 403);
            }
    
            return $next($request);
    
        }
    
        private function validateApplicationToken($authorizationHeader)
        {
            $token = str_replace('Bearer ', null, $authorizationHeader);
    
            return $token === getenv('APP_TOKEN');
        }
    
        private function validateDestinationCredentials($user, $pass)
        {
            if (!($user === getenv('DESTINATION_USER') && $pass === getenv('DESTINATION_PASS'))) {
                return false;
            }
    
            return true;
        }
    }
    

    That means our service will need Basic Authentication and also one Token based authentication.

    The frontend

    Our ui5 application will use one destination called BACKEND. We’ll configure it in our neo-app.json file

        ...
        {
          "path": "/backend",
          "target": {
            "type": "destination",
            "name": "BACKEND"
          },
          "description": "BACKEND"
        }
        ...
    

    Now we’ll create our extra file called destinations.json. Localneo will use this file to create a web server to serve our frontend locally (using the destination).

    As I said before our backend will need a Basic Authentication. This Authentication will be set up in the destination configuration

    {
      "server": {
        "port": "8080",
        "path": "/webapp/index.html",
        "open": true
      },
      "service": {
        "sapui5": {
          "useSAPUI5": true,
          "version": "1.54.8"
        }
      },
      "destinations": {
        "BACKEND": {
          "url": "http://localhost:8888",
          "auth": "superSecretUser:superSecretPassword"
        }
      }
    }
    

    Our application will be a simple list of items

    <mvc:View controllerName="gonzalo123.controller.App" xmlns:html="http://www.w3.org/1999/xhtml" xmlns:mvc="sap.ui.core.mvc" displayBlock="true" xmlns="sap.m">
      <App id="idAppControl">
        <pages>
          <Page title="{i18n>appTitle}">
            <content>
              <List>
                <items>
                  <ObjectListItem id="GET" title="{i18n>get}"
                                  type="Active"
                                  press="getPressHandle">
                    <attributes>
                      <ObjectAttribute id="getCount" text="{/Data/get/count}"/>
                    </attributes>
                  </ObjectListItem>
                  <ObjectListItem id="POST" title="{i18n>post}"
                                  type="Active"
                                  press="postPressHandle">
                    <attributes>
                      <ObjectAttribute id="postCount" text="{/Data/post/count}"/>
                    </attributes>
                  </ObjectListItem>
                </items>
              </List>
            </content>
          </Page>
        </pages>
      </App>
    </mvc:View>
    

    When we click on GET we’ll perform a GET request to the backend and we’ll increment the counter. The same with POST.
    We’ll also show de date provided by the backend in a MessageToast.

    sap.ui.define([
      "sap/ui/core/mvc/Controller",
      "sap/ui/model/json/JSONModel",
      'sap/m/MessageToast',
      "gonzalo123/model/api"
    ], function (Controller, JSONModel, MessageToast, api) {
      "use strict";
    
      return Controller.extend("gonzalo123.controller.App", {
        model: new JSONModel({
          Data: {get: {count: 0}, post: {count: 0}}
        }),
    
        onInit: function () {
          this.getView().setModel(this.model);
        },
    
        getPressHandle: function () {
          api.get("/", {}).then(function (data) {
            var count = this.model.getProperty('/Data/get/count');
            MessageToast.show("Pressed : " + data.date);
            this.model.setProperty('/Data/get/count', ++count);
          }.bind(this));
        },
    
        postPressHandle: function () {
          var count = this.model.getProperty('/Data/post/count');
          api.post("/", {}).then(function (data) {
            MessageToast.show("Pressed : " + data.date);
            this.model.setProperty('/Data/post/count', ++count);
          }.bind(this));
        }
      });
    });
    

    Start our application locally

    Now we only need to start the backend

    php -S 0.0.0.0:8888 -t www

    And the frontend
    localneo

    Debugging locally

    As we’re working locally we can use local debugger in the backend and we can use breakpoints, inspect variables, etc.

    We also can debug the frontend using Chrome developer tools. We can also map our local filesystem in the browser and we can save files directly in Chrome.

    Testing

    We can test the backend using phpunit and run our tests with
    composer run test

    Here we can see a simple test of the backend

        public function testAuthorizedRequest()
        {
            $headers = [
                'Authorization2' => 'Bearer superSecretToken',
                'Content-Type'   => 'application/json',
                'Authorization'  => 'Basic ' . base64_encode('superSecretUser:superSecretPassword'),
            ];
    
            $this->json('GET', '/api', [], $headers)
                ->assertResponseStatus(200);
            $this->json('POST', '/api', [], $headers)
                ->assertResponseStatus(200);
        }
    
    
        public function testRequests()
        {
    
            $headers = [
                'Authorization2' => 'Bearer superSecretToken',
                'Content-Type'   => 'application/json',
                'Authorization'  => 'Basic ' . base64_encode('superSecretUser:superSecretPassword'),
            ];
    
            $this->json('GET', '/api', [], $headers)
                ->seeJsonStructure(['date']);
            $this->json('POST', '/api', [], $headers)
                ->seeJsonStructure(['date']);
        }
    

    We also can test the frontend using OPA5.

    As Backend is already tested we’ll mock the backend here using sinon (https://sinonjs.org/) server

    ...
        opaTest("When I click on GET the GET counter should increment by one", function (Given, When, Then) {
          Given.iStartMyApp("./integration/Test1/index.html");
          When.iClickOnGET();
          Then.getCounterShouldBeIncrementedByOne().and.iTeardownMyAppFrame();
        });
    
        opaTest("When I click on POST the POST counter should increment by one", function (Given, When, Then) {
          Given.iStartMyApp("./integration/Test1/index.html");
          When.iClickOnPOST();
          Then.postCounterShouldBeIncrementedByOne().and.iTeardownMyAppFrame();
        });
    ...
    

    The configuration of our sinon server:

    sap.ui.define(
      ["test/server"],
      function (server) {
        "use strict";
    
        return {
          init: function () {
            var oServer = server.initServer("/backend/api");
    
            oServer.respondWith("GET", /backend\/api/, [200, {
              "Content-Type": "application/json"
            }, JSON.stringify({
              "date": "2018-07-29T18:44:57+02:00"
            })]);
    
            oServer.respondWith("POST", /backend\/api/, [200, {
              "Content-Type": "application/json"
            }, JSON.stringify({
              "date": "2018-07-29T18:44:57+02:00"
            })]);
          }
        };
      }
    );
    

    The build process

    Before uploading the application to SCP we need to build it. The build process optimizes the files and creates Component-preload.js and sap-ui-cachebuster-info.json file (to ensure our users aren’t using a cached version of our application)
    We’ll use grunt to build our application. Here we can see our Gruntfile.js

    module.exports = function (grunt) {
      "use strict";
    
      require('load-grunt-tasks')(grunt);
      require('time-grunt')(grunt);
    
      grunt.config.merge({
        pkg: grunt.file.readJSON('package.json'),
        watch: {
          js: {
            files: ['Gruntfile.js', 'webapp/**/*.js', 'webapp/**/*.properties'],
            tasks: ['jshint'],
            options: {
              livereload: true
            }
          },
    
          livereload: {
            options: {
              livereload: true
            },
            files: [
              'webapp/**/*.html',
              'webapp/**/*.js',
              'webapp/**/*.css'
            ]
          }
        }
      });
    
      grunt.registerTask("default", [
        "clean",
        "lint",
        "build"
      ]);
    };
    

    In our Gruntfile I’ve also configure a watcher to build the application automatically and triggering the live reload (to reload my browser every time I change the frontend)

    Now I can build the dist folder with the command:

    grunt

    Deploy to SCP

    The deploy process is very well explained in the Holger’s repository
    Basically we need to download MTA Archive builder and extract it to ./ci/tools/mta.jar.
    Also we need SAP Cloud Platform Neo Environment SDK (./ci/tools/neo-java-web-sdk/)
    We can download those binaries from here

    Then we need to fulfill our scp credentials in ./ci/deploy-mta.properties and configure our application in ./ci/mta.yaml
    Finally we will run ./ci/deploy-mta.sh (here we can set up our scp password in order to input it within each deploy)

    Full code (frontend and backend) in my github account

    Playing with Ionic, Lumen, Firebase, Google maps, Raspberry Pi and background geolocation

    I wanna do a simple pet project. The idea is to build a mobile application. This application will track my GPS location and send this information to a Firebase database. I’ve never play with Firebase and I want to learn a little bit. With this information I will build a simple web application hosted in my Raspberry Pi. This web application will show a Google map with my last location. I will put this web application in my TV and anyone in my house will see where I am every time.

    That’s the idea. I want a MVP. First the mobile application. I will use ionic framework. I’m big fan of ionic.

    The mobile application is very simple. It only has a toggle to activate-deactivate the background geolocation (sometimes I don’t want to be tracked :).

    <ion-header>
        <ion-navbar>
            <ion-title>
                Ionic Blank
            </ion-title>
        </ion-navbar>
    </ion-header>
    
    <ion-header>
        <ion-toolbar [color]="toolbarColor">
            <ion-title>{{title}}</ion-title>
            <ion-buttons end>
                <ion-toggle color="light"
                            checked="{{isBgEnabled}}"
                            (ionChange)="changeWorkingStatus($event)">
                </ion-toggle>
            </ion-buttons>
        </ion-toolbar>
    </ion-header>
    
    <ion-content padding>
    </ion-content>
    

    And the controller:

    import {Component} from '@angular/core';
    import {Platform} from 'ionic-angular';
    import {LocationTracker} from "../../providers/location-tracker/location-tracker";
    
    @Component({
        selector: 'page-home',
        templateUrl: 'home.html'
    })
    export class HomePage {
        public status: string = localStorage.getItem('status') || "-";
        public title: string = "";
        public isBgEnabled: boolean = false;
        public toolbarColor: string;
    
        constructor(platform: Platform,
                    public locationTracker: LocationTracker) {
    
            platform.ready().then(() => {
    
                    if (localStorage.getItem('isBgEnabled') === 'on') {
                        this.isBgEnabled = true;
                        this.title = "Working ...";
                        this.toolbarColor = 'secondary';
                    } else {
                        this.isBgEnabled = false;
                        this.title = "Idle";
                        this.toolbarColor = 'light';
                    }
            });
        }
    
        public changeWorkingStatus(event) {
            if (event.checked) {
                localStorage.setItem('isBgEnabled', "on");
                this.title = "Working ...";
                this.toolbarColor = 'secondary';
                this.locationTracker.startTracking();
            } else {
                localStorage.setItem('isBgEnabled', "off");
                this.title = "Idle";
                this.toolbarColor = 'light';
                this.locationTracker.stopTracking();
            }
        }
    }
    

    As you can see, the toggle button will activate-deactivate the background geolocation and it also changes de background color of the toolbar.

    For background geolocation I will use one cordova plugin available as ionic native plugin

    Here you can see read a very nice article explaining how to use the plugin with ionic. As the article explains I’ve created a provider

    import {Injectable, NgZone} from '@angular/core';
    import {BackgroundGeolocation} from '@ionic-native/background-geolocation';
    import {CONF} from "../conf/conf";
    
    @Injectable()
    export class LocationTracker {
        constructor(public zone: NgZone,
                    private backgroundGeolocation: BackgroundGeolocation) {
        }
    
        showAppSettings() {
            return this.backgroundGeolocation.showAppSettings();
        }
    
        startTracking() {
            this.startBackgroundGeolocation();
        }
    
        stopTracking() {
            this.backgroundGeolocation.stop();
        }
    
        private startBackgroundGeolocation() {
            this.backgroundGeolocation.configure(CONF.BG_GPS);
            this.backgroundGeolocation.start();
        }
    }
    

    The idea of the plugin is send a POST request to a url with the gps data in the body of the request. So, I will create a web api server to handle this request. I will use my Raspberry Pi3. to serve the application. I will create a simple PHP/Lumen application. This application will handle the POST request of the mobile application and also will serve a html page with the map (using google maps).

    Mobile requests will be authenticated with a token in the header and web application will use a basic http authentication. Because of that I will create two middlewares to handle the the different ways to authenticate.

    <?php
    require __DIR__ . '/../vendor/autoload.php';
    
    use App\Http\Middleware;
    use App\Model\Gps;
    use Illuminate\Contracts\Debug\ExceptionHandler;
    use Illuminate\Http\Request;
    use Laravel\Lumen\Application;
    use Laravel\Lumen\Routing\Router;
    
    (new Dotenv\Dotenv(__DIR__ . '/../env/'))->load();
    
    $app = new Application(__DIR__ . '/..');
    $app->singleton(ExceptionHandler::class, App\Exceptions\Handler::class);
    $app->routeMiddleware([
        'auth'  => Middleware\AuthMiddleware::class,
        'basic' => Middleware\BasicAuthMiddleware::class,
    ]);
    
    $app->router->group(['middleware' => 'auth', 'prefix' => '/locator'], function (Router $route) {
        $route->post('/gps', function (Gps $gps, Request $request) {
            $requestData = $request->all();
            foreach ($requestData as $poi) {
                $gps->persistsData([
                    'date'             => date('YmdHis'),
                    'serverTime'       => time(),
                    'time'             => $poi['time'],
                    'latitude'         => $poi['latitude'],
                    'longitude'        => $poi['longitude'],
                    'accuracy'         => $poi['accuracy'],
                    'speed'            => $poi['speed'],
                    'altitude'         => $poi['altitude'],
                    'locationProvider' => $poi['locationProvider'],
                ]);
            }
    
            return 'OK';
        });
    });
    
    return $app;
    

    As we can see the route /locator/gps will handle the post request. I’ve created a model to persists gps data in the firebase database:

    <?php
    
    namespace App\Model;
    
    use Kreait\Firebase\Factory;
    use Kreait\Firebase\ServiceAccount;
    
    class Gps
    {
        private $database;
    
        private const FIREBASE_CONF = __DIR__ . '/../../conf/firebase.json';
    
        public function __construct()
        {
            $serviceAccount = ServiceAccount::fromJsonFile(self::FIREBASE_CONF);
            $firebase       = (new Factory)
                ->withServiceAccount($serviceAccount)
                ->create();
    
            $this->database = $firebase->getDatabase();
        }
    
        public function getLast()
        {
            $value = $this->database->getReference('gps/poi')
                ->orderByKey()
                ->limitToLast(1)
                ->getValue();
    
            $out                 = array_values($value)[0];
            $out['formatedDate'] = \DateTimeImmutable::createFromFormat('YmdHis', $out['date'])->format('d/m/Y H:i:s');
    
            return $out;
        }
    
        public function persistsData(array $data)
        {
            return $this->database
                ->getReference('gps/poi')
                ->push($data);
        }
    }
    

    The project is almost finished. Now we only need to create the google map.

    That’s the api

    <?php
    $app->router->group(['middleware' => 'basic', 'prefix' => '/map'], function (Router $route) {
        $route->get('/', function (Gps $gps) {
            return view("index", $gps->getLast());
        });
    
        $route->get('/last', function (Gps $gps) {
            return $gps->getLast();
        });
    });
    

    And the HTML

    <!DOCTYPE html>
    <html>
    <head>
        <meta name="viewport" content="initial-scale=1.0, user-scalable=no">
        <meta charset="utf-8">
        <title>Locator</title>
        <style>
            #map {
                height: 100%;
            }
    
            html, body {
                height: 100%;
                margin: 0;
                padding: 0;
            }
        </style>
    </head>
    <body>
    <div id="map"></div>
    <script>
    
        var lastDate;
        var DELAY = 60;
    
        function drawMap(lat, long, text) {
            var CENTER = {lat: lat, lng: long};
            var contentString = '<div id="content">' + text + '</div>';
            var infowindow = new google.maps.InfoWindow({
                content: contentString
            });
            var map = new google.maps.Map(document.getElementById('map'), {
                zoom: 11,
                center: CENTER,
                disableDefaultUI: true
            });
    
            var marker = new google.maps.Marker({
                position: CENTER,
                map: map
            });
            var trafficLayer = new google.maps.TrafficLayer();
    
            trafficLayer.setMap(map);
            infowindow.open(map, marker);
        }
    
        function initMap() {
            lastDate = '{{ $formatedDate }}';
            drawMap({{ $latitude }}, {{ $longitude }}, lastDate);
        }
    
        setInterval(function () {
            fetch('/map/last', {credentials: "same-origin"}).then(function (response) {
                response.json().then(function (data) {
                    if (lastDate !== data.formatedDate) {
                        drawMap(data.latitude, data.longitude, data.formatedDate);
                    }
                });
            });
        }, DELAY * 1000);
    </script>
    <script async defer src="https://maps.googleapis.com/maps/api/js?key=my_google_maps_key&callback=initMap">
    </script>
    </body>
    </html>
    

    And that’s all just enough for a weekend. Source code is available in my github account

    Handling Amazon SNS messages with PHP, Lumen and CloudWatch

    This days I’m involve with Amazon’s AWS and since I am migrating my backends to Lumen I’m going to play a little bit with AWS and Lumen. Today I want to create a simple Lumen server to handle SNS notifications. One end-point to listen to SNS and another one to emit notifications. I also want to register logs within CloudWatch. Let’s start.

    First the Lumen server.

    use Laravel\Lumen\Application;
    
    require __DIR__ . '/../vendor/autoload.php';
    
    (new Dotenv\Dotenv(__DIR__ . "/../env"))->load();
    
    $app = new Application();
    
    $app->register(App\Providers\LogServiceProvider::class);
    $app->register(App\Providers\AwsServiceProvider::class);
    
    $app->group(['namespace' => 'App\Http\Controllers'], function (Application $app) {
        $app->get("/push", "SnsController@push");
        $app->post("/read", "SnsController@read");
    });
    
    $app->run();
    

    As we can see there’s a route to push notifications and another one to read messages.

    To work with SNS I will create a simple service provider

    namespace App\Providers;
    
    use Illuminate\Support\ServiceProvider;
    use Aws\Sns\SnsClient;
    
    class AwsServiceProvider extends ServiceProvider
    {
        public function register()
        {
            $awsCredentials = [
                'region'      => getenv('AWS_REGION'),
                'version'     => getenv('AWS_VERSION'),
                'credentials' => [
                    'key'    => getenv('AWS_CREDENTIALS_KEY'),
                    'secret' => getenv('AWS_CREDENTIALS_SECRET'),
                ],
            ];
    
            $this->app->instance(SnsClient::class, new SnsClient($awsCredentials));
        }
    }
    

    Now We can create the routes in SnsController. Sns has a confirmation mechanism to validate endpoints. It’s well explained here

    namespace App\Http\Controllers;
    
    use Aws\Sns\SnsClient;
    use Illuminate\Http\Request;
    use Laravel\Lumen\Routing\Controller;
    use Monolog\Logger;
    
    class SnsController extends Controller
    {
        private $request;
        private $logger;
    
        public function __construct(Request $request, Logger $logger)
        {
            $this->request = $request;
            $this->logger  = $logger;
        }
    
        public function push(SnsClient $snsClient)
        {
            $snsClient->publish([
                'TopicArn' => getenv('AWS_SNS_TOPIC1'),
                'Message'  => 'hi',
                'Subject'  => 'Subject',
            ]);
    
            return ['push'];
        }
    
        public function read(SnsClient $snsClient)
        {
            $data = $this->request->json()->all();
    
            if ($this->request->headers->get('X-Amz-Sns-Message-Type') == 'SubscriptionConfirmation') {
                $this->logger->notice("sns:confirmSubscription");
                $snsClient->confirmSubscription([
                    'TopicArn' => getenv('AWS_SNS_TOPIC1'),
                    'Token'    => $data['Token'],
                ]);
            } else {
                $this->logger->warn("read", [
                    'Subject'   => $data['Subject'],
                    'Message'   => $data['Message'],
                    'Timestamp' => $data['Timestamp'],
                ]);
            }
    
            return "OK";
        }
    }
    

    Finally I want to use CloudWatch so I will configure Monolog with another service provider. It’s also well explained here:

    namespace App\Providers;
    
    use Aws\CloudWatchLogs\CloudWatchLogsClient;
    use Illuminate\Support\ServiceProvider;
    use Maxbanton\Cwh\Handler\CloudWatch;
    use Monolog\Formatter\LineFormatter;
    use Monolog\Logger;
    
    class LogServiceProvider extends ServiceProvider
    {
        public function register()
        {
            $awsCredentials = [
                'region'      => getenv('AWS_REGION'),
                'version'     => getenv('AWS_VERSION'),
                'credentials' => [
                    'key'    => getenv('AWS_CREDENTIALS_KEY'),
                    'secret' => getenv('AWS_CREDENTIALS_SECRET'),
                ],
            ];
    
            $cwClient = new CloudWatchLogsClient($awsCredentials);
    
            $cwRetentionDays      = getenv('CW_RETENTIONDAYS');
            $cwGroupName          = getenv('CW_GROUPNAME');
            $cwStreamNameInstance = getenv('CW_STREAMNAMEINSTANCE');
            $loggerName           = getenv('CF_LOGGERNAME');
    
            $logger  = new Logger($loggerName);
            $handler = new CloudWatch($cwClient, $cwGroupName, $cwStreamNameInstance, $cwRetentionDays);
            $handler->setFormatter(new LineFormatter(null, null, false, true));
    
            $logger->pushHandler($handler);
    
            $this->app->instance(Logger::class, $logger);
        }
    }
    

    Debugging those kind of webhooks with a EC2 instance sometimes is a bit hard. But we can easily expose our local webserver to internet with ngrok.
    We only need to start our local server

    php -S 0.0.0.0:8080 -t www
    

    And create a tunnel wiht ngrok

    ngrok http 8080
    

    And that’s up. Lumen and SNS up and running.

    Code available in my github

    Authenticate OpenUI5 applications and Lumen backends with Amazon Cognito and JWT

    Today I want to create an UI5/OpenUI5 boilerplate that plays with Lumen backends. Simple, isn’t it? We only need to create a Lumen API server and connect our OpenUI5 application with this API server. But today I also want to create a Login also. The typical user/password input form. I don’t want to build it from scratch (a user database, oauth provider or something like that). Since this days I’m involved with Amazon AWS projects I want to try Amazon Cognito.

    Cognito has a great javaScript SDK. In fact we can do all the authentication flow (create users, validate passwords, change password, multifactor authentication, …) with Cognito. To create this project first I’ve create the following steps within Amazon AWS Cognito Console: Create a user pool with required attributes (email only in this example), without MFA and only allow administrators to create users. I’ve also created a App client inside this pool, so I’ve got a UserPoolId and a ClientId.

    Let’s start with the OpenUI5 application. I’ve created an small application with one route called “home”. To handle the login process I will work in Component.js init function. The idea is check the cognito session. If there’s an active one (that’s means a Json Web Token stored in the local storage) we’ll display to “home” route and if there isn’t we’ll show login one.

    sap.ui.define([
            "sap/ui/core/UIComponent",
            "sap/ui/Device",
            "app/model/models",
            "app/model/cognito"
        ], function (UIComponent, Device, models, cognito) {
            "use strict";
    
            return UIComponent.extend("app.Component", {
    
                metadata: {
                    manifest: "json"
                },
    
                init: function () {
                    UIComponent.prototype.init.apply(this, arguments);
                    this.setModel(models.createDeviceModel(), "device");
                    this.getRouter().initialize();
    
                    var targets = this.getTargets();
                    cognito.hasSession(function (err) {
                        if (err) {
                            targets.display("login");
                            return;
                        }
                        targets.display("home");
                    });
                },
    
                /* *** */
            });
        }
    );
    

    To encapsulate the cognito operations I’ve create a model called cognito.js. It’s not perfect, but it allows me to abstract cognito stuff in the OpenUI5 application.

    sap.ui.define([
            "app/conf/env"
        ], function (env) {
            "use strict";
    
            AWSCognito.config.region = env.region;
    
            var poolData = {
                UserPoolId: env.UserPoolId,
                ClientId: env.ClientId
            };
    
            var userPool = new AWSCognito.CognitoIdentityServiceProvider.CognitoUserPool(poolData);
            var jwt;
    
            var cognito = {
                getJwt: function () {
                    return jwt;
                },
    
                hasSession: function (cbk) {
                    var cognitoUser = cognito.getCurrentUser();
                    if (cognitoUser != null) {
                        cognitoUser.getSession(function (err, session) {
                            if (err) {
                                cbk(err);
                                return;
                            }
                            if (session.isValid()) {
                                jwt = session.idToken.getJwtToken();
                                cbk(false, session)
                            } else {
                                cbk(true);
                            }
                        });
                    } else {
                        cbk(true);
                    }
                },
    
                getCurrentUser: function () {
                    return userPool.getCurrentUser();
                },
    
                signOut: function () {
                    var currentUser = cognito.getCurrentUser();
                    if (currentUser) {
                        currentUser.signOut()
                    }
                },
    
                getUsername: function () {
                    var currentUser = cognito.getCurrentUser();
                    return (currentUser) ? currentUser.username : undefined;
                },
    
                getUserData: function (user) {
                    return {
                        Username: user,
                        Pool: userPool
                    };
                },
    
                getCognitoUser: function (user) {
                    return new AWSCognito.CognitoIdentityServiceProvider.CognitoUser(cognito.getUserData(user));
                },
    
                authenticateUser: function (user, pass, cbk) {
                    var authenticationData = {
                        Username: user,
                        Password: pass
                    };
    
                    var authenticationDetails = new AWSCognito.CognitoIdentityServiceProvider.AuthenticationDetails(authenticationData);
                    var cognitoUser = new AWSCognito.CognitoIdentityServiceProvider.CognitoUser(cognito.getUserData(user));
    
                    cognitoUser.authenticateUser(authenticationDetails, cbk);
    
                    return cognitoUser;
                }
            };
    
            return cognito;
        }
    );
    

    The login route has the following xml view:

    <core:View
            xmlns:core="sap.ui.core"
            xmlns:f="sap.ui.layout.form"
            xmlns="sap.m"
            controllerName="app.controller.Login"
    >
        <Image class="bg"></Image>
        <VBox class="sapUiSmallMargin loginForm">
            <f:SimpleForm visible="{= ${/flow} === 'login' }">
                <f:toolbar>
                    <Toolbar>
                        <Title text="{i18n>Login_Title}" level="H4" titleStyle="H4"/>
                    </Toolbar>
                </f:toolbar>
                <f:content>
                    <Label text="{i18n>Login_user}"/>
                    <Input placeholder="{i18n>Login_userPlaceholder}" value="{/user}"/>
                    <Label text="{i18n>Login_pass}"/>
                    <Input type="Password" placeholder="{i18n>Login_passPlaceholder}" value="{/pass}"/>
                    <Button type="Accept" text="{i18n>OK}" press="loginPressHandle"/>
                </f:content>
            </f:SimpleForm>
            
            <f:SimpleForm visible="{= ${/flow} === 'PasswordReset' }">
                <f:toolbar>
                    <Toolbar>
                        <Title text="{i18n>Login_PasswordReset}" level="H4" titleStyle="H4"/>
                    </Toolbar>
                </f:toolbar>
                <f:content>
                    <Label text="{i18n>Login_verificationCode}"/>
                    <Input type="Number" placeholder="{i18n>Login_verificationCodePlaceholder}" value="{/verificationCode}"/>
                    <Label text="{i18n>Login_newpass}"/>
                    <Input type="Password" placeholder="{i18n>Login_newpassPlaceholder}" value="{/newPass}"/>
                    <Button type="Accept" text="{i18n>OK}" press="newPassVerificationPressHandle"/>
                </f:content>
            </f:SimpleForm>
            
            <f:SimpleForm visible="{= ${/flow} === 'newPasswordRequired' }">
                <f:toolbar>
                    <Toolbar>
                        <Title text="{i18n>Login_PasswordReset}" level="H4" titleStyle="H4"/>
                    </Toolbar>
                </f:toolbar>
                <f:content>
                    <Label text="{i18n>Login_newpass}"/>
                    <Input type="Password" placeholder="{i18n>Login_newpassPlaceholder}" value="{/newPass}"/>
                    <Button type="Accept" text="{i18n>OK}" press="newPassPressHandle"/>
                </f:content>
            </f:SimpleForm>
        </VBox>
    </core:View>
    

    It has three different stages: “login”, “PasswordReset” and “newPasswordRequired”
    “login” is the main one. In this stage the user can input his login credentials. If credentials are OK then we’ll display home route.
    The first time a user log in in the application with the password provided by the administrator, Cognito will force to change the password. Then We’ll show newPasswordRequired flow. I’m not going to explain each step. We developers prefer code than texts. That’s the code:

    sap.ui.define([
            "app/controller/BaseController",
            "sap/ui/model/json/JSONModel",
            "sap/m/MessageToast",
            "app/model/cognito"
        ], function (BaseController, JSONModel, MessageToast, cognito) {
            "use strict";
    
            var cognitoUser;
            return BaseController.extend("app.controller.Login", {
                model: {
                    user: "",
                    pass: "",
                    flow: "login",
                    verificationCode: undefined,
                    newPass: undefined
                },
    
                onInit: function () {
                    this.getView().setModel(new JSONModel(this.model));
                },
    
                newPassPressHandle: function () {
                    var that = this;
                    var targets = this.getOwnerComponent().getTargets();
                    var attributesData = {};
                    sap.ui.core.BusyIndicator.show();
                    cognitoUser.completeNewPasswordChallenge(this.model.newPass, attributesData, {
                        onFailure: function (err) {
                            sap.ui.core.BusyIndicator.hide();
                            MessageToast.show(err.message);
                        },
                        onSuccess: function (data) {
                            sap.ui.core.BusyIndicator.hide();
                            that.getModel().setProperty("/flow", "login");
                            targets.display("home");
                        }
                    })
                },
    
                newPassVerificationPressHandle: function () {
                    var that = this;
                    var targets = this.getOwnerComponent().getTargets();
                    sap.ui.core.BusyIndicator.show();
                    cognito.getCognitoUser(this.model.user).confirmPassword(this.model.verificationCode, this.model.newPass, {
                        onFailure: function (err) {
                            sap.ui.core.BusyIndicator.hide();
                            MessageToast.show(err);
                        },
                        onSuccess: function (result) {
                            sap.ui.core.BusyIndicator.hide();
                            that.getModel().setProperty("/flow", "PasswordReset");
                            targets.display("home");
                        }
                    });
                },
    
                loginPressHandle: function () {
                    var that = this;
                    var targets = this.getOwnerComponent().getTargets();
                    sap.ui.core.BusyIndicator.show();
                    cognitoUser = cognito.authenticateUser(this.model.user, this.model.pass, {
                        onSuccess: function (result) {
                            sap.ui.core.BusyIndicator.hide();
                            targets.display("home");
                        },
    
                        onFailure: function (err) {
                            sap.ui.core.BusyIndicator.hide();
                            switch (err.code) {
                                case "PasswordResetRequiredException":
                                    that.getModel().setProperty("/flow", "PasswordReset");
                                    break;
                                default:
                                    MessageToast.show(err.message);
                            }
                        },
    
                        newPasswordRequired: function (userAttributes, requiredAttributes) {
                            sap.ui.core.BusyIndicator.hide();
                            that.getModel().setProperty("/flow", "newPasswordRequired");
                        }
                    });
                }
            });
        }
    );
    

    The home route is the main one. It asumes that there’s an active Cognito session enabled.

    <mvc:View
            controllerName="app.controller.Home"
            xmlns="sap.m"
            xmlns:mvc="sap.ui.core.mvc"
            xmlns:semantic="sap.m.semantic">
        <semantic:FullscreenPage
                id="page"
                semanticRuleSet="Optimized"
                showNavButton="false"
                title="{i18n>loggedUser}: {/userName}">
            <semantic:content>
                <Panel width="auto" class="sapUiResponsiveMargin" accessibleRole="Region">
                    <headerToolbar>
                        <Toolbar height="3rem">
                            <Title text="Title"/>
                        </Toolbar>
                    </headerToolbar>
                    <content>
                        <Text text="Lorem ipsum dolor st amet, consetetur sadipscing elitr, sed diam nonumy eirmod tempor invidunt ut labore et dolore magna aliquyam erat, sed diam voluptua. At vero eos et accusam et justo duo dolores et ea rebum. Stet clita kasd gubergren, no sea takimata sanctus est Lorem ipsum dolor sit amet. Lorem ipsum dolor sit amet, consetetur sadipscing elitr, sed diam nonumy eirmod tempor invidunt ut labore et dolore magna aliquyam erat, sed diam voluptua. Lorem ipsum dolor sit amet, consetetur sadipscing elitr, sed diam nonumy eirmod tempor invidunt ut labore et dolore magna aliquyam erat"/>
                        <Button text="{i18n>Hello}" icon="sap-icon://hello-world" press="helloPress"/>
                    </content>
                </Panel>
            </semantic:content>
            <semantic:customFooterContent>
                <Button text="{i18n>LogOff}" icon="sap-icon://visits" press="onLogOffPress"/>
            </semantic:customFooterContent>
        </semantic:FullscreenPage>
    </mvc:View>
    

    It shows the Cognito login name. It alos has a simple logff button and also one button that calls to the backend.

    sap.ui.define([
            "app/controller/BaseController",
            "sap/ui/model/json/JSONModel",
            "sap/m/MessageToast",
            "app/model/cognito",
            "app/model/api"
        ], function (BaseController, JSONModel, MessageToast, cognito, api) {
            "use strict";
    
            return BaseController.extend("app.controller.Home", {
                model: {
                    userName: ""
                },
    
                onInit: function () {
                    this.model.userName = cognito.getUsername();
                    this.getView().setModel(new JSONModel(this.model));
                },
    
                helloPress: function () {
                    api.get("/api/hi", {}, function (data) {
                        MessageToast.show("Hello user " + data.userInfo.username + " (" + data.userInfo.email + ")");
                    });
                },
    
                onLogOffPress: function () {
                    cognito.signOut();
                    this.getOwnerComponent().getTargets().display("login");
                }
            });
        }
    );
    

    To handle ajax requests I’ve create an api model. This model injects jwt inside every request.

    sap.ui.define([
        "sap/m/MessageToast",
        "app/model/cognito"
    ], function (MessageToast, cognito) {
        "use strict";
    
        var backend = "";
    
        return {
            get: function (uri, params, cb) {
                params = params || {};
                params._jwt = cognito.getJwt();
                sap.ui.core.BusyIndicator.show(1000);
    
                jQuery.ajax({
                    type: "GET",
                    contentType: "application/json",
                    data: params,
                    url: backend + uri,
                    cache: false,
                    dataType: "json",
                    async: true,
                    success: function (data, textStatus, jqXHR) {
                        sap.ui.core.BusyIndicator.hide();
                        cb(data);
                    },
                    error: function (data, textStatus, jqXHR) {
                        sap.ui.core.BusyIndicator.hide();
                        switch (data.status) {
                            case 403: // Forbidden
                                MessageToast.show('Auth error');
                                break;
                            default:
                                console.log('Error', data);
                        }
                    }
                });
            }
        };
    });
    

    That’s the frontend. Now it’s time to backend. Our Backend will be a simple Lumen server.

    use App\Http\Middleware;
    use Illuminate\Contracts\Debug\ExceptionHandler;
    use Laravel\Lumen\Application;
    
    (new Dotenv\Dotenv(__DIR__ . "/../env/"))->load();
    
    $app = new Application();
    
    $app->singleton(ExceptionHandler::class, App\Exceptions\Handler::class);
    
    $app->routeMiddleware([
        'cognito' => Middleware\AuthCognitoMiddleware::class,
    ]);
    
    $app->register(App\Providers\RedisServiceProvider::class);
    
    $app->group([
        'middleware' => 'cognito',
        'namespace'  => 'App\Http\Controllers',
    ], function (Application $app) {
        $app->get("/api/hi", "DemoController@hi");
    });
    
    $app->run();
    

    As you can see I’ve created a middelware to handle the authentication. This middleware will check the jwt provided by the frontend. We will use “spomky-labs/jose” library to validate the token.

    namespace App\Http\Middleware;
    
    use Closure;
    use Illuminate\Http\Request;
    use Jose\Factory\JWKFactory;
    use Jose\Loader;
    use Monolog\Logger;
    use Symfony\Component\Cache\Adapter\RedisAdapter;
    
    class AuthCognitoMiddleware
    {
        public function handle(Request $request, Closure $next)
        {
            try {
                $payload = $this->getPayload($request->get('_jwt'), $this->getJwtWebKeys());
                config([
                    "userInfo" => [
                        'username' => $payload['cognito:username'],
                        'email'    => $payload['email'],
                    ],
                ]);
            } catch (\Exception $e) {
                $log = app(Logger::class);
                $log->alert($e->getMessage());
    
                return response('Token Error', 403);
            }
    
            return $next($request);
        }
    
        private function getJwtWebKeys()
        {
            $url      = sprintf(
                'https://cognito-idp.%s.amazonaws.com/%s/.well-known/jwks.json',
                getenv('AWS_REGION'),
                getenv('AWS_COGNITO_POOL')
            );
            $cacheKey = sprintf('JWKFactory-Content-%s', hash('sha512', $url));
    
            $cache = app(RedisAdapter::class);
    
            $item = $cache->getItem($cacheKey);
            if (!$item->isHit()) {
                $item->set($this->getContent($url));
                $item->expiresAfter((int)getenv("TTL_JWK_CACHE"));
                $cache->save($item);
            }
    
            return JWKFactory::createFromJKU($url, false, $cache);
        }
    
        private function getPayload($accessToken, $jwtWebKeys)
        {
            $loader  = new Loader();
            $jwt     = $loader->loadAndVerifySignatureUsingKeySet($accessToken, $jwtWebKeys, ['RS256']);
            $payload = $jwt->getPayload();
    
            return $payload;
        }
    
        private function getContent($url)
        {
            $ch = curl_init();
            curl_setopt_array($ch, [
                CURLOPT_RETURNTRANSFER => true,
                CURLOPT_URL            => $url,
                CURLOPT_SSL_VERIFYPEER => true,
                CURLOPT_SSL_VERIFYHOST => 2,
            ]);
            $content = curl_exec($ch);
            curl_close($ch);
    
            return $content;
        }
    }
    

    To validate jwt Cognito tokens we need to obtain JwtWebKeys from this url

    https://cognito-idp.my_aws_region.amazonaws.com/my_aws_cognito_pool_id/.well-known/jwks.json

    That means that we need to fetch this url within every backend request, and that’s not cool. spomky-labs/jose allows us to use a cache to avoid fetch the request again and again. This cache is an instance of something that implementes the interface Psr\Cache\CacheItemPoolInterface. I’m not going to create a Cache from scratch. I’m not crazy. I’ll use symfony/cache here with a Redis adapter

    And basically that’s all. Full application in my github

    PHP application in SAP Cloud Platform. With PostgreSQL, Redis and Cloud Foundry

    Keeping on with my study of SAP’s cloud platform (SCP) and Cloud Foundry today I’m going to build a simple PHP application. This application serves a simple Bootstrap landing page. The application uses a HTTP basic authentication. The credentials are validated against a PostgreSQL database. It also has a API to retrieve the localtimestamp from database server (just for play with a database server). I also want to play with Redis in the cloud too, so the API request will have a Time To Live (ttl) of 5 seconds. I will use a Redis service to do it.

    First we create our services in cloud foundry. I’m using the free layer of SAP cloud foundry for this example. I’m not going to explain here how to do that. It’s pretty straightforward within SAP’s coopkit. Time ago I played with IBM’s cloud foundry too. I remember that it was also very simple too.

    Then we create our application (.bp-config/options.json)

    {
    "WEBDIR": "www",
    "LIBDIR": "lib",
    "PHP_VERSION": "{PHP_70_LATEST}",
    "PHP_MODULES": ["cli"],
    "WEB_SERVER": "nginx"
    }

    If we want to use our PostgreSQL and Redis services with our PHP Appliacation we need to connect those services to our application. This operation can be done also with SAP’s Cockpit.

    Now is the turn of PHP application. I normally use Silex framework within my backends, but now there’s a problem: Silex is dead. I feel a little bit sad but I’m not going to cry. It’s just a tool and there’re another ones. I’ve got my example with Silex but, as an exercise, I will also do it with Lumen.

    Let’s start with Silex. If you’re familiar with Silex micro framework (or another microframework, indeed) you can see that there isn’t anything especial.

    use Symfony\Component\HttpKernel\Exception\HttpException;
    use Symfony\Component\HttpFoundation\Request;
    use Silex\Provider\TwigServiceProvider;
    use Silex\Application;
    use Predis\Client;
    
    if (php_sapi_name() == "cli-server") {
        // when I start the server my local machine vendors are in a different path
        require __DIR__ . '/../vendor/autoload.php';
        // and also I mock VCAP_SERVICES env
        $env   = file_get_contents(__DIR__ . "/../conf/vcap_services.json");
        $debug = true;
    } else {
        require 'vendor/autoload.php';
        $env   = $_ENV["VCAP_SERVICES"];
        $debug = false;
    }
    
    $vcapServices = json_decode($env, true);
    
    $app = new Application(['debug' => $debug, 'ttl' => 5]);
    
    $app->register(new TwigServiceProvider(), [
        'twig.path' => __DIR__ . '/../views',
    ]);
    
    $app['db'] = function () use ($vcapServices) {
        $dbConf = $vcapServices['postgresql'][0]['credentials'];
        $dsn    = "pgsql:dbname={$dbConf['dbname']};host={$dbConf['hostname']};port={$dbConf['port']}";
        $dbh    = new PDO($dsn, $dbConf['username'], $dbConf['password']);
        $dbh->setAttribute(PDO::ATTR_ERRMODE, PDO::ERRMODE_EXCEPTION);
        $dbh->setAttribute(PDO::ATTR_CASE, PDO::CASE_UPPER);
        $dbh->setAttribute(PDO::ATTR_DEFAULT_FETCH_MODE, PDO::FETCH_ASSOC);
    
        return $dbh;
    };
    
    $app['redis'] = function () use ($vcapServices) {
        $redisConf = $vcapServices['redis'][0]['credentials'];
    
        return new Client([
            'scheme'   => 'tcp',
            'host'     => $redisConf['hostname'],
            'port'     => $redisConf['port'],
            'password' => $redisConf['password'],
        ]);
    };
    
    $app->get("/", function (Application $app) {
        return $app['twig']->render('index.html.twig', [
            'user' => $app['user'],
            'ttl'  => $app['ttl'],
        ]);
    });
    
    $app->get("/timestamp", function (Application $app) {
        if (!$app['redis']->exists('timestamp')) {
            $stmt = $app['db']->prepare('SELECT localtimestamp');
            $stmt->execute();
            $app['redis']->set('timestamp', $stmt->fetch()['TIMESTAMP'], 'EX', $app['ttl']);
        }
    
        return $app->json($app['redis']->get('timestamp'));
    });
    
    $app->before(function (Request $request) use ($app) {
        $username = $request->server->get('PHP_AUTH_USER', false);
        $password = $request->server->get('PHP_AUTH_PW');
    
        $stmt = $app['db']->prepare('SELECT name, surname FROM public.user WHERE username=:USER AND pass=:PASS');
        $stmt->execute(['USER' => $username, 'PASS' => md5($password)]);
        $row = $stmt->fetch();
        if ($row !== false) {
            $app['user'] = $row;
        } else {
            header("WWW-Authenticate: Basic realm='RIS'");
            throw new HttpException(401, 'Please sign in.');
        }
    }, 0);
    
    $app->run();
    

    Maybe the only especial thing is the way that autoloader is done. We are initializing autoloader in two different ways. One way when the application is run in the cloud and another one when the application is run locally with PHP’s built-in server. That’s because vendors are located in different paths depending on which environment the application lives in. When Cloud Foundry connect services to appliations it injects environment variables with the service configuration (credentials, host, …). It uses VCAP_SERVICES env var.

    I use the built-in server to run the application locally. When I’m doing that I don’t have VCAP_SERVICES variable. And also my services information are different than when I’m running the application in the cloud. Maybe it’s better with an environment variable but I’m using this trick:

    if (php_sapi_name() == "cli-server") {
        // I'm runing the application locally
    } else {
        // I'm in the cloud
    }
    

    So when I’m locally I mock VCAP_SERVICES with my local values and also, for example, configure Silex application in debug mode.

    Sometimes I want to run my application locally but I want to use the cloud services. I cannot connect directly to those services, but we can do it over ssh through our connected application. For example If our PostgreSQL application is running on 10.11.241.0:48825 we can map this remote port (in a private network) to our local port with this command.

    cf ssh -N -T -L 48825:10.11.241.0:48825 silex
    

    You can see more information about this command here.

    Now we can use pgAdmin, for example, in our local machine to connect to cloud server.

    We can do the same with Redis

    cf ssh -N -T -L 54266:10.11.241.9:54266 silex
    

    And basically that’s all. Now we’ll do the same with Lumen. The idea is create the same application with Lumen instead of Silex. It’s a dummy application but it cover task that I normally use. I also will re-use the Redis and PostgreSQL services from the previous project.

    use App\Http\Middleware;
    use Laravel\Lumen\Application;
    use Laravel\Lumen\Routing\Router;
    use Predis\Client;
    
    if (php_sapi_name() == "cli-server") {
        require __DIR__ . '/../vendor/autoload.php';
        $env = 'dev';
    } else {
        require 'vendor/autoload.php';
        $env = 'prod';
    }
    
    (new Dotenv\Dotenv(__DIR__ . "/../env/{$env}"))->load();
    
    $app = new Application();
    
    $app->routeMiddleware([
        'auth' => Middleware\AuthMiddleware::class,
    ]);
    
    $app->register(App\Providers\VcapServiceProvider::class);
    $app->register(App\Providers\StdoutLogServiceProvider::class);
    $app->register(App\Providers\DbServiceProvider::class);
    $app->register(App\Providers\RedisServiceProvider::class);
    
    $app->router->group(['middleware' => 'auth'], function (Router $router) {
        $router->get("/", function () {
            return view("index", [
                'user' => config("user"),
                'ttl'  => getenv('TTL'),
            ]);
        });
    
        $router->get("/timestamp", function (Client $redis, PDO $conn) {
            if (!$redis->exists('timestamp')) {
                $stmt = $conn->prepare('SELECT localtimestamp');
                $stmt->execute();
                $redis->set('timestamp', $stmt->fetch()['TIMESTAMP'], 'EX', getenv('TTL'));
            }
    
            return response()->json($redis->get('timestamp'));
        });
    });
    
    $app->run();
    

    I’ve created four servicer providers. One for handle Database connections (I don’t like ORMs)

    namespace App\Providers;
    
    use Illuminate\Support\ServiceProvider;
    use PDO;
    
    class DbServiceProvider extends ServiceProvider
    {
        public function register()
        {
        }
    
        public function boot()
        {
            $vcapServices = app('vcap_services');
    
            $dbConf = $vcapServices['postgresql'][0]['credentials'];
            $dsn    = "pgsql:dbname={$dbConf['dbname']};host={$dbConf['hostname']};port={$dbConf['port']}";
            $dbh    = new PDO($dsn, $dbConf['username'], $dbConf['password']);
            $dbh->setAttribute(PDO::ATTR_ERRMODE, PDO::ERRMODE_EXCEPTION);
            $dbh->setAttribute(PDO::ATTR_CASE, PDO::CASE_UPPER);
            $dbh->setAttribute(PDO::ATTR_DEFAULT_FETCH_MODE, PDO::FETCH_ASSOC);
    
            $this->app->bind(PDO::class, function ($app) use ($dbh) {
                return $dbh;
            });
        }
    }
    

    Another one for Redis. I need to study a little bit more Lumen. I know that Lumen has a built-in tool to work with Redis.

    namespace App\Providers;
    
    use Illuminate\Support\ServiceProvider;
    use Predis\Client;
    
    class RedisServiceProvider extends ServiceProvider
    {
        public function register()
        {
        }
    
        public function boot()
        {
            $vcapServices = app('vcap_services');
            $redisConf    = $vcapServices['redis'][0]['credentials'];
    
            $redis = new Client([
                'scheme'   => 'tcp',
                'host'     => $redisConf['hostname'],
                'port'     => $redisConf['port'],
                'password' => $redisConf['password'],
            ]);
    
            $this->app->bind(Client::class, function ($app) use ($redis) {
                return $redis;
            });
        }
    }
    

    Another one to tell monolog to send logs to Stdout

    namespace App\Providers;
    
    use Illuminate\Support\ServiceProvider;
    use Monolog;
    
    class StdoutLogServiceProvider extends ServiceProvider
    {
        public function register()
        {
            app()->configureMonologUsing(function (Monolog\Logger $monolog) {
                return $monolog->pushHandler(new \Monolog\Handler\ErrorLogHandler());
            });
        }
    }
    

    And the last one to work with Vcap environment variables. Probably I need to integrate it with dotenv files

    namespace App\Providers;
    
    use Illuminate\Support\ServiceProvider;
    
    class VcapServiceProvider extends ServiceProvider
    {
        public function register()
        {
            if (php_sapi_name() == "cli-server") {
                $env = file_get_contents(__DIR__ . "/../../conf/vcap_services.json");
            } else {
                $env = $_ENV["VCAP_SERVICES"];
            }
    
            $vcapServices = json_decode($env, true);
    
            $this->app->bind('vcap_services', function ($app) use ($vcapServices) {
                return $vcapServices;
            });
        }
    }
    

    We also need to handle authentication (http basic auth in this case) so we’ll create a simple middleware

    namespace App\Http\Middleware;
    
    use Closure;
    use Illuminate\Http\Request;
    use PDO;
    
    class AuthMiddleware
    {
        public function handle(Request $request, Closure $next)
        {
            $user = $request->getUser();
            $pass = $request->getPassword();
    
            $db = app(PDO::class);
            $stmt = $db->prepare('SELECT name, surname FROM public.user WHERE username=:USER AND pass=:PASS');
            $stmt->execute(['USER' => $user, 'PASS' => md5($pass)]);
            $row = $stmt->fetch();
            if ($row !== false) {
                config(['user' => $row]);
            } else {
                $headers = ['WWW-Authenticate' => 'Basic'];
                return response('Admin Login', 401, $headers);
            }
    
            return $next($request);
        }
    }
    

    In summary: Lumen is cool. The interface is very similar to Silex. I can swap my mind from thinking in Silex to thinking in Lumen easily. Blade instead Twig: no problem. Service providers are very similar. Routing is almost the same and Middlewares are much better. Nowadays backend is a commodity for me so I don’t want to spend to much time working on it. I want something that just work. Lumen looks like that.

    Both projects: Silex and Lumen are available in my github

    Taking photos with an ionic2 application and upload them to S3 Bucket with SAP’s Cloud Foundry using Silex and Lumen

    Today I want to play with an experiment. When I work with mobile applications, I normally use ionic and on-premise backends. Today I want play with cloud based backends. In this small experiment I want to use an ionic2 application to take pictures and upload them to an S3 bucket. Let’s start.

    First I’ve created a simple ionic2 application. It’s a very simple application. Only one page with a button to trigger the device’s camera.

    <ion-header>
        <ion-navbar>
            <ion-title>
                Photo
            </ion-title>
        </ion-navbar>
    </ion-header>
    
    <ion-content padding>
        <ion-fab bottom right>
            <button ion-fab (click)="takePicture()">
                <ion-icon  name="camera"></ion-icon>
            </button>
        </ion-fab>
    </ion-content>
    

    The controller uses @ionic-native/camera to take photos and later we use @ionic-native/transfer to upload them to the backend.

    import {Component} from '@angular/core';
    import {Camera, CameraOptions} from '@ionic-native/camera';
    import {Transfer, FileUploadOptions, TransferObject} from '@ionic-native/transfer';
    import {ToastController} from 'ionic-angular';
    import {LoadingController} from 'ionic-angular';
    
    @Component({
        selector: 'page-home',
        templateUrl: 'home.html'
    })
    export class HomePage {
        constructor(private transfer: Transfer,
                    private camera: Camera,
                    public toastCtrl: ToastController,
                    public loading: LoadingController) {
        }
    
        takePicture() {
            const options: CameraOptions = {
                quality: 100,
                destinationType: this.camera.DestinationType.FILE_URI,
                sourceType: this.camera.PictureSourceType.CAMERA,
                encodingType: this.camera.EncodingType.JPEG,
                targetWidth: 1000,
                targetHeight: 1000,
                saveToPhotoAlbum: false,
                correctOrientation: true
            };
    
            this.camera.getPicture(options).then((uri) => {
                const fileTransfer: TransferObject = this.transfer.create();
    
                let options: FileUploadOptions = {
                    fileKey: 'file',
                    fileName: uri.substr(uri.lastIndexOf('/') + 1),
                    chunkedMode: true,
                    headers: {
                        Connection: "close"
                    },
                    params: {
                        metadata: {foo: 'bar'},
                        token: 'mySuperSecretToken'
                    }
                };
    
                let loader = this.loading.create({
                    content: 'Uploading ...',
                });
    
                loader.present().then(() => {
                    let s3UploadUri = 'https://myApp.cfapps.eu10.hana.ondemand.com/upload';
                    fileTransfer.upload(uri, s3UploadUri, options).then((data) => {
                        let message;
                        let response = JSON.parse(data.response);
                        if (response['status']) {
                            message = 'Picture uploaded to S3: ' + response['key']
                        } else {
                            message = 'Error Uploading to S3: ' + response['error']
                        }
                        loader.dismiss();
                        let toast = this.toastCtrl.create({
                            message: message,
                            duration: 3000
                        });
                        toast.present();
                    }, (err) => {
                        loader.dismiss();
                        let toast = this.toastCtrl.create({
                            message: "Error",
                            duration: 3000
                        });
                        toast.present();
                    });
                });
            });
        }
    }
    

    Now let’s work with the backend. Next time I’ll use JavaScript AWS SDK to upload pictures directly from mobile application (without backend), but today We’ll use a backend. Nowadays I’m involved with SAP Cloud platform projects, so we’ll use SAP’s Cloud Foundry tenant (using a free account). In this tenant we’ll create a PHP application using the PHP buildpack with nginx

    applications:
    - name:    myApp
      path: .
      memory:  128MB
      buildpack: php_buildpack
    

    The PHP application is a simple Silex application to handle the file uploads and post the pictures to S3 using the official AWS SDK for PHP (based on Guzzle)

    use Symfony\Component\HttpFoundation\Request;
    use Silex\Application;
    use Aws\S3\S3Client;
    
    require 'vendor/autoload.php';
    
    $app = new Application([
        'debug'        => false,
        'aws.config'   => [
            'debug'       => false,
            'version'     => 'latest',
            'region'      => 'eu-west-1',
            'credentials' => [
                'key'    => $_ENV['s3key'],
                'secret' => $_ENV['s3secret'],
            ],
        ],
    ]);
    
    $app['aws'] = function () use ($app) {
        return new S3Client($app['aws.config']);
    };
    
    $app->post('/upload', function (Request $request, Application $app) {
        $metadata = json_decode($request->get('metadata'), true);
        $token    = $request->get('token');
    
        if ($token === $_ENV['token']) {
            $fileName = $_FILES['file']['name'];
            $fileType = $_FILES['file']['type'];
            $tmpName  = $_FILES['file']['tmp_name'];
    
            /** @var \Aws\S3\S3Client $s3 */
            $s3 = $app['aws'];
            try {
                $key = date('YmdHis') . "_" . $fileName;
                $s3->putObject([
                    'Bucket'      => $_ENV['s3bucket'],
                    'Key'         => $key,
                    'SourceFile'  => $tmpName,
                    'ContentType' => $fileType,
                    'Metadata'    => $metadata,
                ]);
                unlink($tmpName);
    
                return $app->json([
                    'status' => true,
                    'key'    => $key,
                ]);
            } catch (Aws\S3\Exception\S3Exception $e) {
                return $app->json([
                    'status' => false,
                    'error'  => $e->getMessage(),
                ]);
            }
        } else {
            return $app->json([
                'status' => false,
                'error'  => "Token error",
            ]);
        }
    });
    
    $app->run();
    

    I just wanted a simple prototype (a working one). Enough for a Sunday morning hacking.

    UPDATE

    I had this post ready weeks ago but something has changed. Silex is dead. So, as an exercise I’ll migrate current Silex application to Lumen (a quick prototype).

    That’s the main application.

    use App\Http\Middleware;
    use Aws\S3\S3Client;
    use Illuminate\Http\Request;
    use Laravel\Lumen\Application;
    
    require 'vendor/autoload.php';
    
    (new Dotenv\Dotenv(__DIR__ . "/../env"))->load();
    
    $app = new Application();
    
    $app->routeMiddleware([
        'auth' => Middleware\AuthMiddleware::class,
    ]);
    
    $app->register(App\Providers\S3ServiceProvider::class);
    
    $app->group(['middleware' => 'auth'], function (Application $app) {
        $app->post('/upload', function (Request $request, Application $app, S3Client $s3) {
            $metadata = json_decode($request->get('metadata'), true);
            $fileName = $_FILES['file']['name'];
            $fileType = $_FILES['file']['type'];
            $tmpName  = $_FILES['file']['tmp_name'];
    
            try {
                $key = date('YmdHis') . "_" . $fileName;
                $s3->putObject([
                    'Bucket'      => getenv('s3bucket'),
                    'Key'         => $key,
                    'SourceFile'  => $tmpName,
                    'ContentType' => $fileType,
                    'Metadata'    => $metadata,
                ]);
                unlink($tmpName);
    
                return response()->json([
                    'status' => true,
                    'key'    => $key,
                ]);
            } catch (Aws\S3\Exception\S3Exception $e) {
                return response()->json([
                    'status' => false,
                    'error'  => $e->getMessage(),
                ]);
            }
        });
    });
    
    $app->run();
    

    Probably we can find a S3 Service provider, but I’ve built a simple one for this example.

    namespace App\Providers;
    
    use Illuminate\Support\ServiceProvider;
    use Aws\S3\S3Client;
    
    class S3ServiceProvider extends ServiceProvider
    {
        public function register()
        {
            $this->app->bind(S3Client::class, function ($app) {
                $conf = [
                    'debug'       => false,
                    'version'     => getenv('AWS_VERSION'),
                    'region'      => getenv('AWS_REGION'),
                    'credentials' => [
                        'key'    => getenv('s3key'),
                        'secret' => getenv('s3secret'),
                    ],
                ];
    
                return new S3Client($conf);
            });
        }
    }
    

    And also I’m using a middleware for the authentication

    namespace App\Http\Middleware;
    
    use Closure;
    use Illuminate\Http\Request;
    
    class AuthMiddleware
    {
        public function handle(Request $request, Closure $next)
        {
            $token = $request->get('token');
            if ($token === getenv('token')) {
                return response('Admin Login', 401);
            }
    
            return $next($request);
        }
    }
    

    Ok. I’ll post this article soon. At least before Lumen will be dead also, and I need to update this post again 🙂

    Full project (mobile application and both backends) in my githubgithub

    Silex is dead (… or not)

    The last week was deSymfony conference in Castellón (Spain). IMHO deSymfony is the best conference I’ve ever attended. The talks are good but from time to now I appreciate this kind of events not because of them. I like to go to events because of people, the coffee breaks and the community (and in deSymfony is brilliant at this point). This year I cannot join to the conference. It was a pity. A lot of good friends there. So I only can follow the buzz in Twitter, read the published slides (thanks Raul) and wait for the talk videos in youtube.

    In my Twitter timeline especially two tweets get my attention. One tweet was from Julieta Cuadrado and another one from Asier Marqués.

    Tweets are in Spanish but the translation is clear: Javier Eguiluz (Symfony Core Team member and co-organizer of the conference) said in his talk: “Silex is dead”. At the time I read the tweets his slides were not available yet, but a couple of days after the slides were online. The slide 175 is clear “Silex is dead”

    Javier recommends us not to use Silex in future new projects and mark existing ones as “legacy”. It’s hard to me. If you have ever read my blog you will notice that I’m a big fan of Silex. Each time I need a backend, a API/REST server of something like that the first thing I do is “composer require silex/silex”. I know that Silex has limitations. It’s built on top of Pimple dependency injection container and Pimple is really awful, but this microframework gives to me exactly what I need. It’s small, simple, fast enough and really easy to adapt to my needs.

    I remember a dinner in deSymfony years ago speaking with Javier in Barcelona. He was trying to “convince” me to use Symfony full stack framework instead of Silex. He almost succeeded, but I didn’t like Symfony full stack. Too complicated for me. A lot interesting things but a lot of them I don’t really need. I don’t like Symfony full stack framework, but I love Symfony. For me it’s great because of its components. They’re independent pieces of code that I can use to fit exactly to my needs instead of using a full-stack framework. I’ve learn a lot SOLID reading and hacking with Symfony components. I’m not saying that full stack frameworks are bad. I only say that they’re not for me. If I’m forced to use them I will do it, but if I can choose, I definitely choose a micro framework, even for medium an big projects.

    New version of Symfony (Symfony 4) is coming next November and reading the slides of Javier at slideshare I can get an idea of its roadmap. My summary is clear: “Brilliant”. It looks like the people of Symfony listen to my needs and change all the framework to adapt it to me. After understand the roadmap I think that I need to change to title of the post (Initially it was only “Silex is dead”). Silex is not dead. For me Symfony (the full stack framework) is the death. Silex will be upgraded and will be renamed to Symfony (I know that this assertion is subjective. It’s just my point of view). So the bad feeling that I felt when I read Julieta and Asier’s tweets turns into a good one. Good move SensioLabs!

    But I’ve got a problem right now. What can I do if I need to start a new project today? Symfony 4 isn’t ready yet. Javier said that we can use Symfony Flex and create new projects with Symfony 3 with the look and feel of Symfony 4, but Flex is still in alpha and I don’t want to play with alpha tools in production. Especially in the backend. I’m getting older, I know. For me the backend is a commodity right now. I need the backend to serve JSON mainly.

    I normally use PHP and Silex here only because I’m very confortable with it. In the projects, business people doesn’t care about technologies and frameworks. It’s our job (or our problem depending on how to read it). And don’t forget one thing: Developers are part of business, so in one part of my mind I don’t care about frameworks also. I care about making things done, maximising the potential of technology and driving innovation to customer benefits (good lapidary phrase, isn’t it?).

    So I’ve started looking for alternatives. My objective here is clear: I want to find a framework to do the things that I usually do with Silex. Nothing more. And there’s something important here: The tool must be easy to learn. I want to master (or at least become productive) the tool in a couple of days maximum.

    I started with the first one: Lumen and I think I will stop searching. Lumen is the micro framework of Laravel. Probably in the PHP world now there’re two major communities: Symfony and Laravel. Maybe if we’re strict Laravel and Symfony are not different communities. In fact Laravel and Symfony shares a lot of components. So maybe both communities are the same.

    I’ve almost never played with Laravel and it’s time to study it a little bit. Time ago I used Eloquent ORM but since I hate ORMs I always return to PDO/DBAL. As I said before I didn’t like Symfony full stack framework. It’s too complex for me, and Laravel is the same. When I started with PHP (in the early 2000) there weren’t any framework. I remember me reading books of Java and J2EE. Trying to understand something in its nightmare of acronyms, XMLs configurations and trying to build my own framework in PHP. Now in 2017 to build our own framework in PHP is good learning point but use it with real projects is ridiculous. As someone said before (I don’t remember who) “Everybody must build his own framework, and never use it at all“.

    Swap from Silex to Lumen is pretty straightforward. In fact with one ultra-minimal application it’s exactly the same:

    use Silex\Application;
    
    $app = new Application();
    
    $app->get("/", function() {
        return "Hello from Silex";
    });
    
    $app->run();
    
    use Laravel\Lumen\Application;
    
    $app = new Application();
    
    $app->get("/", function() {
        return "Hello from Lumen";
    });
    
    $app->run();
    

    If you’re a Silex user you only need a couple of hours reading the Lumen docs and you will be able to set up a new project without any problem. Concepts are the same, slight differences and even cool things such as groups and middlewares. Nothing impossible to do with Silex, indeed, but with a very smart and simple interface. If I need to create a new project right now I will use Lumen without any doubt.

    Next winter, when Symfony 4 arrives, I probably will face the problem of choose. But past years I’ve been involved into the crazy world of JavaScript: Angular, Angular2, React, npm, yarn, webpack, … If I’ve survived this (finally I choose JQuery, but that’s a different story :), I am ready for all right now.