Happy logins. Only the happy user will pass

Login forms are bored. In this example we’re going to create an especial login form. Only for happy users. Happiness is something complicated, but at least, one smile is more easy to obtain, and all is better with one smile :). Our login form will only appear if the user smiles. Let’s start.

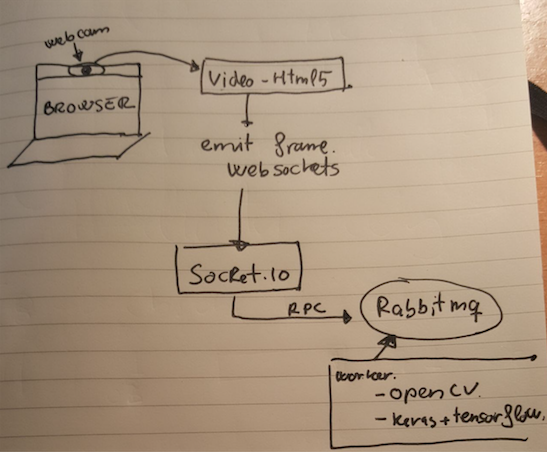
I must admit that this project is just an excuse to play with different technologies that I wanted to play. Weeks ago I discovered one library called face_classification. With this library I can perform emotion classification from a picture. The idea is simple. We create RabbitMQ RPC server script that answers with the emotion of the face within a picture. Then we obtain on frame from the video stream of the webcam (with HTML5) and we send this frame using websocket to a socket.io server. This websocket server (node) ask to the RabbitMQ RPC the emotion and it sends back to the browser the emotion and a the original picture with a rectangle over the face.

Frontend

As well as we’re going to use socket.io for websockets we will use the same script to serve the frontend (the login and the HTML5 video capture)

<!doctype html>
<html>
<head>
    <title>Happy login</title>
    <link rel="stylesheet" href="css/app.css">
</head>
<body>

<div id="login-page" class="login-page">
    <div class="form">
        <h1 id="nonHappy" style="display: block;">Only the happy user will pass</h1>
        <form id="happyForm" class="login-form" style="display: none" onsubmit="return false;">
            <input id="user" type="text" placeholder="username"/>
            <input id="pass" type="password" placeholder="password"/>
            <button id="login">login</button>
            <p></p>
            <img id="smile" width="426" height="320" src=""/>
        </form>
        <div id="video">
            <video style="display:none;"></video>
            <canvas id="canvas" style="display:none"></canvas>
            <canvas id="canvas-face" width="426" height="320"></canvas>
        </div>
    </div>
</div>

<div id="private" style="display: none;">
    <h1>Private page</h1>
</div>

<script src="https://code.jquery.com/jquery-3.2.1.min.js" integrity="sha256-hwg4gsxgFZhOsEEamdOYGBf13FyQuiTwlAQgxVSNgt4=" crossorigin="anonymous"></script>
<script src="https://unpkg.com/sweetalert/dist/sweetalert.min.js"></script>
<script type="text/javascript" src="/socket.io/socket.io.js"></script>
<script type="text/javascript" src="/js/app.js"></script>
</body>
</html>

Here we’ll connect to the websocket and we’ll emit the webcam frame to the server. We´ll also be listening to one event called ‘response’ where server will notify us when one emotion has been detected.

let socket = io.connect(location.origin),
    img = new Image(),
    canvasFace = document.getElementById('canvas-face'),
    context = canvasFace.getContext('2d'),
    canvas = document.getElementById('canvas'),
    width = 640,
    height = 480,
    delay = 1000,
    jpgQuality = 0.6,
    isHappy = false;

socket.on('response', function (r) {
    let data = JSON.parse(r);
    if (data.length > 0 && data[0].hasOwnProperty('emotion')) {
        if (isHappy === false && data[0]['emotion'] === 'happy') {
            isHappy = true;
            swal({
                title: "Good!",
                text: "All is better with one smile!",
                icon: "success",
                buttons: false,
                timer: 2000,
            });

            $('#nonHappy').hide();
            $('#video').hide();
            $('#happyForm').show();
            $('#smile')[0].src = 'data:image/png;base64,' + data[0].image;
        }

        img.onload = function () {
            context.drawImage(this, 0, 0, canvasFace.width, canvasFace.height);
        };

        img.src = 'data:image/png;base64,' + data[0].image;
    }
});

navigator.getMedia = (navigator.getUserMedia || navigator.webkitGetUserMedia || navigator.mozGetUserMedia);

navigator.getMedia({video: true, audio: false}, (mediaStream) => {
    let video = document.getElementsByTagName('video')[0];
    video.src = window.URL.createObjectURL(mediaStream);
    video.play();
    setInterval(((video) => {
        return function () {
            let context = canvas.getContext('2d');
            canvas.width = width;
            canvas.height = height;
            context.drawImage(video, 0, 0, width, height);
            socket.emit('img', canvas.toDataURL('image/jpeg', jpgQuality));
        }
    })(video), delay)
}, error => console.log(error));

$(() => {
    $('#login').click(() => {
        $('#login-page').hide();
        $('#private').show();
    })
});

Backend
Finally we’ll work in the backend. Basically I’ve check the examples that we can see in face_classification project and tune it a bit according to my needs.

from rabbit import builder
import logging
import numpy as np
from keras.models import load_model
from utils.datasets import get_labels
from utils.inference import detect_faces
from utils.inference import draw_text
from utils.inference import draw_bounding_box
from utils.inference import apply_offsets
from utils.inference import load_detection_model
from utils.inference import load_image
from utils.preprocessor import preprocess_input
import cv2
import json
import base64

detection_model_path = 'trained_models/detection_models/haarcascade_frontalface_default.xml'
emotion_model_path = 'trained_models/emotion_models/fer2013_mini_XCEPTION.102-0.66.hdf5'
emotion_labels = get_labels('fer2013')
font = cv2.FONT_HERSHEY_SIMPLEX

# hyper-parameters for bounding boxes shape
emotion_offsets = (20, 40)

# loading models
face_detection = load_detection_model(detection_model_path)
emotion_classifier = load_model(emotion_model_path, compile=False)

# getting input model shapes for inference
emotion_target_size = emotion_classifier.input_shape[1:3]


def format_response(response):
    decoded_json = json.loads(response)
    return "Hello {}".format(decoded_json['name'])


def on_data(data):
    f = open('current.jpg', 'wb')
    f.write(base64.decodebytes(data))
    f.close()
    image_path = "current.jpg"

    out = []
    # loading images
    rgb_image = load_image(image_path, grayscale=False)
    gray_image = load_image(image_path, grayscale=True)
    gray_image = np.squeeze(gray_image)
    gray_image = gray_image.astype('uint8')

    faces = detect_faces(face_detection, gray_image)
    for face_coordinates in faces:
        x1, x2, y1, y2 = apply_offsets(face_coordinates, emotion_offsets)
        gray_face = gray_image[y1:y2, x1:x2]

        try:
            gray_face = cv2.resize(gray_face, (emotion_target_size))
        except:
            continue

        gray_face = preprocess_input(gray_face, True)
        gray_face = np.expand_dims(gray_face, 0)
        gray_face = np.expand_dims(gray_face, -1)
        emotion_label_arg = np.argmax(emotion_classifier.predict(gray_face))
        emotion_text = emotion_labels[emotion_label_arg]
        color = (0, 0, 255)

        draw_bounding_box(face_coordinates, rgb_image, color)
        draw_text(face_coordinates, rgb_image, emotion_text, color, 0, -50, 1, 2)
        bgr_image = cv2.cvtColor(rgb_image, cv2.COLOR_RGB2BGR)

        cv2.imwrite('predicted.png', bgr_image)
        data = open('predicted.png', 'rb').read()
        encoded = base64.encodebytes(data).decode('utf-8')
        out.append({
            'image': encoded,
            'emotion': emotion_text,
        })

    return out

logging.basicConfig(level=logging.WARN)
rpc = builder.rpc("image.check", {'host': 'localhost', 'port': 5672})
rpc.server(on_data)

Here you can see in action the working prototype

Maybe we can do the same with another tools and even more simple but as I said before this example is just an excuse to play with those technologies:

  • Send webcam frames via websockets
  • Connect one web application to a Pyhon application via RabbitMQ RPC
  • Play with face classification script

Please don’t use this script in production. It’s just a proof of concepts. With smiles but a proof of concepts 🙂

You can see the project in my github account
Using OpenUI5 table and Angularjs

Last days I’ve been playing with OpenUI5. OpenUI5 is a web toolkit that SAP people has released as an open source project. I’ve read several good reviews about this framework, and because of that I started to hack a little bit with it. OpenUI5 came with a very complete set of controls. In this small example I want to use the “table” control. It’s just a datagrid. This days I playing a lot with Angular.js so I wanted to use together OpenUI5’s table control and Angularjs.

I’m not quite sure if it’s a good decision to use together both frameworks. In fact we don’t need Angular.js to create web applications using OpenUI5. OpenUI5 uses internally jQuery, but I wanted to hack a little bit and create one Angularjs directive to enclose one OpenUI5 datagrid.

First of all, we create one index.html. It’s just a boilerplate with angular + ui-router + ui-bootstrap. We also start our OpenUi5 environment with de default theme and including the table library

<!doctype html>
<html ng-app="G">
<head>
    <meta name="viewport" content="width=device-width, initial-scale=1">

    <link rel="stylesheet" href="assets/bootstrap/dist/css/bootstrap.min.css">

    <script src="assets/angular/angular.js"></script>
    <script src="assets/angular-ui-router/release/angular-ui-router.js"></script>
    <script src="assets/angular-bootstrap/ui-bootstrap-tpls.js"></script>

    <script id='sap-ui-bootstrap' type='text/javascript'
            src="https://openui5.hana.ondemand.com/resources/sap-ui-core.js"
            data-sap-ui-theme='sap_bluecrystal'
            data-sap-ui-libs='sap.ui.commons, sap.ui.table'></script>

    <script src="js/ngOpenUI5.js"></script>

    <script src="js/app.js"></script>
    <link rel="stylesheet" href="css/app.css">
</head>
<body class="ng-cloak">

<div class="container">

    <div class="starter-template">
        <div ui-view></div>
    </div>
</div>

<script src="assets/html5shiv/dist/html5shiv.js"></script>
<script src="assets/respond/dest/respond.src.js"></script>

</body>
</html>

Then we create a directive enclosing the OpenUI5 needed code within a Angular module

(function () {
    'use strict';

    angular.module('ng.openui5', [])
        .directive('openui5Table', function () {

            function renderColumns(columns, oTable) {
                for (var i = 0; i <= columns.length; i++) {
                    oTable.addColumn(new sap.ui.table.Column(columns[i]));
                }
            }

            var link = function (scope, element) {

                var oData = scope.model.data,
                    oTable = new sap.ui.table.Table(scope.model.conf),
                    oModel = new sap.ui.model.json.JSONModel();

                oModel.setData({modelData: oData});
                renderColumns(scope.model.columns, oTable);

                oTable.setModel(oModel);
                oTable.bindRows("/modelData");
                oTable.sort(oTable.getColumns()[0]);

                oTable.placeAt(element);

                scope.$watch('model.data', function (data) {
                    if (data) {
                        oModel.setData({modelData: data});
                        oModel.refresh();
                    }
                }, true);

            };

            return {
                restrict: 'E',
                scope: {model: '=ngModel'},
                link: link
            };
        });
}());

And now we can create a simple Angular.js using the ng.openui5 module. In this application we configure the table and fetch the data from an externar API server

(function () {
    'use strict';

    angular.module('G', ['ui.bootstrap', 'ui.router', 'ng.openui5'])

        .value('config', {
            apiUrl: '/api'
        })

        .config(function ($stateProvider, $urlRouterProvider) {
            $urlRouterProvider.otherwise("/");
            $stateProvider
                .state('home', {
                    url: "/",
                    templateUrl: "partials/home.html",
                    controller: 'HomeController'
                });
        })

        .controller('HomeController', function ($scope, $http, $log, config) {
            $scope.refresh = function () {
                $http.get(config.apiUrl + '/gridData').success(function (data) {
                    $scope.datagrid.data = data;
                });
            };

            $scope.datagrid = {
                conf: {
                    title: "Table example",
                    navigationMode: sap.ui.table.NavigationMode.Paginator
                },
                columns: [
                    {
                        label: new sap.ui.commons.Label({text: "Last Name"}),
                        template: new sap.ui.commons.TextView().bindProperty("text", "lastName"),
                        sortProperty: "lastName",
                        filterProperty: "lastName",
                        width: "200px"
                    }, {
                        label: new sap.ui.commons.Label({text: "First Name"}),
                        template: new sap.ui.commons.TextField().bindProperty("value", "name"),
                        sortProperty: "name",
                        filterProperty: "name",
                        width: "100px"
                    }, {
                        label: new sap.ui.commons.Label({text: "Checked"}),
                        template: new sap.ui.commons.CheckBox().bindProperty("checked", "checked"),
                        sortProperty: "checked",
                        filterProperty: "checked",
                        width: "75px",
                        hAlign: "Center"
                    }, {
                        label: new sap.ui.commons.Label({text: "Web Site"}),
                        template: new sap.ui.commons.Link().bindProperty("text", "linkText").bindProperty("href", "href"),
                        sortProperty: "linkText",
                        filterProperty: "linkText"
                    }, {
                        label: new sap.ui.commons.Label({text: "Image"}),
                        template: new sap.ui.commons.Image().bindProperty("src", "src"),
                        width: "75px",
                        hAlign: "Center"
                    }, {
                        label: new sap.ui.commons.Label({text: "Gender"}),
                        template: new sap.ui.commons.ComboBox({
                            items: [
                                new sap.ui.core.ListItem({text: "female"}),
                                new sap.ui.core.ListItem({text: "male"})
                            ]
                        }).bindProperty("value", "gender"),
                        sortProperty: "gender",
                        filterProperty: "gender"
                    }, {
                        label: new sap.ui.commons.Label({text: "Rating"}),
                        template: new sap.ui.commons.RatingIndicator().bindProperty("value", "rating"),
                        sortProperty: "rating",
                        filterProperty: "rating"
                    }

                ]
            };
        })
    ;
}());

The API server is a simple Silex server

<?php
include __DIR__ . '/../../vendor/autoload.php';
use Silex\Application;

$app = new Application();
$app->get("/", function (Application $app) {

$app->get('gridData', function (Application $app) {
    return $app->json([
        ['lastName' => uniqid(), 'name' => "Al", 'checked' => true, 'linkText' => "www.sap.com", 'href' => "http://www.sap.com", 'gender' => "male", 'rating' => 4, 'src' => "images/person1.gif"],
        ['lastName' => "Friese", 'name' => "Andy", 'checked' => true, 'linkText' => "www.sap.com", 'href' => "http://www.sap.com", 'gender' => "male", 'rating' => 2, 'src' => "images/person1.gif"],
        ['lastName' => "Mann", 'name' => "Anita", 'checked' => false, 'linkText' => "www.sap.com", 'href' => "http://www.sap.com", 'gender' => "female", 'rating' => 3, 'src' => "images/person1.gif"],
        ['lastName' => "Schutt", 'name' => "Doris", 'checked' => true, 'linkText' => "www.sap.com", 'href' => "http://www.sap.com", 'gender' => "female", 'rating' => 4, 'src' => "images/person1.gif"],
        ['lastName' => "Open", 'name' => "Doris", 'checked' => true, 'linkText' => "www.sap.com", 'href' => "http://www.sap.com", 'gender' => "female", 'rating' => 2, 'src' => "images/person1.gif"],
        ['lastName' => "Dewit", 'name' => "Kenya", 'checked' => false, 'linkText' => "www.sap.com", 'href' => "http://www.sap.com", 'gender' => "female", 'rating' => 3, 'src' => "images/person1.gif"],
        ['lastName' => "Zar", 'name' => "Lou", 'checked' => true, 'linkText' => "www.sap.com", 'href' => "http://www.sap.com", 'gender' => "male", 'rating' => 1, 'src' => "images/person1.gif"],
        ['lastName' => "Burr", 'name' => "Tim", 'checked' => true, 'linkText' => "www.sap.com", 'href' => "http://www.sap.com", 'gender' => "male", 'rating' => 2, 'src' => "images/person1.gif"],
        ['lastName' => "Hughes", 'name' => "Tish", 'checked' => true, 'linkText' => "www.sap.com", 'href' => "http://www.sap.com", 'gender' => "male", 'rating' => 5, 'src' => "images/person1.gif"],
        ['lastName' => "Lester", 'name' => "Mo", 'checked' => true, 'linkText' => "www.sap.com", 'href' => "http://www.sap.com", 'gender' => "male", 'rating' => 3, 'src' => "images/person1.gif"],
        ['lastName' => "Case", 'name' => "Justin", 'checked' => false, 'linkText' => "www.sap.com", 'href' => "http://www.sap.com", 'gender' => "male", 'rating' => 3, 'src' => "images/person1.gif"],
        ['lastName' => "Time", 'name' => "Justin", 'checked' => true, 'linkText' => "www.sap.com", 'href' => "http://www.sap.com", 'gender' => "male", 'rating' => 4, 'src' => "images/person1.gif"],
        ['lastName' => "Barr", 'name' => "Gaye", 'checked' => true, 'linkText' => "www.sap.com", 'href' => "http://www.sap.com", 'gender' => "male", 'rating' => 2, 'src' => "images/person1.gif"],
        ['lastName' => "Poole", 'name' => "Gene", 'checked' => true, 'linkText' => "www.sap.com", 'href' => "http://www.sap.com", 'gender' => "male", 'rating' => 1, 'src' => "images/person1.gif"],
        ['lastName' => "Ander", 'name' => "Corey", 'checked' => false, 'linkText' => "www.sap.com", 'href' => "http://www.sap.com", 'gender' => "male", 'rating' => 5, 'src' => "images/person1.gif"],
        ['lastName' => "Early", 'name' => "Brighton", 'checked' => true, 'linkText' => "www.sap.com", 'href' => "http://www.sap.com", 'gender' => "male", 'rating' => 3, 'src' => "images/person1.gif"],
        ['lastName' => "Noring", 'name' => "Constance", 'checked' => true, 'linkText' => "www.sap.com", 'href' => "http://www.sap.com", 'gender' => "female", 'rating' => 4, 'src' => "images/person1.gif"],
        ['lastName' => "Haas", 'name' => "Jack", 'checked' => true, 'linkText' => "www.sap.com", 'href' => "http://www.sap.com", 'gender' => "male", 'rating' => 2, 'src' => "images/person1.gif"],
        ['lastName' => "Tress", 'name' => "Matt", 'checked' => true, 'linkText' => "www.sap.com", 'href' => "http://www.sap.com", 'gender' => "male", 'rating' => 4, 'src' => "images/person1.gif"],
        ['lastName' => "Turner", 'name' => "Paige", 'checked' => true, 'linkText' => "www.sap.com", 'href' => "http://www.sap.com", 'gender' => "female", 'rating' => 3, 'src' => "images/person1.gif"]
    ]);
});
$app->run();

And basically that’s all. You can see the whole project within my github account.

working example
working example

Yet Another example of WebSockets, socket.io and AngularJs working with a Silex backend

Remember my last post about WebSockets and AngularJs? Today we’re going to play with something similar. I want to create a key-value interface to play with websockets. Let me explain it a little bit.

First we’re going to see the backend. One Silex application with two routes: a get one and a post one:

<?php

include __DIR__ . '/../../vendor/autoload.php';
include __DIR__ . '/SqlLiteStorage.php';

use Silex\Application;
use Symfony\Component\HttpFoundation\Request;
use Symfony\Component\HttpFoundation\Response;
use Silex\Provider\DoctrineServiceProvider;

$app = new Application([
    'debug'      => true,
    'ioServer'   => 'http://localhost:3000',
    'httpServer' => 'http://localhost:3001',
]);

$app->after(function (Request $request, Response $response) {
    $response->headers->set('Access-Control-Allow-Origin', '*');
});

$app->register(new G\Io\EmitterServiceProvider($app['httpServer']));
$app->register(new DoctrineServiceProvider(), [
    'db.options' => [
        'driver' => 'pdo_sqlite',
        'path'   => __DIR__ . '/../../db/app.db.sqlite',
    ],
]);
$app->register(new G\Io\Storage\Provider(new SqlLiteStorage($app['db'])));

$app->get('conf', function (Application $app, Request $request) {
    $chanel = $request->get('token');
    return $app->json([
        'ioServer' => $app['ioServer'],
        'chanel'   => $chanel
    ]);
});

$app->get('/{key}', function (Application $app, $key) {
    return $app->json($app['gdb.get']($key));
});

$app->post('/{key}', function (Application $app, Request $request, $key) {
    $content = json_decode($request->getContent(), true);

    $chanel = $content['token'];
    $app->json($app['gdb.post']($key, $content['value']));

    $app['io.emit']($chanel, [
        'key'   => $key,
        'value' => $content['value']
    ]);

    return $app->json(true);
});

$app->run();

As we can see we register one service provider:

$app->register(new G\Io\Storage\Provider(new SqlLiteStorage($app['db'])));

This provider needs an instance of StorageIface

namespace G\Io\Storage;

interface StorageIface
{
    public function get($key);

    public function post($key, $value);
}

Our implementation uses SqlLite, but it’s pretty straightforward to change to another Database Storage or even a NoSql Database.

use Doctrine\DBAL\Connection;
use G\Io\Storage\StorageIface;

class SqlLiteStorage implements StorageIface
{
    private $db;

    public function __construct(Connection $db)
    {
        $this->db = $db;
    }

    public function get($key)
    {
        $statement = $this->db->executeQuery('select value from storage where key = :KEY', ['KEY' => $key]);
        $data      = $statement->fetchAll();

        return isset($data[0]['value']) ? $data[0]['value'] : null;
    }

    public function post($key, $value)
    {
        $this->db->beginTransaction();

        $statement = $this->db->executeQuery('select value from storage where key = :KEY', ['KEY' =>; $key]);
        $data      = $statement->fetchAll();

        if (count($data) > 0) {
            $this->db->update('storage', ['value' => $value], ['key' => $key]);
        } else {
            $this->db->insert('storage', ['key' => $key, 'value' => $value]);
        }

        $this->db->commit();

        return $value;
    }
}

We also register another Service provider:

$app->register(new G\Io\EmitterServiceProvider($app['httpServer']));

This provider’s responsibility is to notify to the websocket’s server when anything changes within the storage:

namespace G\Io;

use Pimple\Container;
use Pimple\ServiceProviderInterface;

class EmitterServiceProvider implements ServiceProviderInterface
{
    private $server;

    public function __construct($url)
    {
        $this->server = $url;
    }

    public function register(Container $app)
    {
        $app['io.emit'] = $app->protect(function ($chanel, $params) use ($app) {
            $s = curl_init();
            curl_setopt($s, CURLOPT_URL, '{$this->server}/emit/?' . http_build_query($params) . '&_chanel=' . $chanel);
            curl_setopt($s, CURLOPT_RETURNTRANSFER, true);
            $content = curl_exec($s);
            $status  = curl_getinfo($s, CURLINFO_HTTP_CODE);
            curl_close($s);

            if ($status != 200) throw new \Exception();

            return $content;
        });
    }
}

The Websocket server is a simple socket.io server as well as a Express server to handle the backend’s triggers.

var
    express = require('express'),
    expressApp = express(),
    server = require('http').Server(expressApp),
    io = require('socket.io')(server, {origins: 'localhost:*'})
    ;

expressApp.get('/emit', function (req, res) {
    io.sockets.emit(req.query._chanel, req.query);
    res.json('OK');
});

expressApp.listen(3001);

server.listen(3000);

Our client application is an AngularJs application:

<!doctype html>
<html ng-app="app">
<head>
    <script src="//localhost:3000/socket.io/socket.io.js"></script>
    <script src="assets/angularjs/angular.js"></script>
    <script src="js/app.js"></script>
    <script src="js/gdb.js"></script>
</head>
<body>
 
<div ng-controller="MainController">
    <input type="text" ng-model="key">
    <button ng-click="change()">change</button>
</div>
 
</body>
</html>
angular.module('app', ['Gdb'])

    .run(function (Gdb) {
        Gdb.init({
            server: 'http://localhost:8080/gdb',
            token: '4b96716bcb3d42fc01ff421ea2cfd757'
        });
    })

    .controller('MainController', function ($scope, Gdb) {
        $scope.change = function () {
            Gdb.set('key', $scope.key).then(function() {
                console.log(&quot;Value set&quot;);
            });
        };

        Gdb.get('key').then(function (data) {
            $scope.key = data;
        });

        Gdb.watch('key', function (value) {
            console.log(&quot;Value updated&quot;);
            $scope.key = value;
        });
    })
;

As we can see the AngularJs application uses one small library called Gdb to handle the communications with the backend and WebSockets:

angular.module('Gdb', [])
    .factory('Gdb', function ($http, $q, $rootScope) {

        var socket,
            gdbServer,
            token,
            watches = {};

        var Gdb = {
            init: function (conf) {
                gdbServer = conf.server;
                token = conf.token;

                $http.get(gdbServer + '/conf', {params: {token: token}}).success(function (data) {
                    socket = io.connect(data.ioServer);
                    socket.on(data.chanel, function (data) {
                        watches.hasOwnProperty(data.key) ? watches[data.key](data.value) : null;
                        $rootScope.$apply();
                    });
                });
            },

            set: function (key, value) {
                var deferred = $q.defer();

                $http.post(gdbServer + '/' + key, {value: value, token: token}).success(function (data) {
                    deferred.resolve(data);
                });

                return deferred.promise;
            },

            get: function (key) {
                var deferred = $q.defer();

                $http.get(gdbServer + '/' + key, {params: {token: token}}).success(function (data) {
                    deferred.resolve(JSON.parse(data));
                });

                return deferred.promise;
            },

            watch: function (key, closure) {
                watches[key] = closure;
            }
        };

        return Gdb;
    });

And that’s all. You can see the whole project at github.

Integrating WebSockets with PHP applications. Silex and socket.io playing together.

WebSockets are great. We can start a persistent connection from our browser to our server and use this connection to send real time notifications to our users. Normally when we integrate WebSockets with an existing Web application, we need to face with one slight problem. Our Web application runs on a Web server (imagine, for example one Silex application). We can use a login form and ensure all requests are authorized (using a security layer). This problem is solved years ago. We can use Basic HTTP authentification, Digtest authentification, a session based authentication, token based authentificatio, OAuth, … The problem arrives when we add WebSocket server. WebSocket server is another serve. We can use node.js, ruby, or even PHP with Rachet. But how we can ensure that WebSocket server’s requests are also authenticated? We can try to share our authentification provider between both servers, but this solution is quite “exotic”. That was the idea behind my blog post: post some time ago. I’ve been thinkin a lot about it, and also read posts and speak with colleages about this subject. Finally I’m using the following solution. Let me explain it.

Websockets are bi-directional. We can get messages in the browser and send them from browser to server. Basically the solution is to disable the messages from the browser to the server via WebSockets. In fact HTML5 provides another tool to do that called Server Side Events (aka SSE), but SSE aren’t as widely used as WebSockets. Because of that I preffer to use WebSockets (without using the browser-to-server chanel) instead of SSE.

Let’s create a simple Silex application:

class Application extends Silex\Application
{
    use Silex\Application\TwigTrait;
}

$app = new Application();

$app->register(new Silex\Provider\TwigServiceProvider(), array(
    'twig.path' => __DIR__ . '/../views',
));

$app->get('/', function () use ($app) {
    return $app->render('home.twig');
});

$app->run();

And our main template with html file

<!DOCTYPE html>
<html>
<head>
    <title></title>
</head>
<body>
<script src="//localhost:8080/socket.io/socket.io.js"></script>
<script>
    var socket = io.connect('//localhost:8080');

    socket.on('id1', function (data) {
        console.log("mensage from websocket: " + data);
    });
</script>
</body>
</html>

Now we have Silex application that connects to a WebSockets server. I will use socket.io to build the WebSocket server:

var CONF = {
        IO: {HOST: '0.0.0.0', PORT: 8080}
    },
    io = require('socket.io').listen(CONF.IO.PORT, CONF.IO.HOST);

Whit this ultra minimal configuration we can connect from Silex application to WebSocket server and our web application will listen to messages marked as’id1′ from the WebSocket server but, how can we do to send messages? As I said before we only rely on Silex application (in this example there isn’t any security layer, but we can use our custom login). The trick is to create a new server within our node.js server. Start this server at localhost and perform a curl request from our Silex Application to our node.js server to send the WebSockets push notifications. The idea is:

  • User clicks a link in our html (generated by our Silex application)
  • This request is a standard Silex request (using our security layer)
  • Then Silex performs a curl request to node.js server.
  • If our Silex application and node.js application are in the same server we will create a new server at localhost. In this example we are going to use Express to do that.
  • Express server will handle requests from our Silex application (not from any other host) and will send WebSocket messages

Now our node.js application will change to

var CONF = {
        IO: {HOST: '0.0.0.0', PORT: 8080},
        EXPRESS: {HOST: 'localhost', PORT: 26300}
    },
    io = require('socket.io').listen(CONF.IO.PORT, CONF.IO.HOST),
    app = require('express')();

app.get('/emit/:id/:message', function (req, res) {
    io.sockets.emit(req.params.id, req.params.message);
    res.json('OK');
});

app.listen(CONF.EXPRESS.PORT, CONF.EXPRESS.HOST);

And our html template will change to (I will use Zepto to perform AJAX requests):

<!DOCTYPE html>
<html>
<head>
    <title></title>
</head>
<body>
<ul>
    <li><a href="#" onclick="emit('id1', 'hello')">emit('id1', 'hello')</a></li>
    <li><a href="#" onclick="emit('id1', 'bye')">emit('id1', 'bye')</a></li>
</ul>
<script src="//localhost:8080/socket.io/socket.io.js"></script>
<script src="//cdnjs.cloudflare.com/ajax/libs/zepto/1.1.1/zepto.min.js"></script>
<script>
    var socket = io.connect('//localhost:8080');

    socket.on('id1', function (data) {
        console.log("mensage from websocket: " + data);
    });

    function emit(id, message) {
        $.get('/emit/' + id +  '/' + message);
    }
</script>
</body>
</html>

Now we need to add another route to our Silex application

use Symfony\Component\HttpFoundation\Response;

$app->get('/emit/{id}/{message}', function ($id, $message) use ($app) {
    $s = curl_init();
    curl_setopt($s, CURLOPT_URL, "http://localhost:26300/emit/{$id}/{$message}");
    curl_setopt($s, CURLOPT_RETURNTRANSFER, true);
    $content = curl_exec($s);
    $status = curl_getinfo($s, CURLINFO_HTTP_CODE);
    curl_close($s);

    return new Response($content, $status);
});

And that’s all. Our Request from Silex arrives to WebSocket emmiter using a “secure” layer. OK, now you can said: yes, but anybody can connect to the WebSocket server and listen to ‘id1’ chanel, without any restriction. Yes, it’s true. But here you can use different solutions to ensure privacy. For example you can use a “non-obvious” chanel name based on cryptografic funcions. It’s not 100% secure, but it’s the same security layer than the standard session based security mechanism. If we know the cookie name we can perform a session hijacking attack and gain access to secure areas (without knowing the login credentials). We can generate chanel names like this: 7265cfe8fe3daa4c5069d609a0312dd2 with our Silex Application and send to the browser with an AJAX request.

I’ve created an small screencast to see the prototype in action. (source code in my github account)
In the screencast we can see how to install the prototype from github, install PHP’s vendors and the node js modules. We also can see how websocket works with two browser instances, and how to send messages directly accesing to Express application using localhost interface (and an error when I try to reach to Express server using a different network interface)

What do you think? Do you have another solution?

Playing with HTML5. Building a simple pool of WebWokers

Today I’m playing with the HTML5’s WebWorkers. Since our JavaScript code runs within a single thread in our WebBrowser, heavy scripts can lock the execution of our code. HTML5 gives us one tool called WebWorkers to allow us to run different threads within our Application.

Today I’m playing with one small example (that’s just an experiment). I want to create a pool of WebWebworkers and use them as a simple queue.
The usage of the library is similar than the usage of WebWorkers. The following code shows how to start the pool with 10 instances of our worker “js/worker.js”

    // new worker pool with 10 instances of the worker
    var pool = new WorkerPool('js/worker.js', 10);

    // register callback to worker's onmessage event
    pool.registerOnMessage(function (e) {
        console.log("Received (from worker): ", e.data);
    });

“js/worker.js” is a standard WebWorker. In this example our worker perform XHR request to a API server (in this case one Silex application)

importScripts('ajax.js');

self.addEventListener('message', function (e) {
    var data = e.data;

    switch (data.method) {
        case 'GET':
            getRequest(data.resource, function(xhr) {
                self.postMessage({status: xhr.status, responseText: xhr.responseText});
            });
            break;
    }
}, false);

WebWorkers runs in different scope than a traditional browser application. Not all JavaScript objects are available in the webworker scpope. For example we cannot access to “window” and DOM elements, but we can use XMLHttpRequest. In our experimente we’re going to preform XHR requests from the webworker.

The library creates a queue with the variable number of workers:

var WorkerPool;

WorkerPool = (function () {
    var pool = {};
    var poolIds = [];

    function WorkerPool(worker, numberOfWorkers) {
        this.worker = worker;
        this.numberOfWorkers = numberOfWorkers;

        for (var i = 0; i < this.numberOfWorkers; i++) {
            poolIds.push(i);
            var myWorker = new Worker(worker);

            +function (i) {
                myWorker.addEventListener('message', function (e) {
                    var data = e.data;
                    console.log("Worker #" + i + " finished. status: " + data.status);
                    pool[i].status = true;
                    poolIds.push(i);
                });
            }(i);

            pool[i] = {status: true, worker: myWorker};
        }

        this.getFreeWorkerId = function (callback) {
            if (poolIds.length > 0) {
                return callback(poolIds.pop());
            } else {
                var that = this;
                setTimeout(function () {
                    that.getFreeWorkerId(callback);
                }, 100);
            }
        }
    }

    WorkerPool.prototype.postMessage = function (data) {
        this.getFreeWorkerId(function (workerId) {
            pool[workerId].status = false;
            var worker = pool[workerId].worker;
            console.log("postMessage with worker #" + workerId);
            worker.postMessage(data);
        });
    };

    WorkerPool.prototype.registerOnMessage = function (callback) {
        for (var i = 0; i < this.numberOfWorkers; i++) {
            pool[i].worker.addEventListener('message', callback);
        }
    };

    WorkerPool.prototype.getFreeIds = function () {
        return poolIds;
    };

    return WorkerPool;
})();

The API server is a simple Silex application. This application also enables cross origin (CORS). You can read about it here.

use Silex\Application;
use Symfony\Component\HttpFoundation\Request;
use Symfony\Component\HttpFoundation\Response;

$app = new Application();

$app->get('/hello', function () use ($app) {
    error_log("GET /hello");
    sleep(2); // emulate slow process
    return $app->json(['method' => 'GET', 'response' => 'OK']);
});

$app->after(function (Request $request, Response $response) {
    $response->headers->set('Access-Control-Allow-Origin', '*');
});

$app->run();

You can see the whole code in my github account.

Here one small screencast to see the application in action.

Real time monitoring PHP applications with websockets and node.js

The inspection of the error logs is a common way to detect errors and bugs. We also can show errors on-screen within our developement server, or we even can use great tools like firePHP to show our PHP errors and warnings inside our firebug console. That’s cool, but we only can see our session errors/warnings. If we want to see another’s errors we need to inspect the error log. tail -f is our friend, but we need to surf against all the warnings of all sessions to see our desired ones. Because of that I want to build a tool to monitor my PHP applications in real-time. Let’s start:

What’s the idea? The idea is catch all PHP’s errors and warnings at run time and send them to a node.js HTTP server. This server will work similar than a chat server but our clients will only be able to read the server’s logs. Basically the applications have three parts: the node.js server, the web client (html5) and the server part (PHP). Let me explain a bit each part:

The node Server

Basically it has two parts: a http server to handle the PHP errors/warnings and a websocket server to manage the realtime communications with the browser. When I say that I’m using websockets that’s means the web client will only work with a browser with websocket support like chrome. Anyway it’s pretty straightforward swap from a websocket sever to a socket.io server to use it with every browser. But websockets seems to be the future, so I will use websockets in this example.

The http server:

http.createServer(function (req, res) {
    var remoteAdrress = req.socket.remoteAddress;
    if (allowedIP.indexOf(remoteAdrress) >= 0) {
        res.writeHead(200, {
            'Content-Type': 'text/plain'
        });
        res.end('Ok\n');
        try {
            var parsedUrl = url.parse(req.url, true);
            var type = parsedUrl.query.type;
            var logString = parsedUrl.query.logString;
            var ip = eval(parsedUrl.query.logString)[0];
            if (inspectingUrl == "" ||  inspectingUrl == ip) {
                clients.forEach(function(client) {
                    client.write(logString);
                });
            }
        } catch(err) {
            console.log("500 to " + remoteAdrress);
            res.writeHead(500, {
                'Content-Type': 'text/plain'
            });
            res.end('System Error\n');
        }
    } else {
        console.log("401 to " + remoteAdrress);
        res.writeHead(401, {
            'Content-Type': 'text/plain'
        });
        res.end('Not Authorized\n');
    }
}).listen(httpConf.port, httpConf.host);

and the web socket server:

var inspectingUrl = undefined;

ws.createServer(function(websocket) {
    websocket.on('connect', function(resource) {
        var parsedUrl = url.parse(resource, true);
        inspectingUrl = parsedUrl.query.ip;
        clients.push(websocket);
    });

    websocket.on('close', function() {
        var pos = clients.indexOf(websocket);
        if (pos >= 0) {
            clients.splice(pos, 1);
        }
    });

}).listen(wsConf.port, wsConf.host);

If you want to know more about node.js and see more examples, have a look to the great site: http://nodetuts.com/. In this site Pedro Teixeira will show examples and node.js tutorials. In fact my node.js http + websoket server is a mix of two tutorials from this site.

The web client.

The web client is a simple websockets application. We will handle the websockets connection, reconnect if it dies and a bit more. I’s based on node.js chat demo

<?php $ip = filter_input(INPUT_GET, 'ip', FILTER_SANITIZE_STRING); ?>

        Real time <?= $ip ?> monitor
<script type="text/javascript" src="http://ajax.googleapis.com/ajax/libs/jquery/1.4.3/jquery.min.js"></script><script type="text/javascript">// <![CDATA[
            selectedIp = '<?= $ip ?>';

// ]]></script>
<script type="text/javascript" src="js.js"></script>
</pre>
<div id="toolbar">
<ul id="status">
	<li>Socket status: <span id="socketStatus">Conecting ...</span></li>
	<li>IP: <!--?= $ip == '' ? 'all' : $ip . " <a href='?ip='-->[all]" ?></li>
	<li>count: <span id="count">0</span></li>
</ul>
</div>
<pre>


And the javascript magic

var timeout = 5000;
var wsServer = '192.168.2.2:8880';
var unread = 0;
var focus = false;

var count = 0;
function updateCount() {
    count++;
    $("#count").text(count);
}

function cleanString(string) {
    return string.replace(/&/g,"&amp;").replace(/</g,"&lt;").replace(/>/g,"&gt;");
}

function updateUptime () {
    var now = new Date();
    $("#uptime").text(now.toRelativeTime());
}

function updateTitle(){
    if (unread) {
        document.title = "(" + unread.toString() + ") Real time " + selectedIp + " monitor";
    } else {
        document.title = "Real time " + selectedIp + " monitor";
    }
}

function pad(n) {
    return ("0" + n).slice(-2);
}

function startWs(ip) {
    try {
        ws = new WebSocket("ws://" + wsServer + "?ip=" + ip);
        $('#toolbar').css('background', '#65A33F');
        $('#socketStatus').html('Connected to ' + wsServer);
        //console.log("startWs:" + ip);
        //listen for browser events so we know to update the document title
        $(window).bind("blur", function() {
            focus = false;
            updateTitle();
        });

        $(window).bind("focus", function() {
            focus = true;
            unread = 0;
            updateTitle();
        });
    } catch (err) {
        //console.log(err);
        setTimeout(startWs, timeout);
    }

    ws.onmessage = function(event) {
        unread++;
        updateTitle();
        var now = new Date();
        var hh = pad(now.getHours());
        var mm = pad(now.getMinutes());
        var ss = pad(now.getSeconds());

        var timeMark = '[' + hh + ':' + mm + ':' + ss + '] ';
        logString = eval(event.data);
        var host = logString[0];
        var line = "<table class='message'><tr><td width='1%' class='date'>" + timeMark + "</td><td width='1%' valign='top' class='host'><a href=?ip=" + host + ">" + host + "</a></td>";
        line += "<td class='msg-text' width='98%'>" + logString[1]; + "</td></tr>";
        if (logString[2]) {
            line += "<tr><td>&nbsp;</td><td colspan='3' class='msg-text'>" + logString[2] + "</td></tr>";
        }

        $('#log').append(line);
        updateCount();
        window.scrollBy(0, 100000000000000000);
    };

    ws.onclose = function(){
        //console.log("ws.onclose");
        $('#toolbar').css('background', '#933');
        $('#socketStatus').html('Disconected');
        setTimeout(function() {startWs(selectedIp)}, timeout);
    }
}

$(document).ready(function() {
    startWs(selectedIp);
});

The server part:

The server part will handle silently all PHP warnings and errors and it will send them to the node server. The idea is to place a minimal PHP line of code at the beginning of the application that we want to monitor. Imagine the following piece of PHP code

$a = $var[1];
$a = 1/0;
class Dummy
{
    static function err()
    {
        throw new Exception("error");
    }
}
Dummy1::err();

it will throw:
A notice: Undefined variable: var
A warning: Division by zero
An Uncaught exception ‘Exception’ with message ‘error’

So we will add our small library to catch those errors and send them to the node server

include('client/NodeLog.php');
NodeLog::init('192.168.2.2');

$a = $var[1];
$a = 1/0;
class Dummy
{
    static function err()
    {
        throw new Exception("error");
    }
}
Dummy1::err();

The script will work in the same way than the fist version but if we start our node.js server in a console:

$ node server.js
HTTP server started at 192.168.2.2::5672
Web Socket server started at 192.168.2.2::8880

We will see those errors/warnings in real-time when we start our browser

Here we can see a small screencast with the working application:

This is the server side library:

class NodeLog
{
    const NODE_DEF_HOST = '127.0.0.1';
    const NODE_DEF_PORT = 5672;

    private $_host;
    private $_port;

    /**
     * @param String $host
     * @param Integer $port
     * @return NodeLog
     */
    static function connect($host = null, $port = null)
    {
        return new self(is_null($host) ? self::$_defHost : $host, is_null($port) ? self::$_defPort : $port);
    }

    function __construct($host, $port)
    {
        $this->_host = $host;
        $this->_port = $port;
    }

    /**
     * @param String $log
     * @return Array array($status, $response)
     */
    public function log($log)
    {
        list($status, $response) = $this->send(json_encode($log));
        return array($status, $response);
    }

    private function send($log)
    {
        $url = "http://{$this->_host}:{$this->_port}?logString=" . urlencode($log);
        $ch = curl_init();
        curl_setopt($ch, CURLOPT_URL, $url);
        curl_setopt($ch, CURLOPT_NOBODY, true);
        curl_setopt($ch, CURLOPT_RETURNTRANSFER, true);

        $response = curl_exec($ch);
        $status   = curl_getinfo($ch, CURLINFO_HTTP_CODE);
        curl_close($ch);

        return array($status, $response);
    }

    static function getip() {
        $realip = '0.0.0.0';
        if ($_SERVER) {
            if ( isset($_SERVER['HTTP_X_FORWARDED_FOR']) && $_SERVER['HTTP_X_FORWARDED_FOR'] ) {
                $realip = $_SERVER["HTTP_X_FORWARDED_FOR"];
            } elseif ( isset($_SERVER['HTTP_CLIENT_IP']) && $_SERVER["HTTP_CLIENT_IP"] ) {
                $realip = $_SERVER["HTTP_CLIENT_IP"];
            } else {
                $realip = $_SERVER["REMOTE_ADDR"];
            }
        } else {
            if ( getenv('HTTP_X_FORWARDED_FOR') ) {
                $realip = getenv('HTTP_X_FORWARDED_FOR');
            } elseif ( getenv('HTTP_CLIENT_IP') ) {
                $realip = getenv('HTTP_CLIENT_IP');
            } else {
                $realip = getenv('REMOTE_ADDR');
            }
        }
        return $realip;
    }

    public static function getErrorName($err)
    {
        $errors = array(
            E_ERROR             => 'ERROR',
            E_RECOVERABLE_ERROR => 'RECOVERABLE_ERROR',
            E_WARNING           => 'WARNING',
            E_PARSE             => 'PARSE',
            E_NOTICE            => 'NOTICE',
            E_STRICT            => 'STRICT',
            E_DEPRECATED        => 'DEPRECATED',
            E_CORE_ERROR        => 'CORE_ERROR',
            E_CORE_WARNING      => 'CORE_WARNING',
            E_COMPILE_ERROR     => 'COMPILE_ERROR',
            E_COMPILE_WARNING   => 'COMPILE_WARNING',
            E_USER_ERROR        => 'USER_ERROR',
            E_USER_WARNING      => 'USER_WARNING',
            E_USER_NOTICE       => 'USER_NOTICE',
            E_USER_DEPRECATED   => 'USER_DEPRECATED',
        );
        return $errors[$err];
    }

    private static function set_error_handler($nodeHost, $nodePort)
    {
        set_error_handler(function ($errno, $errstr, $errfile, $errline) use($nodeHost, $nodePort) {
            $err = NodeLog::getErrorName($errno);
            /*
            if (!(error_reporting() & $errno)) {
                // This error code is not included in error_reporting
                return;
            }
            */
            $log = array(
                NodeLog::getip(),
                "<strong class="{$err}">{$err}</strong> {$errfile}:{$errline}",
                nl2br($errstr)
            );
            NodeLog::connect($nodeHost, $nodePort)->log($log);
            return false;
        });
    }

    private static function register_exceptionHandler($nodeHost, $nodePort)
    {
        set_exception_handler(function($exception) use($nodeHost, $nodePort) {
            $exceptionName = get_class($exception);
            $message = $exception->getMessage();
            $file = $exception->getFile();
            $line = $exception->getLine();
            $trace = $exception->getTraceAsString();

            $msg = count($trace) > 0 ? "Stack trace:\n{$trace}" : null;
            $log = array(
                NodeLog::getip(),
                nl2br("<strong class="ERROR">Uncaught exception '{$exceptionName}'</strong> with message '{$message}' in {$file}:{$line}"),
                nl2br($msg)
            );
            NodeLog::connect($nodeHost, $nodePort)->log($log);
            return false;
        });
    }

    private static function register_shutdown_function($nodeHost, $nodePort)
    {
        register_shutdown_function(function() use($nodeHost, $nodePort) {
            $error = error_get_last();

            if ($error['type'] == E_ERROR) {
                $err = NodeLog::getErrorName($error['type']);
                $log = array(
                    NodeLog::getip(),
                    "<strong class="{$err}">{$err}</strong> {$error['file']}:{$error['line']}",
                    nl2br($error['message'])
                );
                NodeLog::connect($nodeHost, $nodePort)->log($log);
            }
            echo NodeLog::connect($nodeHost, $nodePort)->end();
        });
    }

    private static $_defHost = self::NODE_DEF_HOST;
    private static $_defPort = self::NODE_DEF_PORT;

    /**
     * @param String $host
     * @param Integer $port
     * @return NodeLog
     */
    public static function init($host = self::NODE_DEF_HOST, $port = self::NODE_DEF_PORT)
    {
        self::$_defHost = $host;
        self::$_defPort = $port;

        self::register_exceptionHandler($host, $port);
        self::set_error_handler($host, $port);
        self::register_shutdown_function($host, $port);

        $node = self::connect($host, $port);
        $node->start();
        return $node;
    }

    private static $time;
    private static $mem;

    public function start()
    {
        self::$time = microtime(TRUE);
        self::$mem = memory_get_usage();
        $log = array(NodeLog::getip(), "<strong class="OK">Start</strong> >>>> {$_SERVER['REQUEST_URI']}");
        $this->log($log);
    }

    public function end()
    {
        $mem = (memory_get_usage() - self::$mem) / (1024 * 1024);
        $time = microtime(TRUE) - self::$time;
        $log = array(NodeLog::getip(), "<strong class="OK">End</strong> <<<< mem: {$mem} time {$time}");         $this->log($log);
    }
}

And of course the full code on gitHub: RealTimeMonitor