Alexa skill and account linking with serverless and Cognito

Sometimes when we’re building one Alexa skill, we need to identify the user. To do that Alexa provides account linking. Basically we need an Oauth2 server to link our account within our Alexa skill. AWS provide us a managed Oauth2 service called Cognito, so we can use use Cognito identity pool to handle the authentication for our Alexa Skills.

In this example I’ve followed the following blog post. Cognito is is a bit weird to set up but after following all the steps we can use Account Linking in Alexa skill.

There’s also a good sample skill here. I’ve studied a little bit this example and create a working prototype by my own, basically to understand the process.

That’s my skill:

const Alexa = require('ask-sdk')

const RequestInterceptor = require('./interceptors/RequestInterceptor')
const ResponseInterceptor = require('./interceptors/ResponseInterceptor')
const LocalizationInterceptor = require('./interceptors/LocalizationInterceptor')
const GetLinkedInfoInterceptor = require('./interceptors/GetLinkedInfoInterceptor')

const LaunchRequestHandler = require('./handlers/LaunchRequestHandler')
const CheckAccountLinkedHandler = require('./handlers/CheckAccountLinkedHandler')
const HelloWorldIntentHandler = require('./handlers/HelloWorldIntentHandler')
const HelpIntentHandler = require('./handlers/HelpIntentHandler')
const CancelAndStopIntentHandler = require('./handlers/CancelAndStopIntentHandler')
const SessionEndedRequestHandler = require('./handlers/SessionEndedRequestHandler')
const FallbackHandler = require('./handlers/FallbackHandler')
const ErrorHandler = require('./handlers/ErrorHandler')
const RequestInfoHandler = require('./handlers/RequestInfoHandler')

let skill

module.exports.handler = async (event, context) => {
  if (!skill) {
    skill = Alexa.SkillBuilders.custom().
      addRequestInterceptors(
        RequestInterceptor,
        ResponseInterceptor,
        LocalizationInterceptor,
        GetLinkedInfoInterceptor
      ).
      addRequestHandlers(
        LaunchRequestHandler,
        CheckAccountLinkedHandler,
        HelloWorldIntentHandler,
        RequestInfoHandler,
        HelpIntentHandler,
        CancelAndStopIntentHandler,
        SessionEndedRequestHandler,
        FallbackHandler).
      addErrorHandlers(
        ErrorHandler).
      create()
  }

  return await skill.invoke(event, context)
}

The most important thing here is maybe GetLinkedInfoInterceptor.

const log = require('../lib/log')
const cognito = require('../lib/cognito')
const utils = require('../lib/utils')

const GetLinkedInfoInterceptor = {
  async process (handlerInput) {
    if (utils.isAccountLinked(handlerInput)) {
      const userData = await cognito.getUserData(handlerInput.requestEnvelope.session.user.accessToken)
      log.info('GetLinkedInfoInterceptor: getUserData: ', userData)
      const sessionAttributes = handlerInput.attributesManager.getSessionAttributes()
      if (userData.Username !== undefined) {
        sessionAttributes.auth = true
        sessionAttributes.emailAddress = cognito.getAttribute(userData.UserAttributes, 'email')
        sessionAttributes.userName = userData.Username
        handlerInput.attributesManager.setSessionAttributes(sessionAttributes)
      } else {
        sessionAttributes.auth = false
        log.error('GetLinkedInfoInterceptor: No user data was found.')
      }
    }
  }
}

module.exports = GetLinkedInfoInterceptor

This interceptor retrieves the user info from cognito when we provide the accessToken. We can obtain the accessToken from session (if our skill is account linked). Then we inject the user information (in my example the email and the username of the Cognito identity pool) into the session.

Then we can create one intent in our request handlers chain called CheckAccountLinkedHandler. With this intent we check if our skill is account linked. If not we can provide ‘withLinkAccountCard’ to force user to login with Cognito and link the skill’s account.

const utils = require('../lib/utils')

const CheckAccountLinkedHandler = {
  canHandle (handlerInput) {
    return !utils.isAccountLinked(handlerInput)
  },
  handle (handlerInput) {
    const requestAttributes = handlerInput.attributesManager.getRequestAttributes()
    const speakOutput = requestAttributes.t('NEED_TO_LINK_MESSAGE', 'SKILL_NAME')
    return handlerInput.responseBuilder.
      speak(speakOutput).
      withLinkAccountCard().
      getResponse()
  }
}

module.exports = CheckAccountLinkedHandler

Later we can create one intent to give the information to the user of maybe, in another case, perform an authorization workflow

const RequestInfoHandler = {
  canHandle (handlerInput) {
    const request = handlerInput.requestEnvelope.request
    return (request.type === 'IntentRequest'
      && request.intent.name === 'RequestInfoIntent')
  },
  handle (handlerInput) {
    const request = handlerInput.requestEnvelope.request
    const requestAttributes = handlerInput.attributesManager.getRequestAttributes()
    const sessionAttributes = handlerInput.attributesManager.getSessionAttributes()
    const repromptOutput = requestAttributes.t('FOLLOW_UP_MESSAGE')
    const cardTitle = requestAttributes.t('SKILL_NAME')

    let speakOutput = ''

    let inquiryTypeId = getResolvedSlotIDValue(request, 'infoTypeRequested')
    if (!inquiryTypeId) {
      inquiryTypeId = 'fullProfile'
      speakOutput += requestAttributes.t('NOT_SURE_OF_TYPE_MESSAGE')
    } else {
      if (inquiryTypeId === 'emailAddress' || inquiryTypeId === 'fullProfile') {
        speakOutput += requestAttributes.t('REPORT_EMAIL_ADDRESS', sessionAttributes.emailAddress)
      }

      if (inquiryTypeId === 'userName' || inquiryTypeId === 'fullProfile') {
        speakOutput += requestAttributes.t('REPORT_USERNAME', sessionAttributes.userName)
      }
    }

    speakOutput += repromptOutput

    return handlerInput.responseBuilder.
      speak(speakOutput).
      reprompt(repromptOutput).
      withSimpleCard(cardTitle, speakOutput).
      getResponse()
  }
}

module.exports = RequestInfoHandler

And basically that’s all. In fact isn’t very different than traditional web authentication. Maybe the most complicated part especially if you’re not used to Oauth2 is to configure Cognito properly.

Here you can see the source code in my github.

Using cache buster with OpenUI5 outside SCP

When we work with SPAs and web applications we need to handle with the browser’s cache. Sometimes we change our static files but the client’s browser uses a cached version of the file instead of the new one. We can tell the user: Please empty your cache to use the new version. But most of the times the user don’t know what we’re speaking about, and we have a problem. There’s a technique called cache buster used to bypass this issue. It consists on to change the name of the file (or adding an extra parameter), basically to ensure that the browser will send a different request to the server to prevent the browser from reusing the cached version of the file.

When we work with sapui5 application over SCP, we only need to use the cachebuster version of sap-ui-core

<script id="sap-ui-bootstrap"
      src="https://sapui5.hana.ondemand.com/resources/sap-ui-cachebuster/sap-ui-core.js"
      data-sap-ui-libs="sap.m"
      data-sap-ui-theme="sap_belize"
      data-sap-ui-compatVersion="edge"
      data-sap-ui-appCacheBuster=""
      data-sap-ui-preload="async"
      data-sap-ui-resourceroots='{"app": ""}'
      data-sap-ui-frameOptions="trusted">
</script>

With this configuration, our framework will use a “cache buster friendly” version of our files and SCP will serve them properly.

For example, when our framework wants the /dist/Component.js file, the browser will request /dist/~1541685070813~/Component.js to the server. And the server will server the file /dist/Component.js. As I said before when we work with SCP, our standard build process automatically takes care about it. It creates a file called sap-ui-cachebuster-info.json where we can find all our files with one kind of hash that our build process changes each time our file is changed.

{
  "Component-dbg.js": 1545316733136,
  "Component-preload.js": 1545316733226,
  "Component.js": 1541685070813,
  ...
}

It works like a charm but I not always use SCP. Sometimes I use OpenUI5 in one nginx server, for example. So cache buster “doesn’t work”. That’s a problem because I need to handle with browser caches again each time we deploy the new version of the application. I wanted to solve the issue. Let me explain how I did it.

Since I was using one Lumen/PHP server to the backend, my first idea was to create a dynamic route in Lumen to handle cache-buster urls. With this approach I know I can solve the problem but there’s something that I did not like: I’ll use a dynamic server to serve static content. I don’t have a huge traffic. I can use this approach but it isn’t beautiful.

My second approach was: Ok I’ve got a sap-ui-cachebuster-info.json file where I can see all the files that cache buster will use and their hashes. So, Why not I create those files in my build script. With this approach I will create the full static structure each time I deploy de application, without needing any server side scripting language to generate dynamic content. OpenUI5 uses grunt so I can create a simple grunt task to create my files.

'use strict';

var fs = require('fs');
var path = require('path');
var chalk = require('chalk');

module.exports = function(grunt) {
  var name = 'cacheBuster';
  var info = 'Generates Cache buster files';

  var cacheBuster = function() {
    var config = grunt.config.get(name);
    var data, t, src, dest, dir, prop;

    data = grunt.file.readJSON(config.src + '/sap-ui-cachebuster-info.json');
    for (prop in data) {
      if (data.hasOwnProperty(prop)) {
        t = data[prop];
        src = config.src + '/' + prop;
        dest = config.src + '/~' + t + '~/' + prop;
        grunt.verbose.writeln(
            name + ': ' + chalk.cyan(path.basename(src)) + ' to ' +
            chalk.cyan(dest) + '.');
        dir = path.dirname(dest);
        grunt.file.mkdir(dir);
        fs.copyFileSync(src, dest);
      }
    }
  };

  grunt.registerMultiTask(name, info, cacheBuster);
};

I deploy my grunt task to npm so when I need to use it I only need to:

Install the task

npm install gonzalo123-cachebuster

Add the task to my gruntfile

require('gonzalo123-cachebuster')(grunt);

and set up the path where ui5 task generates our dist files

  grunt.config.merge({
    pkg: grunt.file.readJSON('package.json'),
    ...
    cacheBuster: {
      src: 'dist'
    }
  });

And that’s all. My users with enjoy (or suffer) the new versions of my applications without having problems with cached files.

Grunt task available in my github

Working with SAPUI5 locally and deploying in SCP

When I work with SAPUI5 projects I normally use WebIDE. WebIDE is a great tool but I’m more confortable working locally with my local IDE.
I’ve this idea in my mind but I never find the time slot to work on it. Finally, after finding this project from Holger Schäfer in github, I realized how easy it’s and I started to work with this project and adapt it to my needs.

The base of this project is localneo. Localneo starts a http server based on neo-app.json file. That means we’re going to use the same configuration than we’ve in production (in SCP). Of course we’ll need destinations. We only need one extra file called destination.json where we’ll set up our destinations (it creates one http proxy, nothing else).

In this project I’ll create a simple example application that works with one API server.

The backend

I’ll use in this example one PHP/Lumen application:

$app->router->group(['prefix' => '/api', 'middleware' => Middleware\AuthMiddleware::NAME], function (Router $route) {
    $route->get('/', Handlers\HomeHandler::class);
    $route->post('/', Handlers\HomeHandler::class);
});

Basically it has two routes. In fact both routes are the same. One accept POST request and another one GET requests.
They’ll answer with the current date in a json file

namespace App\Http\Handlers;

class HomeHandler
{
    public function __invoke()
    {
        return ['date' => (new \DateTime())->format('c')];
    }
}

Both routes are under one middleware to provide the authentication.

namespace App\Http\Middleware;

use Closure;
use Illuminate\Http\Request;

class AuthMiddleware
{
    public const NAME = 'auth';

    public function handle(Request $request, Closure $next)
    {
        $user = $request->getUser();
        $pass = $request->getPassword();

        if (!$this->validateDestinationCredentials($user, $pass)) {
            $headers = ['WWW-Authenticate' => 'Basic'];

            return response('Backend Login', 401, $headers);
        }

        $authorizationHeader = $request->header('Authorization2');
        if (!$this->validateApplicationToken($authorizationHeader)) {
            return response('Invalid token ', 403);
        }

        return $next($request);

    }

    private function validateApplicationToken($authorizationHeader)
    {
        $token = str_replace('Bearer ', null, $authorizationHeader);

        return $token === getenv('APP_TOKEN');
    }

    private function validateDestinationCredentials($user, $pass)
    {
        if (!($user === getenv('DESTINATION_USER') && $pass === getenv('DESTINATION_PASS'))) {
            return false;
        }

        return true;
    }
}

That means our service will need Basic Authentication and also one Token based authentication.

The frontend

Our ui5 application will use one destination called BACKEND. We’ll configure it in our neo-app.json file

    ...
    {
      "path": "/backend",
      "target": {
        "type": "destination",
        "name": "BACKEND"
      },
      "description": "BACKEND"
    }
    ...

Now we’ll create our extra file called destinations.json. Localneo will use this file to create a web server to serve our frontend locally (using the destination).

As I said before our backend will need a Basic Authentication. This Authentication will be set up in the destination configuration

{
  "server": {
    "port": "8080",
    "path": "/webapp/index.html",
    "open": true
  },
  "service": {
    "sapui5": {
      "useSAPUI5": true,
      "version": "1.54.8"
    }
  },
  "destinations": {
    "BACKEND": {
      "url": "http://localhost:8888",
      "auth": "superSecretUser:superSecretPassword"
    }
  }
}

Our application will be a simple list of items

<mvc:View controllerName="gonzalo123.controller.App" xmlns:html="http://www.w3.org/1999/xhtml" xmlns:mvc="sap.ui.core.mvc" displayBlock="true" xmlns="sap.m">
  <App id="idAppControl">
    <pages>
      <Page title="{i18n>appTitle}">
        <content>
          <List>
            <items>
              <ObjectListItem id="GET" title="{i18n>get}"
                              type="Active"
                              press="getPressHandle">
                <attributes>
                  <ObjectAttribute id="getCount" text="{/Data/get/count}"/>
                </attributes>
              </ObjectListItem>
              <ObjectListItem id="POST" title="{i18n>post}"
                              type="Active"
                              press="postPressHandle">
                <attributes>
                  <ObjectAttribute id="postCount" text="{/Data/post/count}"/>
                </attributes>
              </ObjectListItem>
            </items>
          </List>
        </content>
      </Page>
    </pages>
  </App>
</mvc:View>

When we click on GET we’ll perform a GET request to the backend and we’ll increment the counter. The same with POST.
We’ll also show de date provided by the backend in a MessageToast.

sap.ui.define([
  "sap/ui/core/mvc/Controller",
  "sap/ui/model/json/JSONModel",
  'sap/m/MessageToast',
  "gonzalo123/model/api"
], function (Controller, JSONModel, MessageToast, api) {
  "use strict";

  return Controller.extend("gonzalo123.controller.App", {
    model: new JSONModel({
      Data: {get: {count: 0}, post: {count: 0}}
    }),

    onInit: function () {
      this.getView().setModel(this.model);
    },

    getPressHandle: function () {
      api.get("/", {}).then(function (data) {
        var count = this.model.getProperty('/Data/get/count');
        MessageToast.show("Pressed : " + data.date);
        this.model.setProperty('/Data/get/count', ++count);
      }.bind(this));
    },

    postPressHandle: function () {
      var count = this.model.getProperty('/Data/post/count');
      api.post("/", {}).then(function (data) {
        MessageToast.show("Pressed : " + data.date);
        this.model.setProperty('/Data/post/count', ++count);
      }.bind(this));
    }
  });
});

Start our application locally

Now we only need to start the backend

php -S 0.0.0.0:8888 -t www

And the frontend
localneo

Debugging locally

As we’re working locally we can use local debugger in the backend and we can use breakpoints, inspect variables, etc.

We also can debug the frontend using Chrome developer tools. We can also map our local filesystem in the browser and we can save files directly in Chrome.

Testing

We can test the backend using phpunit and run our tests with
composer run test

Here we can see a simple test of the backend

    public function testAuthorizedRequest()
    {
        $headers = [
            'Authorization2' => 'Bearer superSecretToken',
            'Content-Type'   => 'application/json',
            'Authorization'  => 'Basic ' . base64_encode('superSecretUser:superSecretPassword'),
        ];

        $this->json('GET', '/api', [], $headers)
            ->assertResponseStatus(200);
        $this->json('POST', '/api', [], $headers)
            ->assertResponseStatus(200);
    }


    public function testRequests()
    {

        $headers = [
            'Authorization2' => 'Bearer superSecretToken',
            'Content-Type'   => 'application/json',
            'Authorization'  => 'Basic ' . base64_encode('superSecretUser:superSecretPassword'),
        ];

        $this->json('GET', '/api', [], $headers)
            ->seeJsonStructure(['date']);
        $this->json('POST', '/api', [], $headers)
            ->seeJsonStructure(['date']);
    }

We also can test the frontend using OPA5.

As Backend is already tested we’ll mock the backend here using sinon (https://sinonjs.org/) server

...
    opaTest("When I click on GET the GET counter should increment by one", function (Given, When, Then) {
      Given.iStartMyApp("./integration/Test1/index.html");
      When.iClickOnGET();
      Then.getCounterShouldBeIncrementedByOne().and.iTeardownMyAppFrame();
    });

    opaTest("When I click on POST the POST counter should increment by one", function (Given, When, Then) {
      Given.iStartMyApp("./integration/Test1/index.html");
      When.iClickOnPOST();
      Then.postCounterShouldBeIncrementedByOne().and.iTeardownMyAppFrame();
    });
...

The configuration of our sinon server:

sap.ui.define(
  ["test/server"],
  function (server) {
    "use strict";

    return {
      init: function () {
        var oServer = server.initServer("/backend/api");

        oServer.respondWith("GET", /backend\/api/, [200, {
          "Content-Type": "application/json"
        }, JSON.stringify({
          "date": "2018-07-29T18:44:57+02:00"
        })]);

        oServer.respondWith("POST", /backend\/api/, [200, {
          "Content-Type": "application/json"
        }, JSON.stringify({
          "date": "2018-07-29T18:44:57+02:00"
        })]);
      }
    };
  }
);

The build process

Before uploading the application to SCP we need to build it. The build process optimizes the files and creates Component-preload.js and sap-ui-cachebuster-info.json file (to ensure our users aren’t using a cached version of our application)
We’ll use grunt to build our application. Here we can see our Gruntfile.js

module.exports = function (grunt) {
  "use strict";

  require('load-grunt-tasks')(grunt);
  require('time-grunt')(grunt);

  grunt.config.merge({
    pkg: grunt.file.readJSON('package.json'),
    watch: {
      js: {
        files: ['Gruntfile.js', 'webapp/**/*.js', 'webapp/**/*.properties'],
        tasks: ['jshint'],
        options: {
          livereload: true
        }
      },

      livereload: {
        options: {
          livereload: true
        },
        files: [
          'webapp/**/*.html',
          'webapp/**/*.js',
          'webapp/**/*.css'
        ]
      }
    }
  });

  grunt.registerTask("default", [
    "clean",
    "lint",
    "build"
  ]);
};

In our Gruntfile I’ve also configure a watcher to build the application automatically and triggering the live reload (to reload my browser every time I change the frontend)

Now I can build the dist folder with the command:

grunt

Deploy to SCP

The deploy process is very well explained in the Holger’s repository
Basically we need to download MTA Archive builder and extract it to ./ci/tools/mta.jar.
Also we need SAP Cloud Platform Neo Environment SDK (./ci/tools/neo-java-web-sdk/)
We can download those binaries from here

Then we need to fulfill our scp credentials in ./ci/deploy-mta.properties and configure our application in ./ci/mta.yaml
Finally we will run ./ci/deploy-mta.sh (here we can set up our scp password in order to input it within each deploy)

Full code (frontend and backend) in my github account

Happy logins. Only the happy user will pass

Login forms are bored. In this example we’re going to create an especial login form. Only for happy users. Happiness is something complicated, but at least, one smile is more easy to obtain, and all is better with one smile :). Our login form will only appear if the user smiles. Let’s start.

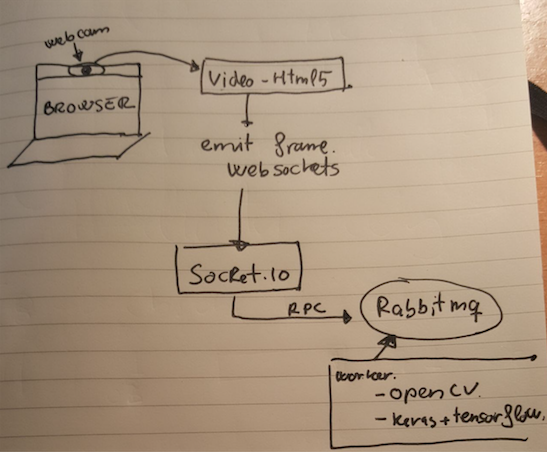
I must admit that this project is just an excuse to play with different technologies that I wanted to play. Weeks ago I discovered one library called face_classification. With this library I can perform emotion classification from a picture. The idea is simple. We create RabbitMQ RPC server script that answers with the emotion of the face within a picture. Then we obtain on frame from the video stream of the webcam (with HTML5) and we send this frame using websocket to a socket.io server. This websocket server (node) ask to the RabbitMQ RPC the emotion and it sends back to the browser the emotion and a the original picture with a rectangle over the face.

Frontend

As well as we’re going to use socket.io for websockets we will use the same script to serve the frontend (the login and the HTML5 video capture)

<!doctype html>
<html>
<head>
    <title>Happy login</title>
    <link rel="stylesheet" href="css/app.css">
</head>
<body>

<div id="login-page" class="login-page">
    <div class="form">
        <h1 id="nonHappy" style="display: block;">Only the happy user will pass</h1>
        <form id="happyForm" class="login-form" style="display: none" onsubmit="return false;">
            <input id="user" type="text" placeholder="username"/>
            <input id="pass" type="password" placeholder="password"/>
            <button id="login">login</button>
            <p></p>
            <img id="smile" width="426" height="320" src=""/>
        </form>
        <div id="video">
            <video style="display:none;"></video>
            <canvas id="canvas" style="display:none"></canvas>
            <canvas id="canvas-face" width="426" height="320"></canvas>
        </div>
    </div>
</div>

<div id="private" style="display: none;">
    <h1>Private page</h1>
</div>

<script src="https://code.jquery.com/jquery-3.2.1.min.js" integrity="sha256-hwg4gsxgFZhOsEEamdOYGBf13FyQuiTwlAQgxVSNgt4=" crossorigin="anonymous"></script>
<script src="https://unpkg.com/sweetalert/dist/sweetalert.min.js"></script>
<script type="text/javascript" src="/socket.io/socket.io.js"></script>
<script type="text/javascript" src="/js/app.js"></script>
</body>
</html>

Here we’ll connect to the websocket and we’ll emit the webcam frame to the server. We´ll also be listening to one event called ‘response’ where server will notify us when one emotion has been detected.

let socket = io.connect(location.origin),
    img = new Image(),
    canvasFace = document.getElementById('canvas-face'),
    context = canvasFace.getContext('2d'),
    canvas = document.getElementById('canvas'),
    width = 640,
    height = 480,
    delay = 1000,
    jpgQuality = 0.6,
    isHappy = false;

socket.on('response', function (r) {
    let data = JSON.parse(r);
    if (data.length > 0 && data[0].hasOwnProperty('emotion')) {
        if (isHappy === false && data[0]['emotion'] === 'happy') {
            isHappy = true;
            swal({
                title: "Good!",
                text: "All is better with one smile!",
                icon: "success",
                buttons: false,
                timer: 2000,
            });

            $('#nonHappy').hide();
            $('#video').hide();
            $('#happyForm').show();
            $('#smile')[0].src = 'data:image/png;base64,' + data[0].image;
        }

        img.onload = function () {
            context.drawImage(this, 0, 0, canvasFace.width, canvasFace.height);
        };

        img.src = 'data:image/png;base64,' + data[0].image;
    }
});

navigator.getMedia = (navigator.getUserMedia || navigator.webkitGetUserMedia || navigator.mozGetUserMedia);

navigator.getMedia({video: true, audio: false}, (mediaStream) => {
    let video = document.getElementsByTagName('video')[0];
    video.src = window.URL.createObjectURL(mediaStream);
    video.play();
    setInterval(((video) => {
        return function () {
            let context = canvas.getContext('2d');
            canvas.width = width;
            canvas.height = height;
            context.drawImage(video, 0, 0, width, height);
            socket.emit('img', canvas.toDataURL('image/jpeg', jpgQuality));
        }
    })(video), delay)
}, error => console.log(error));

$(() => {
    $('#login').click(() => {
        $('#login-page').hide();
        $('#private').show();
    })
});

Backend
Finally we’ll work in the backend. Basically I’ve check the examples that we can see in face_classification project and tune it a bit according to my needs.

from rabbit import builder
import logging
import numpy as np
from keras.models import load_model
from utils.datasets import get_labels
from utils.inference import detect_faces
from utils.inference import draw_text
from utils.inference import draw_bounding_box
from utils.inference import apply_offsets
from utils.inference import load_detection_model
from utils.inference import load_image
from utils.preprocessor import preprocess_input
import cv2
import json
import base64

detection_model_path = 'trained_models/detection_models/haarcascade_frontalface_default.xml'
emotion_model_path = 'trained_models/emotion_models/fer2013_mini_XCEPTION.102-0.66.hdf5'
emotion_labels = get_labels('fer2013')
font = cv2.FONT_HERSHEY_SIMPLEX

# hyper-parameters for bounding boxes shape
emotion_offsets = (20, 40)

# loading models
face_detection = load_detection_model(detection_model_path)
emotion_classifier = load_model(emotion_model_path, compile=False)

# getting input model shapes for inference
emotion_target_size = emotion_classifier.input_shape[1:3]


def format_response(response):
    decoded_json = json.loads(response)
    return "Hello {}".format(decoded_json['name'])


def on_data(data):
    f = open('current.jpg', 'wb')
    f.write(base64.decodebytes(data))
    f.close()
    image_path = "current.jpg"

    out = []
    # loading images
    rgb_image = load_image(image_path, grayscale=False)
    gray_image = load_image(image_path, grayscale=True)
    gray_image = np.squeeze(gray_image)
    gray_image = gray_image.astype('uint8')

    faces = detect_faces(face_detection, gray_image)
    for face_coordinates in faces:
        x1, x2, y1, y2 = apply_offsets(face_coordinates, emotion_offsets)
        gray_face = gray_image[y1:y2, x1:x2]

        try:
            gray_face = cv2.resize(gray_face, (emotion_target_size))
        except:
            continue

        gray_face = preprocess_input(gray_face, True)
        gray_face = np.expand_dims(gray_face, 0)
        gray_face = np.expand_dims(gray_face, -1)
        emotion_label_arg = np.argmax(emotion_classifier.predict(gray_face))
        emotion_text = emotion_labels[emotion_label_arg]
        color = (0, 0, 255)

        draw_bounding_box(face_coordinates, rgb_image, color)
        draw_text(face_coordinates, rgb_image, emotion_text, color, 0, -50, 1, 2)
        bgr_image = cv2.cvtColor(rgb_image, cv2.COLOR_RGB2BGR)

        cv2.imwrite('predicted.png', bgr_image)
        data = open('predicted.png', 'rb').read()
        encoded = base64.encodebytes(data).decode('utf-8')
        out.append({
            'image': encoded,
            'emotion': emotion_text,
        })

    return out

logging.basicConfig(level=logging.WARN)
rpc = builder.rpc("image.check", {'host': 'localhost', 'port': 5672})
rpc.server(on_data)

Here you can see in action the working prototype

Maybe we can do the same with another tools and even more simple but as I said before this example is just an excuse to play with those technologies:

  • Send webcam frames via websockets
  • Connect one web application to a Pyhon application via RabbitMQ RPC
  • Play with face classification script

Please don’t use this script in production. It’s just a proof of concepts. With smiles but a proof of concepts 🙂

You can see the project in my github account

Authenticate OpenUI5 applications and Lumen backends with Amazon Cognito and JWT

Today I want to create an UI5/OpenUI5 boilerplate that plays with Lumen backends. Simple, isn’t it? We only need to create a Lumen API server and connect our OpenUI5 application with this API server. But today I also want to create a Login also. The typical user/password input form. I don’t want to build it from scratch (a user database, oauth provider or something like that). Since this days I’m involved with Amazon AWS projects I want to try Amazon Cognito.

Cognito has a great javaScript SDK. In fact we can do all the authentication flow (create users, validate passwords, change password, multifactor authentication, …) with Cognito. To create this project first I’ve create the following steps within Amazon AWS Cognito Console: Create a user pool with required attributes (email only in this example), without MFA and only allow administrators to create users. I’ve also created a App client inside this pool, so I’ve got a UserPoolId and a ClientId.

Let’s start with the OpenUI5 application. I’ve created an small application with one route called “home”. To handle the login process I will work in Component.js init function. The idea is check the cognito session. If there’s an active one (that’s means a Json Web Token stored in the local storage) we’ll display to “home” route and if there isn’t we’ll show login one.

sap.ui.define([
        "sap/ui/core/UIComponent",
        "sap/ui/Device",
        "app/model/models",
        "app/model/cognito"
    ], function (UIComponent, Device, models, cognito) {
        "use strict";

        return UIComponent.extend("app.Component", {

            metadata: {
                manifest: "json"
            },

            init: function () {
                UIComponent.prototype.init.apply(this, arguments);
                this.setModel(models.createDeviceModel(), "device");
                this.getRouter().initialize();

                var targets = this.getTargets();
                cognito.hasSession(function (err) {
                    if (err) {
                        targets.display("login");
                        return;
                    }
                    targets.display("home");
                });
            },

            /* *** */
        });
    }
);

To encapsulate the cognito operations I’ve create a model called cognito.js. It’s not perfect, but it allows me to abstract cognito stuff in the OpenUI5 application.

sap.ui.define([
        "app/conf/env"
    ], function (env) {
        "use strict";

        AWSCognito.config.region = env.region;

        var poolData = {
            UserPoolId: env.UserPoolId,
            ClientId: env.ClientId
        };

        var userPool = new AWSCognito.CognitoIdentityServiceProvider.CognitoUserPool(poolData);
        var jwt;

        var cognito = {
            getJwt: function () {
                return jwt;
            },

            hasSession: function (cbk) {
                var cognitoUser = cognito.getCurrentUser();
                if (cognitoUser != null) {
                    cognitoUser.getSession(function (err, session) {
                        if (err) {
                            cbk(err);
                            return;
                        }
                        if (session.isValid()) {
                            jwt = session.idToken.getJwtToken();
                            cbk(false, session)
                        } else {
                            cbk(true);
                        }
                    });
                } else {
                    cbk(true);
                }
            },

            getCurrentUser: function () {
                return userPool.getCurrentUser();
            },

            signOut: function () {
                var currentUser = cognito.getCurrentUser();
                if (currentUser) {
                    currentUser.signOut()
                }
            },

            getUsername: function () {
                var currentUser = cognito.getCurrentUser();
                return (currentUser) ? currentUser.username : undefined;
            },

            getUserData: function (user) {
                return {
                    Username: user,
                    Pool: userPool
                };
            },

            getCognitoUser: function (user) {
                return new AWSCognito.CognitoIdentityServiceProvider.CognitoUser(cognito.getUserData(user));
            },

            authenticateUser: function (user, pass, cbk) {
                var authenticationData = {
                    Username: user,
                    Password: pass
                };

                var authenticationDetails = new AWSCognito.CognitoIdentityServiceProvider.AuthenticationDetails(authenticationData);
                var cognitoUser = new AWSCognito.CognitoIdentityServiceProvider.CognitoUser(cognito.getUserData(user));

                cognitoUser.authenticateUser(authenticationDetails, cbk);

                return cognitoUser;
            }
        };

        return cognito;
    }
);

The login route has the following xml view:

<core:View
        xmlns:core="sap.ui.core"
        xmlns:f="sap.ui.layout.form"
        xmlns="sap.m"
        controllerName="app.controller.Login"
>
    <Image class="bg"></Image>
    <VBox class="sapUiSmallMargin loginForm">
        <f:SimpleForm visible="{= ${/flow} === 'login' }">
            <f:toolbar>
                <Toolbar>
                    <Title text="{i18n>Login_Title}" level="H4" titleStyle="H4"/>
                </Toolbar>
            </f:toolbar>
            <f:content>
                <Label text="{i18n>Login_user}"/>
                <Input placeholder="{i18n>Login_userPlaceholder}" value="{/user}"/>
                <Label text="{i18n>Login_pass}"/>
                <Input type="Password" placeholder="{i18n>Login_passPlaceholder}" value="{/pass}"/>
                <Button type="Accept" text="{i18n>OK}" press="loginPressHandle"/>
            </f:content>
        </f:SimpleForm>
        
        <f:SimpleForm visible="{= ${/flow} === 'PasswordReset' }">
            <f:toolbar>
                <Toolbar>
                    <Title text="{i18n>Login_PasswordReset}" level="H4" titleStyle="H4"/>
                </Toolbar>
            </f:toolbar>
            <f:content>
                <Label text="{i18n>Login_verificationCode}"/>
                <Input type="Number" placeholder="{i18n>Login_verificationCodePlaceholder}" value="{/verificationCode}"/>
                <Label text="{i18n>Login_newpass}"/>
                <Input type="Password" placeholder="{i18n>Login_newpassPlaceholder}" value="{/newPass}"/>
                <Button type="Accept" text="{i18n>OK}" press="newPassVerificationPressHandle"/>
            </f:content>
        </f:SimpleForm>
        
        <f:SimpleForm visible="{= ${/flow} === 'newPasswordRequired' }">
            <f:toolbar>
                <Toolbar>
                    <Title text="{i18n>Login_PasswordReset}" level="H4" titleStyle="H4"/>
                </Toolbar>
            </f:toolbar>
            <f:content>
                <Label text="{i18n>Login_newpass}"/>
                <Input type="Password" placeholder="{i18n>Login_newpassPlaceholder}" value="{/newPass}"/>
                <Button type="Accept" text="{i18n>OK}" press="newPassPressHandle"/>
            </f:content>
        </f:SimpleForm>
    </VBox>
</core:View>

It has three different stages: “login”, “PasswordReset” and “newPasswordRequired”
“login” is the main one. In this stage the user can input his login credentials. If credentials are OK then we’ll display home route.
The first time a user log in in the application with the password provided by the administrator, Cognito will force to change the password. Then We’ll show newPasswordRequired flow. I’m not going to explain each step. We developers prefer code than texts. That’s the code:

sap.ui.define([
        "app/controller/BaseController",
        "sap/ui/model/json/JSONModel",
        "sap/m/MessageToast",
        "app/model/cognito"
    ], function (BaseController, JSONModel, MessageToast, cognito) {
        "use strict";

        var cognitoUser;
        return BaseController.extend("app.controller.Login", {
            model: {
                user: "",
                pass: "",
                flow: "login",
                verificationCode: undefined,
                newPass: undefined
            },

            onInit: function () {
                this.getView().setModel(new JSONModel(this.model));
            },

            newPassPressHandle: function () {
                var that = this;
                var targets = this.getOwnerComponent().getTargets();
                var attributesData = {};
                sap.ui.core.BusyIndicator.show();
                cognitoUser.completeNewPasswordChallenge(this.model.newPass, attributesData, {
                    onFailure: function (err) {
                        sap.ui.core.BusyIndicator.hide();
                        MessageToast.show(err.message);
                    },
                    onSuccess: function (data) {
                        sap.ui.core.BusyIndicator.hide();
                        that.getModel().setProperty("/flow", "login");
                        targets.display("home");
                    }
                })
            },

            newPassVerificationPressHandle: function () {
                var that = this;
                var targets = this.getOwnerComponent().getTargets();
                sap.ui.core.BusyIndicator.show();
                cognito.getCognitoUser(this.model.user).confirmPassword(this.model.verificationCode, this.model.newPass, {
                    onFailure: function (err) {
                        sap.ui.core.BusyIndicator.hide();
                        MessageToast.show(err);
                    },
                    onSuccess: function (result) {
                        sap.ui.core.BusyIndicator.hide();
                        that.getModel().setProperty("/flow", "PasswordReset");
                        targets.display("home");
                    }
                });
            },

            loginPressHandle: function () {
                var that = this;
                var targets = this.getOwnerComponent().getTargets();
                sap.ui.core.BusyIndicator.show();
                cognitoUser = cognito.authenticateUser(this.model.user, this.model.pass, {
                    onSuccess: function (result) {
                        sap.ui.core.BusyIndicator.hide();
                        targets.display("home");
                    },

                    onFailure: function (err) {
                        sap.ui.core.BusyIndicator.hide();
                        switch (err.code) {
                            case "PasswordResetRequiredException":
                                that.getModel().setProperty("/flow", "PasswordReset");
                                break;
                            default:
                                MessageToast.show(err.message);
                        }
                    },

                    newPasswordRequired: function (userAttributes, requiredAttributes) {
                        sap.ui.core.BusyIndicator.hide();
                        that.getModel().setProperty("/flow", "newPasswordRequired");
                    }
                });
            }
        });
    }
);

The home route is the main one. It asumes that there’s an active Cognito session enabled.

<mvc:View
        controllerName="app.controller.Home"
        xmlns="sap.m"
        xmlns:mvc="sap.ui.core.mvc"
        xmlns:semantic="sap.m.semantic">
    <semantic:FullscreenPage
            id="page"
            semanticRuleSet="Optimized"
            showNavButton="false"
            title="{i18n>loggedUser}: {/userName}">
        <semantic:content>
            <Panel width="auto" class="sapUiResponsiveMargin" accessibleRole="Region">
                <headerToolbar>
                    <Toolbar height="3rem">
                        <Title text="Title"/>
                    </Toolbar>
                </headerToolbar>
                <content>
                    <Text text="Lorem ipsum dolor st amet, consetetur sadipscing elitr, sed diam nonumy eirmod tempor invidunt ut labore et dolore magna aliquyam erat, sed diam voluptua. At vero eos et accusam et justo duo dolores et ea rebum. Stet clita kasd gubergren, no sea takimata sanctus est Lorem ipsum dolor sit amet. Lorem ipsum dolor sit amet, consetetur sadipscing elitr, sed diam nonumy eirmod tempor invidunt ut labore et dolore magna aliquyam erat, sed diam voluptua. Lorem ipsum dolor sit amet, consetetur sadipscing elitr, sed diam nonumy eirmod tempor invidunt ut labore et dolore magna aliquyam erat"/>
                    <Button text="{i18n>Hello}" icon="sap-icon://hello-world" press="helloPress"/>
                </content>
            </Panel>
        </semantic:content>
        <semantic:customFooterContent>
            <Button text="{i18n>LogOff}" icon="sap-icon://visits" press="onLogOffPress"/>
        </semantic:customFooterContent>
    </semantic:FullscreenPage>
</mvc:View>

It shows the Cognito login name. It alos has a simple logff button and also one button that calls to the backend.

sap.ui.define([
        "app/controller/BaseController",
        "sap/ui/model/json/JSONModel",
        "sap/m/MessageToast",
        "app/model/cognito",
        "app/model/api"
    ], function (BaseController, JSONModel, MessageToast, cognito, api) {
        "use strict";

        return BaseController.extend("app.controller.Home", {
            model: {
                userName: ""
            },

            onInit: function () {
                this.model.userName = cognito.getUsername();
                this.getView().setModel(new JSONModel(this.model));
            },

            helloPress: function () {
                api.get("/api/hi", {}, function (data) {
                    MessageToast.show("Hello user " + data.userInfo.username + " (" + data.userInfo.email + ")");
                });
            },

            onLogOffPress: function () {
                cognito.signOut();
                this.getOwnerComponent().getTargets().display("login");
            }
        });
    }
);

To handle ajax requests I’ve create an api model. This model injects jwt inside every request.

sap.ui.define([
    "sap/m/MessageToast",
    "app/model/cognito"
], function (MessageToast, cognito) {
    "use strict";

    var backend = "";

    return {
        get: function (uri, params, cb) {
            params = params || {};
            params._jwt = cognito.getJwt();
            sap.ui.core.BusyIndicator.show(1000);

            jQuery.ajax({
                type: "GET",
                contentType: "application/json",
                data: params,
                url: backend + uri,
                cache: false,
                dataType: "json",
                async: true,
                success: function (data, textStatus, jqXHR) {
                    sap.ui.core.BusyIndicator.hide();
                    cb(data);
                },
                error: function (data, textStatus, jqXHR) {
                    sap.ui.core.BusyIndicator.hide();
                    switch (data.status) {
                        case 403: // Forbidden
                            MessageToast.show('Auth error');
                            break;
                        default:
                            console.log('Error', data);
                    }
                }
            });
        }
    };
});

That’s the frontend. Now it’s time to backend. Our Backend will be a simple Lumen server.

use App\Http\Middleware;
use Illuminate\Contracts\Debug\ExceptionHandler;
use Laravel\Lumen\Application;

(new Dotenv\Dotenv(__DIR__ . "/../env/"))->load();

$app = new Application();

$app->singleton(ExceptionHandler::class, App\Exceptions\Handler::class);

$app->routeMiddleware([
    'cognito' => Middleware\AuthCognitoMiddleware::class,
]);

$app->register(App\Providers\RedisServiceProvider::class);

$app->group([
    'middleware' => 'cognito',
    'namespace'  => 'App\Http\Controllers',
], function (Application $app) {
    $app->get("/api/hi", "DemoController@hi");
});

$app->run();

As you can see I’ve created a middelware to handle the authentication. This middleware will check the jwt provided by the frontend. We will use “spomky-labs/jose” library to validate the token.

namespace App\Http\Middleware;

use Closure;
use Illuminate\Http\Request;
use Jose\Factory\JWKFactory;
use Jose\Loader;
use Monolog\Logger;
use Symfony\Component\Cache\Adapter\RedisAdapter;

class AuthCognitoMiddleware
{
    public function handle(Request $request, Closure $next)
    {
        try {
            $payload = $this->getPayload($request->get('_jwt'), $this->getJwtWebKeys());
            config([
                "userInfo" => [
                    'username' => $payload['cognito:username'],
                    'email'    => $payload['email'],
                ],
            ]);
        } catch (\Exception $e) {
            $log = app(Logger::class);
            $log->alert($e->getMessage());

            return response('Token Error', 403);
        }

        return $next($request);
    }

    private function getJwtWebKeys()
    {
        $url      = sprintf(
            'https://cognito-idp.%s.amazonaws.com/%s/.well-known/jwks.json',
            getenv('AWS_REGION'),
            getenv('AWS_COGNITO_POOL')
        );
        $cacheKey = sprintf('JWKFactory-Content-%s', hash('sha512', $url));

        $cache = app(RedisAdapter::class);

        $item = $cache->getItem($cacheKey);
        if (!$item->isHit()) {
            $item->set($this->getContent($url));
            $item->expiresAfter((int)getenv("TTL_JWK_CACHE"));
            $cache->save($item);
        }

        return JWKFactory::createFromJKU($url, false, $cache);
    }

    private function getPayload($accessToken, $jwtWebKeys)
    {
        $loader  = new Loader();
        $jwt     = $loader->loadAndVerifySignatureUsingKeySet($accessToken, $jwtWebKeys, ['RS256']);
        $payload = $jwt->getPayload();

        return $payload;
    }

    private function getContent($url)
    {
        $ch = curl_init();
        curl_setopt_array($ch, [
            CURLOPT_RETURNTRANSFER => true,
            CURLOPT_URL            => $url,
            CURLOPT_SSL_VERIFYPEER => true,
            CURLOPT_SSL_VERIFYHOST => 2,
        ]);
        $content = curl_exec($ch);
        curl_close($ch);

        return $content;
    }
}

To validate jwt Cognito tokens we need to obtain JwtWebKeys from this url

https://cognito-idp.my_aws_region.amazonaws.com/my_aws_cognito_pool_id/.well-known/jwks.json

That means that we need to fetch this url within every backend request, and that’s not cool. spomky-labs/jose allows us to use a cache to avoid fetch the request again and again. This cache is an instance of something that implementes the interface Psr\Cache\CacheItemPoolInterface. I’m not going to create a Cache from scratch. I’m not crazy. I’ll use symfony/cache here with a Redis adapter

And basically that’s all. Full application in my github

Playing with IoT, MQTT, Arduino and Raspberry Pi. Building a dashboard with OpenUI5

I’ve been playing with MQTT in previous posts. Today I want to build a simple dashboard. Basically because I’ve got a 3.5inch display for my Raspberry Py and I want to use it. The idea is set up my Rasperry Pi as a web kiosk and display the MQTT variables in real time using websockets. Let’s start.

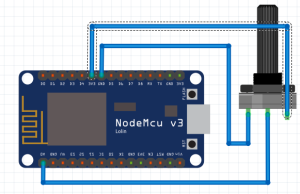
Set up Raspberry Pi as a web kiosk is pretty straightforward. You only need to follow instructions detailed here. Now we will prepare the MQTT inputs. Today we’re going to reuse one example of previous post. A potentiometer controlled by a nodemcu microcontroller connected to our MQTT server via Wifi.

We also will build another circuit using a Arduino board and a ethernet Shield.

With this circuit we’ll register the temperature (using a LM35 temperature sensor), a photo resistor (CDS) to show the light level and a relay to switch on/off a light bulb. The Idea of the circuit is emit the temperature and light level to mosquitto mqtt server and listen to switch status form mqtt server to fire the relay. That’s the arduino code

#include <SPI.h>
#include <Ethernet.h>
#include <PubSubClient.h>

const int photocellPin = 1;
const int tempPin = 0;
const int relayPin = 9;
bool lightStatus = false;

const byte mac[] = { 0xDE, 0xAD, 0xBE, 0xEF, 0xFE, 0xED };

// mqtt configuration
const char* mqttServer = "192.168.1.104";
const int mqttPort = 1883;
const String topicLightChange = "sensors/arduino/light/change";
const String topicLightStatus = "sensors/arduino/light/status";
const String topicTemp = "sensors/arduino/temperature/room1";
const String topicLight = "sensors/arduino/light/room1";
const char* clientName = "com.gonzalo123.arduino";

EthernetClient ethClient;
PubSubClient client(ethClient);

void mqttReConnect() {
  while (!client.connected()) {
    Serial.print("Attempting MQTT connection...");
    if (client.connect(clientName)) {
      Serial.println("connected");
      client.subscribe(topicLightChange.c_str());
    } else {
      Serial.print("failed, rc=");
      Serial.print(client.state());
      Serial.println(" try again in 5 seconds");
      delay(5000);
    }
  }
}

void mqttEmit(String topic, String value) {
  if (client.publish((char*) topic.c_str(), (char*) value.c_str())) {
    //Serial.print("Publish ok (topic: ");
    //Serial.print(topic);
    //Serial.print(", value: ");
    //Serial.print(value);
    //Serial.println(")");
  } else {
    Serial.println("Publish failed");
  }
}

void callback(char* topic, byte* payload, unsigned int length) {
  Serial.print("Message arrived [");
  Serial.print(topic);
  Serial.print("] payload: ");
  String data;
  for (int i = 0; i < length; i++) {
    data += (char)payload[i];
  }

  if (strcmp(topic, topicLightChange.c_str()) == 0) {
    lightStatus = (data == "1") ? true : false;
    Serial.print(data);
  }
  
  Serial.println("");
}

void setup()
{
  Serial.begin(9600);
  pinMode(relayPin, OUTPUT);
  digitalWrite(relayPin, LOW);
  
  client.setServer(mqttServer, mqttPort);
  client.setCallback(callback);
  if (Ethernet.begin(mac) == 0) {
    Serial.println("Failed to configure Ethernet using DHCP");
  }

  delay(1500);
}

void loop()
{
  if (!client.connected()) {
    mqttReConnect();
  }

  client.loop();

  if (lightStatus == 1) {
    digitalWrite(relayPin, HIGH);
  } else {
    digitalWrite(relayPin, LOW);
  }
  mqttEmit(topicLightStatus, lightStatus ? "1" : "0");
  mqttEmit(topicLight, (String) analogRead(photocellPin));
  mqttEmit(topicTemp, (String) ((5.0 * analogRead(tempPin) * 100.0) / 1024.0));

  delay(500);
}

Now we’re going to work with dashboard. This days I’m working with OpenUI5 within various projects and because of that we’ll use this library to build the dashboard. we’ll build something like this:

Basically it’s a view

<mvc:View
        controllerName="gonzalo123.controller.Controller"
        height="100%"
        width="100%"
        xmlns="sap.m"
        xmlns:mvc="sap.ui.core.mvc"
        xmlns:app="http://schemas.sap.com/sapui5/extension/sap.ui.core.CustomData/1"
>
    <IconTabBar expandable="false"
                stretchContentHeight="true"
                class="sapUiResponsiveContentPadding">
        <items>
            <IconTabFilter icon="sap-icon://bbyd-dashboard">
                <TileContainer>
                    <StandardTile
                            icon="sap-icon://explorer"
                            number="{/potentiometer}"
                            numberUnit="%"
                            title="{i18n>potentiometer}"/>
                    <StandardTile
                            icon="sap-icon://temperature"
                            number="{/temperature}"
                            numberUnit="ºC"
                            title="{i18n>temperature}"/>
                    <StandardTile
                            icon="sap-icon://lightbulb"
                            number="{/light/level}"
                            title="{i18n>light}"/>
                </TileContainer>
            </IconTabFilter>
            <IconTabFilter icon="sap-icon://lightbulb">
                <Page showHeader="false"
                      enableScrolling="true">
                    <List>
                        <InputListItem label="{i18n>light}">
                            <Switch state="{/light/status}"
                                    change="onStatusChange"/>
                        </InputListItem>
                    </List>
                </Page>
            </IconTabFilter>
        </items>
    </IconTabBar>
</mvc:View>

And a controller:

sap.ui.define([
        'jquery.sap.global',
        'sap/ui/core/mvc/Controller',
        'sap/ui/model/json/JSONModel',
        "sap/ui/model/resource/ResourceModel",
        'gonzalo123/model/io'
    ],

    function (jQuery, Controller, JSONModel, ResourceModel, io) {
        "use strict";

        io.connect("//192.168.1.104:3000/");

        return Controller.extend("gonzalo123.controller.Controller", {
            model: new JSONModel({
                light: {
                    status: false,
                    level: undefined
                },
                potentiometer: undefined,
                temperature: undefined
            }),

            onInit: function () {
                var model = this.model;
                io.on('mqtt', function (data) {
                    switch (data.topic) {
                        case 'sensors/arduino/temperature/room1':
                            model.setProperty("/temperature", data.payload);
                            break;
                        case 'sensors/arduino/light/room1':
                            model.setProperty("/light/level", data.payload);
                            break;
                        case 'sensors/nodemcu/potentiometer/room1':
                            model.setProperty("/potentiometer", data.payload);
                            break;
                        case 'sensors/arduino/light/status':
                            model.setProperty("/light/status", data.payload == "1");
                            break;
                    }
                });

                this.getView().setModel(this.model);

                var i18nModel = new ResourceModel({
                    bundleName: "gonzalo123.i18n.i18n"
                });

                this.getView().setModel(i18nModel, "i18n");
            },

            onStatusChange: function () {
                io.emit('mqtt', {
                    topic: 'sensors/arduino/light/change',
                    payload: (this.getView().getModel().oData.light.status ? "1" : "0")
                });
            }
        });
    }
);

The real time part we need a gateway between websockets and mqtt data. We’ll use socket.io. Here is the server:

var mqtt = require('mqtt');
var mqttClient = mqtt.connect('mqtt://192.168.1.104');
var httpServer = require('http').createServer();
io = require('socket.io')(httpServer, {origins: '*:*'});

io.on('connection', function(client){
    client.on('mqtt', function(msg){
        console.log("ws", msg);
        mqttClient.publish(msg.topic, msg.payload.toString());
    })
});

mqttClient.on('connect', function () {
    mqttClient.subscribe('sensors/#');
});

mqttClient.on('message', function (topic, message) {
    console.log("mqtt", topic, message.toString());
    io.sockets.emit('mqtt', {
        topic: topic,
        payload: message.toString()
    });
});

httpServer.listen(3000, '0.0.0.0');

Hardware

  • 1 Arduino Uno
  • 1 NodeMCU (V3)
  • 1 potentiometer
  • 1 Servo (SG90)
  • 1 Raspberry Pi 3
  • 3.5inch Display Hat for Raspberry Pi
  • LM35
  • CDS
  • pull down resistor

Source code available in my github account

Encrypt Websocket (socket.io) communications

I’m a big fan of WebSockets and socket.io. I’ve written a lot of about it. In last posts I’ve written about socket.io and authentication. Today we’re going to speak about communications.

Imagine we’ve got a websocket server and we connect our application to this server (even using https/wss). If we open our browser’s console we can inspect our WebSocket communications. We also can enable debugging. This works in a similar way than when we start the promiscuous mode within our network interface. We will see every packets. Not only the packets that server is sending to us.

If we send send sensitive information over websockets, that means than one logged user can see another ones information. We can separate namespaces in our socket.io server. We also can do another thing: Encrypt communications using crypto-js.

I’ve created one small wrapper to use it with socket.io.
We can install our server dependency

npm g-crypt

And install our client dependency with bower

bower install g-crypt

And use it in our server

var io = require('socket.io')(3000),
    Crypt = require("g-crypt"),
    passphrase = 'super-secret-passphrase',
    crypter = Crypt(passphrase);

io.on('connection', function (socket) {
    socket.on('counter', function (data) {
        var decriptedData = crypter.decrypt(data);
        setTimeout(function () {
            console.log("counter status: " + decriptedData.id);
            decriptedData.id++;
            socket.emit('counter', crypter.encrypt(decriptedData));
        }, 1000);
    });
});

And now a simple HTTP application

<!DOCTYPE html>
<html lang="en">
<head>
    <meta charset="UTF-8">
    <title>Title</title>
</head>
<body>
Open console to see the messages

<script src="http://localhost:3000/socket.io/socket.io.js"></script>
<script src="assets/cryptojslib/rollups/aes.js"></script>
<script src="assets/g-crypt/src/Crypt.js"></script>
<script>
    var socket = io('http://localhost:3000/'),
        passphrase = 'super-secret-passphrase',
        crypter = Crypt(passphrase),
        id = 0;

    socket.on('connect', function () {
        console.log("connected! Let's start the counter with: " + id);
        socket.emit('counter', crypter.encrypt({id: id}));
    });

    socket.on('counter', function (data) {
        var decriptedData = crypter.decrypt(data);
        console.log("counter status: " + decriptedData.id);
        socket.emit('counter', crypter.encrypt({id: decriptedData.id}));
    });
</script>

</body>
</html>

Now our communications are encrypted and logged user cannot read another ones data.

Library is a simple wrapper

Crypt = function (passphrase) {
    "use strict";
    var pass = passphrase;
    var CryptoJSAesJson = {
        parse: function (jsonStr) {
            var j = JSON.parse(jsonStr);
            var cipherParams = CryptoJS.lib.CipherParams.create({ciphertext: CryptoJS.enc.Base64.parse(j.ct)});
            if (j.iv) cipherParams.iv = CryptoJS.enc.Hex.parse(j.iv);
            if (j.s) cipherParams.salt = CryptoJS.enc.Hex.parse(j.s);
            return cipherParams;
        },
        stringify: function (cipherParams) {
            var j = {ct: cipherParams.ciphertext.toString(CryptoJS.enc.Base64)};
            if (cipherParams.iv) j.iv = cipherParams.iv.toString();
            if (cipherParams.salt) j.s = cipherParams.salt.toString();
            return JSON.stringify(j);
        }
    };

    return {
        decrypt: function (data) {
            return JSON.parse(CryptoJS.AES.decrypt(data, pass, {format: CryptoJSAesJson}).toString(CryptoJS.enc.Utf8));
        },
        encrypt: function (data) {
            return CryptoJS.AES.encrypt(JSON.stringify(data), pass, {format: CryptoJSAesJson}).toString();
        }
    };
};

if (typeof module !== 'undefined' && typeof module.exports !== 'undefined') {
    CryptoJS = require("crypto-js");
    module.exports = Crypt;
} else {
    window.Crypt = Crypt;
}

Library available in my github and also we can use it using npm and bower.

Sharing authentication between socket.io and a PHP frontend

Normally, when I work with websockets, my stack is a socket.io server and a Silex frontend. Protect a PHP frontend with one kind of authentication of another is pretty straightforward. But if we want to use websockets, we need to set up another server and if we protect our frontend we need to protect our websocket server too.

If our frontend is node too (express for example), sharing authentication is more easy but at this time we we want to use two different servers (a node server and a PHP server). I’ve written about it too but today we`ll see another solution. Let’s start.

Imagine we have this simple Silex application. It has three routes:

  • “/” a public route
  • “/login” to perform the login action
  • “/private” a private route. If we try to get here without a valid session we’ll get a 403 error

And this is the code. It’s basically one example using sessions taken from Silex documentation:

use Silex\Application;
use Silex\Provider\SessionServiceProvider;
use Silex\Provider\TwigServiceProvider;
use Symfony\Component\HttpFoundation\Response;
use Symfony\Component\HttpKernel\Exception\AccessDeniedHttpException;

$app = new Application();

$app->register(new SessionServiceProvider());
$app->register(new TwigServiceProvider(), [
    'twig.path' => __DIR__ . '/../views',
]);

$app->get('/', function (Application $app) {
    return $app['twig']->render('home.twig');
});

$app->get('/login', function () use ($app) {
    $username = $app['request']->server->get('PHP_AUTH_USER', false);
    $password = $app['request']->server->get('PHP_AUTH_PW');

    if ('gonzalo' === $username && 'password' === $password) {
        $app['session']->set('user', ['username' => $username]);

        return $app->redirect('/private');
    }

    $response = new Response();
    $response->headers->set('WWW-Authenticate', sprintf('Basic realm="%s"', 'site_login'));
    $response->setStatusCode(401, 'Please sign in.');

    return $response;
});

$app->get('/private', function () use ($app) {
    $user = $app['session']->get('user');
    if (null === $user) {
        throw new AccessDeniedHttpException('Access Denied');
    }

    return $app['twig']->render('private.twig', [
        'username'  => $user['username']
    ]);
});

$app->run();

Our “/private” route also creates a connection with our websocket server.

<!DOCTYPE html>
<html lang="en">
<head>
    <meta charset="UTF-8">
    <title>Title</title>
</head>
<body>
Welcome {{ username }}!

<script src="http://localhost:3000/socket.io/socket.io.js"></script>
<script>
    var socket = io('http://localhost:3000/');
    socket.on('connect', function () {
        console.log("connected!");
    });
    socket.on('disconnect', function () {
        console.log("disconnected!");
    });
</script>

</body>
</html>

And that’s our socket.io server. A really simple one.

var io = require('socket.io')(3000);

It works. Our frontend is protected. We need to login with our credentials (in this example “gonzalo/password”), but everyone can connect to our socket.io server. The idea is to use our PHP session to protect our socket.io server too. In fact is very easy how to do it. First we need to pass our PHPSESSID to our socket.io server. To do it, when we perform our socket.io connection in the frontend, we pass our session id

<script>
    var socket = io('http://localhost:3000/', {
        query: 'token={{ sessionId }}'
    });
    socket.on('connect', function () {
        console.log("connected!");
    });
    socket.on('disconnect', function () {
        console.log("disconnect!");
    });
</script>

As well as we’re using a twig template we need to pass sessionId variable

$app->get('/private', function () use ($app) {
    $user = $app['session']->get('user');
    if (null === $user) {
        throw new AccessDeniedHttpException('Access Denied');
    }

    return $app['twig']->render('private.twig', [
        'username'  => $user['username'],
        'sessionId' => $app['session']->getId()
    ]);
});

Now we only need to validate the token before stabilising connection. Socket.io provides us a middleware to perform those kind of operations. In this example we’re using PHP sessions out of the box. How can we validate it? The answer is easy. We only need to create a http client (in the socket.io server) and perform a request to a protected route (we’ll use “/private”). If we’re using a different provider to store our sessions (I hope you aren’t using Memcached to store PHP session, indeed) you’ll need to validate our sessionId against your provider.

var io = require('socket.io')(3000),
    http = require('http');

io.use(function (socket, next) {
    var options = {
        host: 'localhost',
        port: 8080,
        path: '/private',
        headers: {Cookie: 'PHPSESSID=' + socket.handshake.query.token}
    };

    http.request(options, function (response) {
        response.on('error', function () {
            next(new Error("not authorized"));
        }).on('data', function () {
            next();
        });
    }).end();
});

io.on('connection', function () {
    console.log("connected!");
});

Ok. This example works but we’re generating dynamically a js file injecting our PHPSESSID. If we want to extract the sessionId from the request we can use document.cookie but sometimes it doesn’t work. That’s because HttpOnly. HttpOnly is our friend if we want to protect our cookies against XSS attacks but in this case our protection difficults our task.

We can solve this problem performing a simple request to our server. We’ll create a new route (a private route) called ‘getSessionID’ that gives us our sessionId.

$app->get('/getSessionID', function (Application $app) {
    $user = $app['session']->get('user');
    if (null === $user) {
        throw new AccessDeniedHttpException('Access Denied');
    }

    return $app->json($app['session']->getId());
});

So before establishing the websocket we just need to create a GET request to our new route to obtain the sessionID.

var io = require('socket.io')(3000),
    http = require('http');

io.use(function (socket, next) {
    var sessionId = socket.handshake.query.token,
        options = {
            host: 'localhost',
            port: 8080,
            path: '/getSessionID',
            headers: {Cookie: 'PHPSESSID=' + sessionId}
        };

    http.request(options, function (response) {
        response.on('error', function () {
            next(new Error("not authorized"));
        });
        response.on('data', function (chunk) {
            var sessionIdFromRequest;
            try {
                sessionIdFromRequest = JSON.parse(chunk.toString());
            } catch (e) {
                next(new Error("not authorized"));
            }

            if (sessionId == sessionIdFromRequest) {
                next();
            } else {
                next(new Error("not authorized"));
            }
        });
    }).end();
});

io.on('connection', function (socket) {
    setInterval(function() {
        socket.emit('hello', {hello: 'world'});
    }, 1000);
});

And thats all. You can see the full example in my github account.

Working with Ionic and PHP Backends. Remote debugging with PHP7 and Xdebug working with real devices

Sometimes I speak with PHP developers and they don’t use remote debugging in their development environments. Some people don’t like to use remote debugging. They prefer to use TDD and rely on the unit tests. That’s a good point of view, but sometimes they don’t use remote debugging only because they don’t know how to do it, and that’s inadmissible. Remote debugger is a powerful tool especially to handle with legacy applications. I’ve using xdebug for years with my linux workstation for years. This days I’m using Mac and it’s also very simple to set up xdebug here.

First we need to install PHP:

brew install php70

Then Xdebug

brew install php70-xdebug

(in a Ubuntu box we only need to use apt-get instead of brew)

Now we need to setup xdebug to enable remote debugging:
In a standard installation xdebug configuration is located at: /usr/local/etc/php/7.0/conf.d/ext-xdebug.ini

[xdebug]
zend_extension="/usr/local/opt/php70-xdebug/xdebug.so"

xdebug.remote_enable=1
xdebug.remote_port=9000
xdebug.profiler_enable=0
xdebug.profiler_output_dir="/tmp"
xdebug.idekey= "PHPSTORM"
xdebug.remote_connect_back = 1
xdebug.max_nesting_level = 250

And basically that’s all. To set/unset the cookie you can use one bookmarklet in your browser (you can generate your bookmarklets here). Or use a Chrome extension to enable xdebug.

Now se only need to start the built-in server with

php -S 0.0.0.0:8080

And remote debugging will be available
Remote debugger works this way:

  • We open on port within our IDE. In my case PHPStorm (it happens when we click on “Start listening for PHP debug connections”)
  • We set one cookie in our browser (it happens when click on Chrome extension)
  • When our server receives one request with the cookie, it connects to the port that our IDE opens (usually port 9000). If you use a personal firewall in your workstation, ensure that you allow incoming connections to this port.

Nowadays I’m involved with several projects building hybrid applications with Apache Cordova. In the Frontend I’m using ionic and Silex in the Backend. When I’m working with hybrid applications normally I go through two phases.

In the first one I build a working prototype. To to this I run a local server and I use my browser to develop the application. This phase is very similar than a traditional Web development process. If we also set up properly LiveReload, our application will be reloaded each time we change one javaScript file. Ionic framework integrates LiveReload and we only need to run:

ionic serve -l

to start our application. We also need to start our backend server. For example

php -S 0.0.0.0:8080 -t api/www

Now we can debug our Backend with remote debugger and Frontend with Chrome’s developer’s tools. Chrome also allows us to edit Frontend files and save them within the filesystem using workspaces. This phase is the easy one. But sooner or later we’ll need start working with a real device. We need a real device basically if we use plugins such as Camera plugin, Geolocation plugin, or things like that. OK there are emulators, but usually emulators don’t allow to use all plugins in the same way than we use then with a real device. Chrome also allow us to see the console logs of the device from our workstation. OK we can see all logs of our plugged Android device using “adb logcat” but follow the flow of our logs with logcat is similar than understand Matrix code. It’s a mess.

If we plug our android device to our computer and we open with Chrome:

chrome://inspect/#devices

We can see our device’s console, use breakpoints and things like that. Cool, isn’t it? Of course it only works if we compile our application without “–release” option. We can do something similar with Safary and iOS devices.

With ionic if we want to use LiveReload from the real device and not to recompile and re-install again and again our application each time we change our javaScript files, we can run the application using

ionic run android --device -l

When we’re developing our application and we’re in this phase we also need to handle with CORS. CORS isn’t a problem when we run our hybrid application in production. When we run the hybrid application with our device our “origin” is the local filesystem. That’s means CORS don’t apply, but when we run our application in the device, but served from our computer (when we use “-l” option), our origin isn’t local filesystem. So if our Backend is served from another origin we need to enable CORS.

We can enable CORS in the backend. I’ve written about it here, but ionic people allows us a easier way. We can set up a local proxy to serve our backend through the same origin than the application does and forget about CORS. Here we can read a good article about it.

Anyway if we want to start the remote debugger we need to create one cookie called XDEBUG_SESSION. In the browser we can use chrome extension, but when we inspect the plugged device isn’t so simple. It would be cool that ionic people allows us to inject cookies to our proxy server. I’ve try to see how to do it with ionic-cli. Maybe is possible but I didn’t realize how to do it. Because of that I’ve created a simple AngularJS service to inject this cookie. Then, if I start listening debug connections in my IDE I’ll be able to use remote debugger as well as I do when I work with the browser.

First we need to install service via Bower:

bower install ng-xdebugger --save

Now we need to include javaScript files

<script src="lib/angular-cookies/angular-cookies.min.js"></script>
<script src="lib/ng-xdebugger/dist/gonzalo123.xdebugger.min.js"></script>

then we add our service to the project.

angular.module("starter", ["ionic", "gonzalo123.xdebugger"])

Now we only need to configure our application and set de debugger key (it must be the same key than we use within the server-side configuration of xdebug)

.config(function (xdebuggerProvider) {
        xdebuggerProvider.setKey('PHPSTORM');
    })
})

And that’s all. The service is very simple. It only uses one http interceptor to inject the cookie in our http requests:

(function () {
    "use strict";

    angular.module("gonzalo123.xdebugger", ["ngCookies"])
        .provider("xdebugger", ['$httpProvider', function ($httpProvider) {
            var debugKey;

            this.$get = function () {
                return {
                    getDebugKey: function () {
                        return debugKey;
                    }
                };
            };

            this.setKey = function (string) {
                if (string) {
                    debugKey = string;
                    $httpProvider.interceptors.push("xdebuggerCookieInterceptor");
                }
            };
        }])

        .factory("xdebuggerCookieInterceptor", ['$cookieStore', 'xdebugger', function ($cookieStore, xdebugger) {
            return {
                response: function (response) {
                    $cookieStore.put("XDEBUG_SESSION", xdebugger.getDebugKey());

                    return response;
                }
            };
        }])
    ;
})();

And of course you can see the whole project in my github account.

Book review: Socket.IO Cookbook

Last summer I collaborated as a technical reviewer in the book “Socket.IO Cookbook” written by Tyson Cadenhead and finally I’ve got the book in my hands

I’m a big fan of real time technologies and I’m normally Socket.io user. Because of that, when people of Packt Publishing contacted me to join to the project as technical reviewer my answer was yes. I’ve got serious problems nowadays to find time to pet projects and extra activities, but if there’re WebSockets inside I cannot resists.

The book is correct and it’s a good starting point to event-based communication with JavaScript. I normally don’t like beginners books (even if I’m a beginner in the technology). I don’t like the books where author explains how to do one thing that I can see how to do it within the website of the. OK. This book isn’t one of those of books. The writer don’t assume reader is a totally newbie. Because of that newbies sometimes can be lost in some chapters, but this exactly the way we all learn new technologies. I like the way Tyson introduces concepts about socket.io.

The book is focused in JavaScript and also uses JavaScript to the backend (with node). Maybe I miss the integration with non-JavaScript environments, but as socket.io is a javascript library I understand that the usage of JavaScript in all application lifecycle is a good approach.

IMG_20151106_204902_jpg

Also those days I was reading and playing a little bit with WebRTC and the book has one chapter about it! #cool