Pomodoro with ESP32. One “The Melee – Side by side” project

Last weekend there was a great event called The Melee – Side by side (Many thanks to @ojoven and @diversius).

The event was one kind of Hackathon where a group of people meet together one day, to share our side projects and to work together (yes. We also have a lunch and beers also :). The format of the event is just a copy of the event that our colleagues from Bilbao called “El Comité“.

@ibaiimaz spoke about one project to create one collaborative pomodoro where the people of one team can share their status and see the status of the rest of the team. When I heard pomodoro and status I immediately thought in one servo moving a flag and some LEDs turning on and off. We had a project. @penniath and @tatai also joined us. We also had a team.

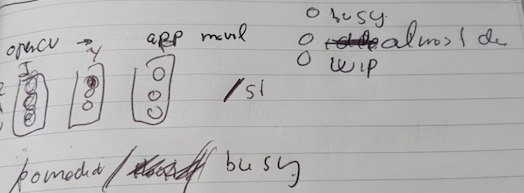
We had a project and we also had a deadline. We must show a working prototype at the end of the day. That means that we didn’t have too many time. First we decided the mockup of the project, reducing the initial scope (more ambitious) to fit it within our time slot. We discuss intensely for 10 minutes and finally we describe an ultra detailed blueprint. That’s the full blueprint of the project:

It was time to start working.

@penniath and @tatai worked in the Backend. It must be the responsible of the pomodoro timers, listen to MQTT events and create an API for the frontend. The backend also must provide a WebSockets interface to allow real time events within the frontend. They decided to use node and socket.io for the WebSockets. You can see the source code here.

@ibaiimaz started with the frontend. He decided to create an Angular web application listening to socket.io events to show the status of the pomodoro. You can see the source code here.

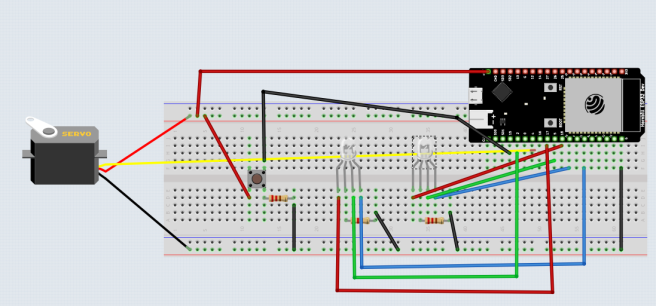
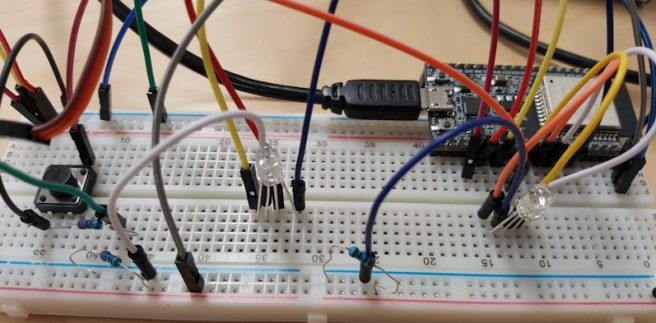
Finaly I worked with the hardware. I created a prototype with one ESP32, two RGB LEDs, one button, one servo and a couple of resistors.

That’s the source code.

#include <WiFi.h>
#include <PubSubClient.h>

int redPin_g = 19;
int greenPin_g = 17;
int bluePin_g = 18;

int redPin_i = 21;
int greenPin_i = 2;
int bluePin_i = 4;

#define SERVO_PIN 16

const int buttonPin = 15;
int buttonState = 0;

int channel = 1;
int hz = 50;
int depth = 16;

const char* ssid = "SSID";
const char* password = "password";
const char* server = "192.168.1.105";
const char* topic = "/pomodoro/+";
const char* clientName = "com.gonzalo123.esp32";

WiFiClient wifiClient;
PubSubClient client(wifiClient);

void wifiConnect() {
  Serial.print("Connecting to ");
  Serial.println(ssid);

  WiFi.begin(ssid, password);

  while (WiFi.status() != WL_CONNECTED) {
    delay(500);
    Serial.print("*");
  }

  Serial.print("WiFi connected: ");
  Serial.println(WiFi.localIP());
}

void mqttReConnect() {
  while (!client.connected()) {
    Serial.print("Attempting MQTT connection...");
    if (client.connect(clientName)) {
      Serial.println("connected");
      client.subscribe(topic);
    } else {
      Serial.print("failed, rc=");
      Serial.print(client.state());
      Serial.println(" try again in 5 seconds");
      delay(5000);
    }
  }
}

void callback(char* topic, byte* payload, unsigned int length) {
  Serial.print("Message arrived [");
  Serial.print(topic);

  String data;
  for (int i = 0; i < length; i++) {
    data += (char)payload[i];
  }

  int value = data.toInt();

  if (strcmp(topic, "/pomodoro/gonzalo") == 0) {
    Serial.print("[gonzalo]");
    switch (value) {
      case 1:
        ledcWrite(1, 3400);
        setColor_g(0, 255, 0);
        break;
      case 2:
        setColor_g(255, 0, 0);
        break;
      case 3:
        ledcWrite(1, 6400);
        setColor_g(0, 0, 255);
        break;
    }
  } else {
    Serial.print("[ibai]");
    switch (value) {
      case 1:
        setColor_i(0, 255, 0);
        break;
      case 2:
        setColor_i(255, 0, 0);
        break;
      case 3:
        setColor_i(0, 0, 255);  // green
        break;
    }
  }

  Serial.print("] value:");
  Serial.println(data);
}

void setup()
{
  Serial.begin(115200);

  pinMode(buttonPin, INPUT_PULLUP);
  pinMode(redPin_g, OUTPUT);
  pinMode(greenPin_g, OUTPUT);
  pinMode(bluePin_g, OUTPUT);

  pinMode(redPin_i, OUTPUT);
  pinMode(greenPin_i, OUTPUT);
  pinMode(bluePin_i, OUTPUT);

  ledcSetup(channel, hz, depth);
  ledcAttachPin(SERVO_PIN, channel);
  wifiConnect();
  client.setServer(server, 1883);
  client.setCallback(callback);

  delay(1500);
}

void mqttEmit(String topic, String value)
{
  client.publish((char*) topic.c_str(), (char*) value.c_str());
}

void loop()
{
  if (!client.connected()) {
    mqttReConnect();
  }

  client.loop();

  buttonState = digitalRead(buttonPin);
  if (buttonState == HIGH) {
    mqttEmit("/start/gonzalo", (String) "3");
  }

  delay(200);
}

void setColor_i(int red, int green, int blue)
{
  digitalWrite(redPin_i, red);
  digitalWrite(greenPin_i, green);
  digitalWrite(bluePin_i, blue);
}

void setColor_g(int red, int green, int blue)
{
  digitalWrite(redPin_g, red);
  digitalWrite(greenPin_g, green);
  digitalWrite(bluePin_g, blue);
}

The MQTT server (a mosquitto server) was initially running in my laptop but as well as I had one Raspberry Pi Zero also in my bag we decided to user the Pi Zero as a server and run mosquitto MQTT server with Raspbian. Everything is better with a Raspberry Pi. @tatai helped me to set up the server.

Here you can see the prototype in action

That’s the kind of side projects that I normally create alone but definitely it’s more fun to do it with other colleagues even it I need to wake up early one Saturday morning.

Source code of ESP32 here.
i18n AngularJS provider

There’s more than one way to perform i18n translations within our AngularJS projects. IMHO the best one is https://angular-translate.github.io/, but today I’m going to show you how I’m doing translations in my small AngularJS projects (normally Ionic projects).

I’ve packaged my custom solution and I also create one bower package ready to use via bower command line:

bower install ng-i8n --save

First we add our provider

<script src='lib/ng-i8n/dist/i8n.min.js'></script>

And now we add our new module (‘gonzalo123.i18n’) to our AngularJS project

angular.module('G', ['ionic', 'ngCordova', 'gonzalo123.i18n'])

Now we’re ready to initialise our provider with the default language and translation data

    .config(function (i18nProvider, Conf) {
        i18nProvider.init(Conf.defaultLang, Conf.lang);
    })

I like to use constants to store default lang and translation table, but it isn’t necessary. We can just pass the default language and Lang object to our provider

    .constant('Conf', {
        defaultLang: 'es',
        lang: {
            HI: {
                en: 'Hello',
                es: 'Hola'
            }
        }
    })

And that’s all. We can translate key in templates (the project also provides a filter):

<h1 class="title">{{ 'HI' | i18n }}</h1>

And also inside our controllers

    .controller('HomeController', function ($scope, i18n) {
        $scope.hi = i18n.traslate('HI');
    })

If we need to change user language, we only need to trigger ‘use’ function:

    .controller('HomeController', function ($scope, i18n) {
        $scope.changeLang = function(lang) {
            i18n.use(lang);
        };
    })

Here we can see the code of our provider:

(function () {
    "use strict";

    angular.module('gonzalo123.i8n', [])
        .provider('i18n', function () {
            var myLang = {},
                userLang = 'en',
                translate;

            translate = function (key) {
                if (myLang.hasOwnProperty(key)) {
                    return myLang[key][userLang] || key;
                } else {
                    return key;
                }
            };

            this.$get = function () {
                return {
                    use: this.use,
                    translate: translate
                };
            };

            this.use = function (lang) {
                userLang = lang;
            };

            this.init = function (lang, conf) {
                userLang = lang;
                myLang = conf;
            };
        })

        .filter('i18n', ['i18n', function (i18n) {
            var i18nFilter = function (key) {
                return i18n.translate(key);
            };

            i8nFilter.$stateful = true;

            return i18nFilter;
        }])
    ;
})();

Anyway the project is in my github account

Handling AngularJs POST requests with a Silex Backend

This days I working a lot with AngularJs applications (who doesn’t?). Normally my backend is a Silex application. It’s pretty straightforward to build a REST api with Silex. But when we play with an AngularJs client we need to face with a a problem. POST requests “doesn’t” work. That’s not 100% true. They work, indeed, but they speak different languages.

Silex assumes our POST requests are encoded as application/x-www-form-urlencoded, but angular encodes POST requests as application/json. That’s not a problem. It isn’t mandatory to use one encoder or another.

For example

name: Gonzalo
surname: Ayuso

If we use application/x-www-form-urlencoded, it’s encoded to:
name=Gonzalo&surname=Ayuso

And if we use application/json, it’s encoded to:
{ "name" : "Gonzalo", "surname" : "Ayuso" }

It’s the same but it isn’t.

Imagine this Silex example.

use Silex\Application;
use Symfony\Component\HttpFoundation\Request;

$app = new Application();

$app->post("/post", function (Application $app, Request $request) {
    return $app->json([
        'status' => true,
        'name'   => $request->get('name')
    ]);
});

This example works with application/x-www-form-urlencoded but it doesn’t work with application/json. We cannot use Symfony\Component\HttpFoundation\Request parameter’s bag as usual. We can get the raw request body with:

$request->getContent();

Our content in a application/json encoded Request is a JSON, so we can use json_decode to access to those parameters.

If we read the Silex documentation we can see how to handle those requests

http://silex.sensiolabs.org/doc/cookbook/json_request_body.html

In this post we’re going to enclose this code within a service provider. OK, that’s not really a service provider (it doesn’t provide any service). It just change the request (when we get application/json) without copy and paste the same code within each project.

use Silex\Application;
use G\AngularPostRequestServiceProvider;
use Symfony\Component\HttpFoundation\Request;

$app = new Application();
$app->register(new AngularPostRequestServiceProvider());

$app->post("/post", function (Application $app, Request $request) {
    return $app->json([
        'status' => true,
        'name'   => $request->get('name')
    ]);
});

The service provider is very simple

namespace G;

use Silex\Application;
use Symfony\Component\HttpFoundation\Request;
use Pimple\ServiceProviderInterface;
use Pimple\Container;

class AngularPostRequestServiceProvider implements ServiceProviderInterface
{
    public function register(Container $app)
    {
        $app->before(function (Request $request) {
            if ($this->isRequestTransformable($request)) {
                $transformedRequest = $this->transformContent($request->getContent());
                $request->request->replace($transformedRequest);
            }
        });
    }

    public function boot(Application $app)
    {
    }

    private function transformContent($content)
    {
        return json_decode($content, true);
    }

    private function isRequestTransformable(Request $request)
    {
        return 0 === strpos($request->headers->get('Content-Type'), 'application/json');
    }
}

You can see the whole code in my github account and also in packagist

Using OpenUI5 table and Angularjs

Last days I’ve been playing with OpenUI5. OpenUI5 is a web toolkit that SAP people has released as an open source project. I’ve read several good reviews about this framework, and because of that I started to hack a little bit with it. OpenUI5 came with a very complete set of controls. In this small example I want to use the “table” control. It’s just a datagrid. This days I playing a lot with Angular.js so I wanted to use together OpenUI5’s table control and Angularjs.

I’m not quite sure if it’s a good decision to use together both frameworks. In fact we don’t need Angular.js to create web applications using OpenUI5. OpenUI5 uses internally jQuery, but I wanted to hack a little bit and create one Angularjs directive to enclose one OpenUI5 datagrid.

First of all, we create one index.html. It’s just a boilerplate with angular + ui-router + ui-bootstrap. We also start our OpenUi5 environment with de default theme and including the table library

<!doctype html>
<html ng-app="G">
<head>
    <meta name="viewport" content="width=device-width, initial-scale=1">

    <link rel="stylesheet" href="assets/bootstrap/dist/css/bootstrap.min.css">

    <script src="assets/angular/angular.js"></script>
    <script src="assets/angular-ui-router/release/angular-ui-router.js"></script>
    <script src="assets/angular-bootstrap/ui-bootstrap-tpls.js"></script>

    <script id='sap-ui-bootstrap' type='text/javascript'
            src="https://openui5.hana.ondemand.com/resources/sap-ui-core.js"
            data-sap-ui-theme='sap_bluecrystal'
            data-sap-ui-libs='sap.ui.commons, sap.ui.table'></script>

    <script src="js/ngOpenUI5.js"></script>

    <script src="js/app.js"></script>
    <link rel="stylesheet" href="css/app.css">
</head>
<body class="ng-cloak">

<div class="container">

    <div class="starter-template">
        <div ui-view></div>
    </div>
</div>

<script src="assets/html5shiv/dist/html5shiv.js"></script>
<script src="assets/respond/dest/respond.src.js"></script>

</body>
</html>

Then we create a directive enclosing the OpenUI5 needed code within a Angular module

(function () {
    'use strict';

    angular.module('ng.openui5', [])
        .directive('openui5Table', function () {

            function renderColumns(columns, oTable) {
                for (var i = 0; i <= columns.length; i++) {
                    oTable.addColumn(new sap.ui.table.Column(columns[i]));
                }
            }

            var link = function (scope, element) {

                var oData = scope.model.data,
                    oTable = new sap.ui.table.Table(scope.model.conf),
                    oModel = new sap.ui.model.json.JSONModel();

                oModel.setData({modelData: oData});
                renderColumns(scope.model.columns, oTable);

                oTable.setModel(oModel);
                oTable.bindRows("/modelData");
                oTable.sort(oTable.getColumns()[0]);

                oTable.placeAt(element);

                scope.$watch('model.data', function (data) {
                    if (data) {
                        oModel.setData({modelData: data});
                        oModel.refresh();
                    }
                }, true);

            };

            return {
                restrict: 'E',
                scope: {model: '=ngModel'},
                link: link
            };
        });
}());

And now we can create a simple Angular.js using the ng.openui5 module. In this application we configure the table and fetch the data from an externar API server

(function () {
    'use strict';

    angular.module('G', ['ui.bootstrap', 'ui.router', 'ng.openui5'])

        .value('config', {
            apiUrl: '/api'
        })

        .config(function ($stateProvider, $urlRouterProvider) {
            $urlRouterProvider.otherwise("/");
            $stateProvider
                .state('home', {
                    url: "/",
                    templateUrl: "partials/home.html",
                    controller: 'HomeController'
                });
        })

        .controller('HomeController', function ($scope, $http, $log, config) {
            $scope.refresh = function () {
                $http.get(config.apiUrl + '/gridData').success(function (data) {
                    $scope.datagrid.data = data;
                });
            };

            $scope.datagrid = {
                conf: {
                    title: "Table example",
                    navigationMode: sap.ui.table.NavigationMode.Paginator
                },
                columns: [
                    {
                        label: new sap.ui.commons.Label({text: "Last Name"}),
                        template: new sap.ui.commons.TextView().bindProperty("text", "lastName"),
                        sortProperty: "lastName",
                        filterProperty: "lastName",
                        width: "200px"
                    }, {
                        label: new sap.ui.commons.Label({text: "First Name"}),
                        template: new sap.ui.commons.TextField().bindProperty("value", "name"),
                        sortProperty: "name",
                        filterProperty: "name",
                        width: "100px"
                    }, {
                        label: new sap.ui.commons.Label({text: "Checked"}),
                        template: new sap.ui.commons.CheckBox().bindProperty("checked", "checked"),
                        sortProperty: "checked",
                        filterProperty: "checked",
                        width: "75px",
                        hAlign: "Center"
                    }, {
                        label: new sap.ui.commons.Label({text: "Web Site"}),
                        template: new sap.ui.commons.Link().bindProperty("text", "linkText").bindProperty("href", "href"),
                        sortProperty: "linkText",
                        filterProperty: "linkText"
                    }, {
                        label: new sap.ui.commons.Label({text: "Image"}),
                        template: new sap.ui.commons.Image().bindProperty("src", "src"),
                        width: "75px",
                        hAlign: "Center"
                    }, {
                        label: new sap.ui.commons.Label({text: "Gender"}),
                        template: new sap.ui.commons.ComboBox({
                            items: [
                                new sap.ui.core.ListItem({text: "female"}),
                                new sap.ui.core.ListItem({text: "male"})
                            ]
                        }).bindProperty("value", "gender"),
                        sortProperty: "gender",
                        filterProperty: "gender"
                    }, {
                        label: new sap.ui.commons.Label({text: "Rating"}),
                        template: new sap.ui.commons.RatingIndicator().bindProperty("value", "rating"),
                        sortProperty: "rating",
                        filterProperty: "rating"
                    }

                ]
            };
        })
    ;
}());

The API server is a simple Silex server

<?php
include __DIR__ . '/../../vendor/autoload.php';
use Silex\Application;

$app = new Application();
$app->get("/", function (Application $app) {

$app->get('gridData', function (Application $app) {
    return $app->json([
        ['lastName' => uniqid(), 'name' => "Al", 'checked' => true, 'linkText' => "www.sap.com", 'href' => "http://www.sap.com", 'gender' => "male", 'rating' => 4, 'src' => "images/person1.gif"],
        ['lastName' => "Friese", 'name' => "Andy", 'checked' => true, 'linkText' => "www.sap.com", 'href' => "http://www.sap.com", 'gender' => "male", 'rating' => 2, 'src' => "images/person1.gif"],
        ['lastName' => "Mann", 'name' => "Anita", 'checked' => false, 'linkText' => "www.sap.com", 'href' => "http://www.sap.com", 'gender' => "female", 'rating' => 3, 'src' => "images/person1.gif"],
        ['lastName' => "Schutt", 'name' => "Doris", 'checked' => true, 'linkText' => "www.sap.com", 'href' => "http://www.sap.com", 'gender' => "female", 'rating' => 4, 'src' => "images/person1.gif"],
        ['lastName' => "Open", 'name' => "Doris", 'checked' => true, 'linkText' => "www.sap.com", 'href' => "http://www.sap.com", 'gender' => "female", 'rating' => 2, 'src' => "images/person1.gif"],
        ['lastName' => "Dewit", 'name' => "Kenya", 'checked' => false, 'linkText' => "www.sap.com", 'href' => "http://www.sap.com", 'gender' => "female", 'rating' => 3, 'src' => "images/person1.gif"],
        ['lastName' => "Zar", 'name' => "Lou", 'checked' => true, 'linkText' => "www.sap.com", 'href' => "http://www.sap.com", 'gender' => "male", 'rating' => 1, 'src' => "images/person1.gif"],
        ['lastName' => "Burr", 'name' => "Tim", 'checked' => true, 'linkText' => "www.sap.com", 'href' => "http://www.sap.com", 'gender' => "male", 'rating' => 2, 'src' => "images/person1.gif"],
        ['lastName' => "Hughes", 'name' => "Tish", 'checked' => true, 'linkText' => "www.sap.com", 'href' => "http://www.sap.com", 'gender' => "male", 'rating' => 5, 'src' => "images/person1.gif"],
        ['lastName' => "Lester", 'name' => "Mo", 'checked' => true, 'linkText' => "www.sap.com", 'href' => "http://www.sap.com", 'gender' => "male", 'rating' => 3, 'src' => "images/person1.gif"],
        ['lastName' => "Case", 'name' => "Justin", 'checked' => false, 'linkText' => "www.sap.com", 'href' => "http://www.sap.com", 'gender' => "male", 'rating' => 3, 'src' => "images/person1.gif"],
        ['lastName' => "Time", 'name' => "Justin", 'checked' => true, 'linkText' => "www.sap.com", 'href' => "http://www.sap.com", 'gender' => "male", 'rating' => 4, 'src' => "images/person1.gif"],
        ['lastName' => "Barr", 'name' => "Gaye", 'checked' => true, 'linkText' => "www.sap.com", 'href' => "http://www.sap.com", 'gender' => "male", 'rating' => 2, 'src' => "images/person1.gif"],
        ['lastName' => "Poole", 'name' => "Gene", 'checked' => true, 'linkText' => "www.sap.com", 'href' => "http://www.sap.com", 'gender' => "male", 'rating' => 1, 'src' => "images/person1.gif"],
        ['lastName' => "Ander", 'name' => "Corey", 'checked' => false, 'linkText' => "www.sap.com", 'href' => "http://www.sap.com", 'gender' => "male", 'rating' => 5, 'src' => "images/person1.gif"],
        ['lastName' => "Early", 'name' => "Brighton", 'checked' => true, 'linkText' => "www.sap.com", 'href' => "http://www.sap.com", 'gender' => "male", 'rating' => 3, 'src' => "images/person1.gif"],
        ['lastName' => "Noring", 'name' => "Constance", 'checked' => true, 'linkText' => "www.sap.com", 'href' => "http://www.sap.com", 'gender' => "female", 'rating' => 4, 'src' => "images/person1.gif"],
        ['lastName' => "Haas", 'name' => "Jack", 'checked' => true, 'linkText' => "www.sap.com", 'href' => "http://www.sap.com", 'gender' => "male", 'rating' => 2, 'src' => "images/person1.gif"],
        ['lastName' => "Tress", 'name' => "Matt", 'checked' => true, 'linkText' => "www.sap.com", 'href' => "http://www.sap.com", 'gender' => "male", 'rating' => 4, 'src' => "images/person1.gif"],
        ['lastName' => "Turner", 'name' => "Paige", 'checked' => true, 'linkText' => "www.sap.com", 'href' => "http://www.sap.com", 'gender' => "female", 'rating' => 3, 'src' => "images/person1.gif"]
    ]);
});
$app->run();

And basically that’s all. You can see the whole project within my github account.

working example
working example

Setting up states from a json file in angularjs applications

Imagine a this simple angularjs application using angular-ui-router:

<!DOCTYPE html>
<html>
<head>
    <meta charset="utf-8">
    <title>Example</title>
    <script src="bower_components/angular/angular.js"></script>
    <script src="bower_components/angular-ui-router/release/angular-ui-router.js"></script>
    <script src="js/app.js"></script>

</head>
<body ng-app="App" ng-controller="MainController">

<div ui-view></div>
</body>
</html>

angular.module('App', ['ui.router'])

    .config(function ($stateProvider, $urlRouterProvider, routerProvider) {
        $stateProvider
            .state('home', {
                url: '/home',
                templateUrl: 'templates/home.html'
            });

        $urlRouterProvider.otherwise('/home');
    })

    .controller('MainController', function ($scope, router) {
        $scope.reload = function() {
            router.setUpRoutes();
        };
    })
;

We’ve defined only one state called “home”. If we need more states we just add more within config() function. In this post we’re going to try to add more states from a json file instead of hardcode the states within the code.

Let’s create our json file with the states definitions:

{
    "xxx": {
        "url": "/xxx",
        "templateUrl": "templates/xxx.html"
    },

    "yyy": {
        "url": "/yyy",
        "templateUrl": "templates/yyy.html"
    },

    "zzz": {
        "url": "/zzz",
        "templateUrl": "templates/zzz.html"
    }
}

Now our application looks like this:

angular.module('App', ['ui.router', 'Routing'])

    .config(function ($stateProvider, $urlRouterProvider, routerProvider) {
        $stateProvider
            .state('home', {
                url: '/home',
                templateUrl: 'templates/home.html'
            });

        $urlRouterProvider.otherwise('/home');

        routerProvider.setCollectionUrl('js/routeCollection.json');
    })

    .controller('MainController', function ($scope, router) {
        $scope.reload = function() {
            router.setUpRoutes();
        };
    })
;

As we can see now we’re using ‘Routing’

angular.module('Routing', ['ui.router'])
    .provider('router', function ($stateProvider) {

        var urlCollection;

        this.$get = function ($http, $state) {
            return {
                setUpRoutes: function () {
                    $http.get(urlCollection).success(function (collection) {
                        for (var routeName in collection) {
                            if (!$state.get(routeName)) {
                                $stateProvider.state(routeName, collection[routeName]);
                            }
                        }
                    });
                }
            }
        };

        this.setCollectionUrl = function (url) {
            urlCollection = url;
        }
    })

    .run(function (router) {
        router.setUpRoutes();
    });

‘Routing’ provides us a provider called ‘router’ that fetch the json file and build the states.

That’s a proof of concept.
There’s a couple of problems (please tell me if you know how to solve them):

  • As far as we’re loading states from a http connection, angular application don’t have all the states when it starts, so we need to create at least the first state with the “old style”
  • We can reload states with the application running. We also can add new states, but we cannot modify the existing ones.

you can see the one example project within my github account.