Happy logins. Only the happy user will pass

Login forms are bored. In this example we’re going to create an especial login form. Only for happy users. Happiness is something complicated, but at least, one smile is more easy to obtain, and all is better with one smile :). Our login form will only appear if the user smiles. Let’s start.

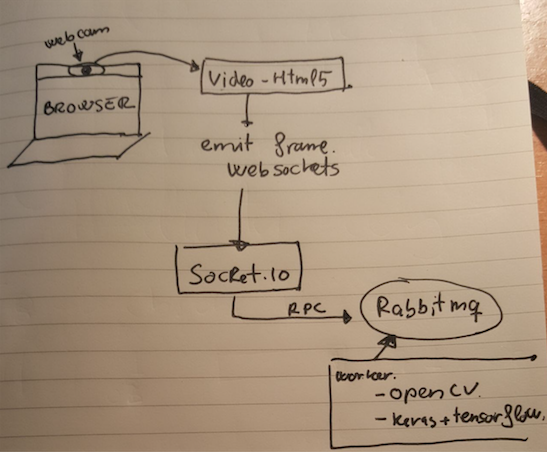
I must admit that this project is just an excuse to play with different technologies that I wanted to play. Weeks ago I discovered one library called face_classification. With this library I can perform emotion classification from a picture. The idea is simple. We create RabbitMQ RPC server script that answers with the emotion of the face within a picture. Then we obtain on frame from the video stream of the webcam (with HTML5) and we send this frame using websocket to a socket.io server. This websocket server (node) ask to the RabbitMQ RPC the emotion and it sends back to the browser the emotion and a the original picture with a rectangle over the face.

Frontend

As well as we’re going to use socket.io for websockets we will use the same script to serve the frontend (the login and the HTML5 video capture)

<!doctype html>
<html>
<head>
    <title>Happy login</title>
    <link rel="stylesheet" href="css/app.css">
</head>
<body>

<div id="login-page" class="login-page">
    <div class="form">
        <h1 id="nonHappy" style="display: block;">Only the happy user will pass</h1>
        <form id="happyForm" class="login-form" style="display: none" onsubmit="return false;">
            <input id="user" type="text" placeholder="username"/>
            <input id="pass" type="password" placeholder="password"/>
            <button id="login">login</button>
            <p></p>
            <img id="smile" width="426" height="320" src=""/>
        </form>
        <div id="video">
            <video style="display:none;"></video>
            <canvas id="canvas" style="display:none"></canvas>
            <canvas id="canvas-face" width="426" height="320"></canvas>
        </div>
    </div>
</div>

<div id="private" style="display: none;">
    <h1>Private page</h1>
</div>

<script src="https://code.jquery.com/jquery-3.2.1.min.js" integrity="sha256-hwg4gsxgFZhOsEEamdOYGBf13FyQuiTwlAQgxVSNgt4=" crossorigin="anonymous"></script>
<script src="https://unpkg.com/sweetalert/dist/sweetalert.min.js"></script>
<script type="text/javascript" src="/socket.io/socket.io.js"></script>
<script type="text/javascript" src="/js/app.js"></script>
</body>
</html>

Here we’ll connect to the websocket and we’ll emit the webcam frame to the server. We´ll also be listening to one event called ‘response’ where server will notify us when one emotion has been detected.

let socket = io.connect(location.origin),
    img = new Image(),
    canvasFace = document.getElementById('canvas-face'),
    context = canvasFace.getContext('2d'),
    canvas = document.getElementById('canvas'),
    width = 640,
    height = 480,
    delay = 1000,
    jpgQuality = 0.6,
    isHappy = false;

socket.on('response', function (r) {
    let data = JSON.parse(r);
    if (data.length > 0 && data[0].hasOwnProperty('emotion')) {
        if (isHappy === false && data[0]['emotion'] === 'happy') {
            isHappy = true;
            swal({
                title: "Good!",
                text: "All is better with one smile!",
                icon: "success",
                buttons: false,
                timer: 2000,
            });

            $('#nonHappy').hide();
            $('#video').hide();
            $('#happyForm').show();
            $('#smile')[0].src = 'data:image/png;base64,' + data[0].image;
        }

        img.onload = function () {
            context.drawImage(this, 0, 0, canvasFace.width, canvasFace.height);
        };

        img.src = 'data:image/png;base64,' + data[0].image;
    }
});

navigator.getMedia = (navigator.getUserMedia || navigator.webkitGetUserMedia || navigator.mozGetUserMedia);

navigator.getMedia({video: true, audio: false}, (mediaStream) => {
    let video = document.getElementsByTagName('video')[0];
    video.src = window.URL.createObjectURL(mediaStream);
    video.play();
    setInterval(((video) => {
        return function () {
            let context = canvas.getContext('2d');
            canvas.width = width;
            canvas.height = height;
            context.drawImage(video, 0, 0, width, height);
            socket.emit('img', canvas.toDataURL('image/jpeg', jpgQuality));
        }
    })(video), delay)
}, error => console.log(error));

$(() => {
    $('#login').click(() => {
        $('#login-page').hide();
        $('#private').show();
    })
});

Backend
Finally we’ll work in the backend. Basically I’ve check the examples that we can see in face_classification project and tune it a bit according to my needs.

from rabbit import builder
import logging
import numpy as np
from keras.models import load_model
from utils.datasets import get_labels
from utils.inference import detect_faces
from utils.inference import draw_text
from utils.inference import draw_bounding_box
from utils.inference import apply_offsets
from utils.inference import load_detection_model
from utils.inference import load_image
from utils.preprocessor import preprocess_input
import cv2
import json
import base64

detection_model_path = 'trained_models/detection_models/haarcascade_frontalface_default.xml'
emotion_model_path = 'trained_models/emotion_models/fer2013_mini_XCEPTION.102-0.66.hdf5'
emotion_labels = get_labels('fer2013')
font = cv2.FONT_HERSHEY_SIMPLEX

# hyper-parameters for bounding boxes shape
emotion_offsets = (20, 40)

# loading models
face_detection = load_detection_model(detection_model_path)
emotion_classifier = load_model(emotion_model_path, compile=False)

# getting input model shapes for inference
emotion_target_size = emotion_classifier.input_shape[1:3]


def format_response(response):
    decoded_json = json.loads(response)
    return "Hello {}".format(decoded_json['name'])


def on_data(data):
    f = open('current.jpg', 'wb')
    f.write(base64.decodebytes(data))
    f.close()
    image_path = "current.jpg"

    out = []
    # loading images
    rgb_image = load_image(image_path, grayscale=False)
    gray_image = load_image(image_path, grayscale=True)
    gray_image = np.squeeze(gray_image)
    gray_image = gray_image.astype('uint8')

    faces = detect_faces(face_detection, gray_image)
    for face_coordinates in faces:
        x1, x2, y1, y2 = apply_offsets(face_coordinates, emotion_offsets)
        gray_face = gray_image[y1:y2, x1:x2]

        try:
            gray_face = cv2.resize(gray_face, (emotion_target_size))
        except:
            continue

        gray_face = preprocess_input(gray_face, True)
        gray_face = np.expand_dims(gray_face, 0)
        gray_face = np.expand_dims(gray_face, -1)
        emotion_label_arg = np.argmax(emotion_classifier.predict(gray_face))
        emotion_text = emotion_labels[emotion_label_arg]
        color = (0, 0, 255)

        draw_bounding_box(face_coordinates, rgb_image, color)
        draw_text(face_coordinates, rgb_image, emotion_text, color, 0, -50, 1, 2)
        bgr_image = cv2.cvtColor(rgb_image, cv2.COLOR_RGB2BGR)

        cv2.imwrite('predicted.png', bgr_image)
        data = open('predicted.png', 'rb').read()
        encoded = base64.encodebytes(data).decode('utf-8')
        out.append({
            'image': encoded,
            'emotion': emotion_text,
        })

    return out

logging.basicConfig(level=logging.WARN)
rpc = builder.rpc("image.check", {'host': 'localhost', 'port': 5672})
rpc.server(on_data)

Here you can see in action the working prototype

Maybe we can do the same with another tools and even more simple but as I said before this example is just an excuse to play with those technologies:

  • Send webcam frames via websockets
  • Connect one web application to a Pyhon application via RabbitMQ RPC
  • Play with face classification script

Please don’t use this script in production. It’s just a proof of concepts. With smiles but a proof of concepts 🙂

You can see the project in my github account
Playing with Docker, Silex, Python, Node and WebSockets

I’m learning Docker. In this post I want to share a little experiment that I have done. I know the code looks like over-engineering but it’s just an excuse to build something with docker and containers. Let me explain it a little bit.

The idea is build a Time clock in the browser. Something like this:

Clock

Yes I know. We can do it only with js, css and html but we want to hack a little bit more. The idea is to create:

  • A Silex/PHP frontend
  • A WebSocket server with socket.io/node
  • A Python script to obtain the current time

WebSocket server will open 2 ports: One port to serve webSockets (socket.io) and another one as a http server (express). Python script will get the current time and it’ll send it to the webSocket server. Finally one frontend(silex) will be listening to WebSocket’s event and it will render the current time.

That’s the WebSocket server (with socket.io and express)

var
    express = require('express'),
    expressApp = express(),
    server = require('http').Server(expressApp),
    io = require('socket.io')(server, {origins: 'localhost:*'})
    ;

expressApp.get('/tic', function (req, res) {
    io.sockets.emit('time', req.query.time);
    res.json('OK');
});

expressApp.listen(6400, '0.0.0.0');

server.listen(8080);

That’s our Python script

from time import gmtime, strftime, sleep
import httplib2

h = httplib2.Http()
while True:
    (resp, content) = h.request("http://node:6400/tic?time=" + strftime("%H:%M:%S", gmtime()))
    sleep(1)

And our Silex frontend

use Silex\Application;
use Silex\Provider\TwigServiceProvider;

$app = new Application(['debug' => true]);
$app->register(new TwigServiceProvider(), [
    'twig.path' => __DIR__ . '/../views',
]);

$app->get("/", function (Application $app) {
    return $app['twig']->render('index.twig', []);
});

$app->run();

using this twig template

<!DOCTYPE html>
<html lang="en">
<head>
    <meta charset="utf-8">
    <meta http-equiv="X-UA-Compatible" content="IE=edge">
    <meta name="viewport" content="width=device-width, initial-scale=1">
    <title>Docker example</title>
    <link rel="stylesheet" href="https://maxcdn.bootstrapcdn.com/bootstrap/3.3.7/css/bootstrap.min.css" integrity="sha384-BVYiiSIFeK1dGmJRAkycuHAHRg32OmUcww7on3RYdg4Va+PmSTsz/K68vbdEjh4u" crossorigin="anonymous">
    <link href="css/app.css" rel="stylesheet">
    <script src="https://oss.maxcdn.com/html5shiv/3.7.3/html5shiv.min.js"></script>
    <script src="https://oss.maxcdn.com/respond/1.4.2/respond.min.js"></script>
</head>
<body>
<div class="site-wrapper">
    <div class="site-wrapper-inner">
        <div class="cover-container">
            <div class="inner cover">
                <h1 class="cover-heading">
                    <div id="display">
                        display
                    </div>
                </h1>
            </div>
        </div>
    </div>
</div>
<script src="//localhost:8080/socket.io/socket.io.js"></script>
<script src="https://ajax.googleapis.com/ajax/libs/jquery/1.12.4/jquery.min.js"></script>
<script>
var socket = io.connect('//localhost:8080');

$(function () {
    socket.on('time', function (data) {
        $('#display').html(data);
    });
});
</script>
</body>
</html>

The idea is to use one Docker container for each process. I like to have all the code in one place so all containers will share the same volume with source code.

First the node container (WebSocket server)

FROM node:argon

RUN mkdir -p /mnt/src
WORKDIR /mnt/src/node

EXPOSE 8080 6400

Now the python container

FROM python:2

RUN pip install httplib2

RUN mkdir -p /mnt/src
WORKDIR /mnt/src/python

And finally Frontend contailer (apache2 with Ubuntu 16.04)

FROM ubuntu:16.04

RUN locale-gen es_ES.UTF-8
RUN update-locale LANG=es_ES.UTF-8
ENV DEBIAN_FRONTEND=noninteractive

RUN apt-get update -y
RUN apt-get install --no-install-recommends -y apache2 php libapache2-mod-php
RUN apt-get clean -y

COPY ./apache2/sites-available/000-default.conf /etc/apache2/sites-available/000-default.conf

RUN mkdir -p /mnt/src

RUN a2enmod rewrite
RUN a2enmod proxy
RUN a2enmod mpm_prefork

RUN chown -R www-data:www-data /mnt/src
ENV APACHE_RUN_USER www-data
ENV APACHE_RUN_GROUP www-data
ENV APACHE_LOG_DIR /var/log/apache2
ENV APACHE_LOCK_DIR /var/lock/apache2
ENV APACHE_PID_FILE /var/run/apache2/apache2.pid
ENV APACHE_SERVERADMIN admin@localhost
ENV APACHE_SERVERNAME localhost

EXPOSE 80

Now we’ve got the three containers but we want to use all together. We’ll use a docker-compose.yml file. The web container will expose port 80 and node container 8080. Node container also opens 6400 but this port is an internal port. We don’t need to access to this port outside. Only Python container needs to access to this port. Because of that 6400 is not mapped to any port in docker-compose

version: '2'

services:
  web:
    image: gonzalo123/example_web
    container_name: example_web
    ports:
     - "80:80"
    restart: always
    depends_on:
      - node
    build:
      context: ./images/php
      dockerfile: Dockerfile
    entrypoint:
      - /usr/sbin/apache2
      - -D
      - FOREGROUND
    volumes:
     - ./src:/mnt/src

  node:
    image: gonzalo123/example_node
    container_name: example_node
    ports:
     - "8080:8080"
    restart: always
    build:
      context: ./images/node
      dockerfile: Dockerfile
    entrypoint:
      - npm
      - start
    volumes:
     - ./src:/mnt/src

  python:
      image: gonzalo123/example_python
      container_name: example_python
      restart: always
      depends_on:
        - node
      build:
        context: ./images/python
        dockerfile: Dockerfile
      entrypoint:
        - python
        - tic.py
      volumes:
       - ./src:/mnt/src

And that’s all. We only need to start our containers

docker-compose up --build -d

and open our browser at: http://localhost to see our Time clock

Full source code available within my github account

Sharing authentication between socket.io and a PHP frontend

Normally, when I work with websockets, my stack is a socket.io server and a Silex frontend. Protect a PHP frontend with one kind of authentication of another is pretty straightforward. But if we want to use websockets, we need to set up another server and if we protect our frontend we need to protect our websocket server too.

If our frontend is node too (express for example), sharing authentication is more easy but at this time we we want to use two different servers (a node server and a PHP server). I’ve written about it too but today we`ll see another solution. Let’s start.

Imagine we have this simple Silex application. It has three routes:

  • “/” a public route
  • “/login” to perform the login action
  • “/private” a private route. If we try to get here without a valid session we’ll get a 403 error

And this is the code. It’s basically one example using sessions taken from Silex documentation:

use Silex\Application;
use Silex\Provider\SessionServiceProvider;
use Silex\Provider\TwigServiceProvider;
use Symfony\Component\HttpFoundation\Response;
use Symfony\Component\HttpKernel\Exception\AccessDeniedHttpException;

$app = new Application();

$app->register(new SessionServiceProvider());
$app->register(new TwigServiceProvider(), [
    'twig.path' => __DIR__ . '/../views',
]);

$app->get('/', function (Application $app) {
    return $app['twig']->render('home.twig');
});

$app->get('/login', function () use ($app) {
    $username = $app['request']->server->get('PHP_AUTH_USER', false);
    $password = $app['request']->server->get('PHP_AUTH_PW');

    if ('gonzalo' === $username && 'password' === $password) {
        $app['session']->set('user', ['username' => $username]);

        return $app->redirect('/private');
    }

    $response = new Response();
    $response->headers->set('WWW-Authenticate', sprintf('Basic realm="%s"', 'site_login'));
    $response->setStatusCode(401, 'Please sign in.');

    return $response;
});

$app->get('/private', function () use ($app) {
    $user = $app['session']->get('user');
    if (null === $user) {
        throw new AccessDeniedHttpException('Access Denied');
    }

    return $app['twig']->render('private.twig', [
        'username'  => $user['username']
    ]);
});

$app->run();

Our “/private” route also creates a connection with our websocket server.

<!DOCTYPE html>
<html lang="en">
<head>
    <meta charset="UTF-8">
    <title>Title</title>
</head>
<body>
Welcome {{ username }}!

<script src="http://localhost:3000/socket.io/socket.io.js"></script>
<script>
    var socket = io('http://localhost:3000/');
    socket.on('connect', function () {
        console.log("connected!");
    });
    socket.on('disconnect', function () {
        console.log("disconnected!");
    });
</script>

</body>
</html>

And that’s our socket.io server. A really simple one.

var io = require('socket.io')(3000);

It works. Our frontend is protected. We need to login with our credentials (in this example “gonzalo/password”), but everyone can connect to our socket.io server. The idea is to use our PHP session to protect our socket.io server too. In fact is very easy how to do it. First we need to pass our PHPSESSID to our socket.io server. To do it, when we perform our socket.io connection in the frontend, we pass our session id

<script>
    var socket = io('http://localhost:3000/', {
        query: 'token={{ sessionId }}'
    });
    socket.on('connect', function () {
        console.log("connected!");
    });
    socket.on('disconnect', function () {
        console.log("disconnect!");
    });
</script>

As well as we’re using a twig template we need to pass sessionId variable

$app->get('/private', function () use ($app) {
    $user = $app['session']->get('user');
    if (null === $user) {
        throw new AccessDeniedHttpException('Access Denied');
    }

    return $app['twig']->render('private.twig', [
        'username'  => $user['username'],
        'sessionId' => $app['session']->getId()
    ]);
});

Now we only need to validate the token before stabilising connection. Socket.io provides us a middleware to perform those kind of operations. In this example we’re using PHP sessions out of the box. How can we validate it? The answer is easy. We only need to create a http client (in the socket.io server) and perform a request to a protected route (we’ll use “/private”). If we’re using a different provider to store our sessions (I hope you aren’t using Memcached to store PHP session, indeed) you’ll need to validate our sessionId against your provider.

var io = require('socket.io')(3000),
    http = require('http');

io.use(function (socket, next) {
    var options = {
        host: 'localhost',
        port: 8080,
        path: '/private',
        headers: {Cookie: 'PHPSESSID=' + socket.handshake.query.token}
    };

    http.request(options, function (response) {
        response.on('error', function () {
            next(new Error("not authorized"));
        }).on('data', function () {
            next();
        });
    }).end();
});

io.on('connection', function () {
    console.log("connected!");
});

Ok. This example works but we’re generating dynamically a js file injecting our PHPSESSID. If we want to extract the sessionId from the request we can use document.cookie but sometimes it doesn’t work. That’s because HttpOnly. HttpOnly is our friend if we want to protect our cookies against XSS attacks but in this case our protection difficults our task.

We can solve this problem performing a simple request to our server. We’ll create a new route (a private route) called ‘getSessionID’ that gives us our sessionId.

$app->get('/getSessionID', function (Application $app) {
    $user = $app['session']->get('user');
    if (null === $user) {
        throw new AccessDeniedHttpException('Access Denied');
    }

    return $app->json($app['session']->getId());
});

So before establishing the websocket we just need to create a GET request to our new route to obtain the sessionID.

var io = require('socket.io')(3000),
    http = require('http');

io.use(function (socket, next) {
    var sessionId = socket.handshake.query.token,
        options = {
            host: 'localhost',
            port: 8080,
            path: '/getSessionID',
            headers: {Cookie: 'PHPSESSID=' + sessionId}
        };

    http.request(options, function (response) {
        response.on('error', function () {
            next(new Error("not authorized"));
        });
        response.on('data', function (chunk) {
            var sessionIdFromRequest;
            try {
                sessionIdFromRequest = JSON.parse(chunk.toString());
            } catch (e) {
                next(new Error("not authorized"));
            }

            if (sessionId == sessionIdFromRequest) {
                next();
            } else {
                next(new Error("not authorized"));
            }
        });
    }).end();
});

io.on('connection', function (socket) {
    setInterval(function() {
        socket.emit('hello', {hello: 'world'});
    }, 1000);
});

And thats all. You can see the full example in my github account.