Connecting Grafana to PostgreSQL with Python for Time Series Analysis

In the world of data analysis and graphs, we have three important tools: Grafana, PostgreSQL, and Python. They work together to help us look at data and track how it changes over time. In this article, we’ll learn step by step how to use Grafana with a PostgreSQL database. We’ll also discover how to use Python to record data that changes over time. By the end of this article, you’ll know how to set up these tools, and you’ll see how they can be useful for your work with data.

First, we create our table. We also create a sequence for the primary key.

CREATE TABLE MEASUREMENTLOG
(
    id              numeric(10)            NOT NULL,
    key             character varying(100) NOT NULL,
    datetime        TIMESTAMP WITHOUT TIME ZONE NOT NULL,
    status          numeric(2) NOT NULL,

    CONSTRAINT MEASUREMENTLOG_pkey PRIMARY KEY (id)
);

create sequence SEQ_MEASUREMENTLOG
    minvalue 0
    maxvalue 999999999999999999
    start with 1
    increment by 1
    cache 1;

And a simple python script to persists a timeseries.

from random import randint
from time import sleep
from datetime import datetime
import os
import logging
import pytz

from dbutils import transactional, get_conn

from settings import DSN

tz = pytz.timezone('Europe/Madrid')

logging.basicConfig(
    format='%(asctime)s [%(levelname)s] %(message)s',
    level='INFO',
    datefmt='%d/%m/%Y %X')

logger = logging.getLogger(__name__)


def persists(key, dt, status):
    with transactional(conn=get_conn(DSN)) as db:
        seq_log = db.fetch_all("SELECT nextval('seq_measurementlog')")[0][0]
        db.insert('measurementlog', dict(
            id=seq_log,
            key=key,
            datetime=dt,
            status=status
        ))


KEY = os.getenv('KEY')
status = 0
while True:
    now = datetime.now(tz)
    persists(
        key=KEY,
        dt=now,
        status=status
    )
    logger.info(f"[{now}] status: {status}")
    status = 1 if status == 0 else 0
    sleep(randint(5, 15))

Now we set up PostgreSQL database and Grafana in a docker-compose.yml.

More information about the configuration of postgresql and grafana here in the links

version: '3'

services:
  pg:
    image: pg
    restart: unless-stopped
    build:
      context: .docker/pg/
      dockerfile: Dockerfile
    environment:
      POSTGRES_PASSWORD: ${POSTGRES_PASSWORD}
      POSTGRES_USER: ${POSTGRES_USER}
      POSTGRES_DB: ${POSTGRES_DB}
      PGTZ: ${TIMEZONE}
      PGDATA: /var/lib/postgresql/data/pgdata
    ports:
      - "5432:5432"
  grafana:
    image: grafana
    restart: unless-stopped
    build:
      context: .docker/grafana/
      dockerfile: Dockerfile
    environment:
      - GF_TIMEZONE=${TIMEZONE}
      - GF_SECURITY_ADMIN_USER=${GF_SECURITY_ADMIN_USER}
      - GF_SECURITY_ADMIN_PASSWORD=${GF_SECURITY_ADMIN_PASSWORD}
      - GF_USERS_DEFAULT_THEME=${GF_USERS_DEFAULT_THEME}
      - GF_USERS_ALLOW_SIGN_UP=${GF_USERS_ALLOW_SIGN_UP}
      - GF_USERS_ALLOW_ORG_CREATE=${GF_USERS_ALLOW_ORG_CREATE}
      - GF_AUTH_ANONYMOUS_ENABLED=${GF_AUTH_ANONYMOUS_ENABLED}
    ports:
      - "3000:3000"
    depends_on:
      - pg

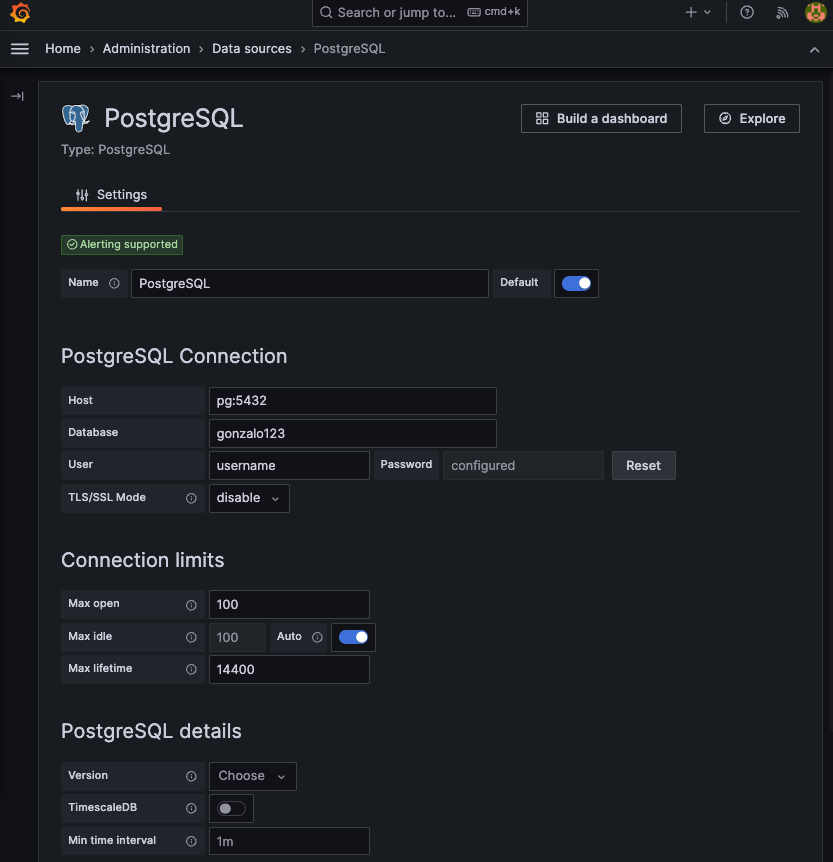
We run the stack, Connect the grafana at port 3000 and configure the datasource

After that we can create the dashboard

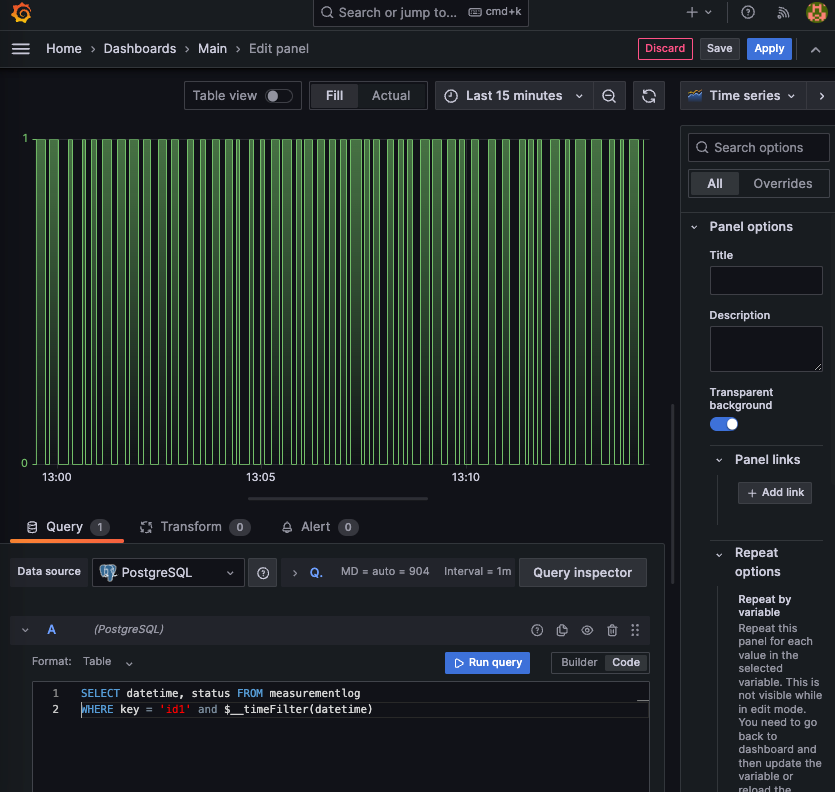
We are using this query

SELECT 
    datetime, 
    status 
FROM 
    measurementlog 
WHERE 
    key = 'id1' and 
    $__timeFilter(datetime)

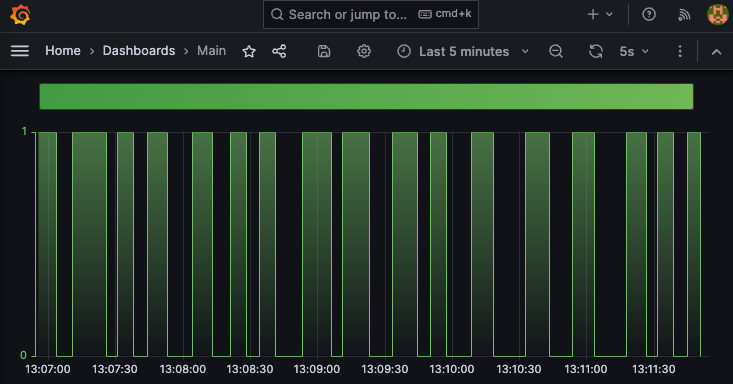
And that’s the dashboard

Proyect available in my github account.

Flask api skeleton to handle PostgreSQL operations

That’s a boilerplate for an api server using Flask. The idea is one api server to work as backend server to handle all database operations. The api server will handle only POST requests and the input parameters will be on the body of the payload as JSON. I know that it isn’t a pure REST server but that’s what I need.

To organize better the api we`ll set a group of modules using Flask’s blueprints. The entry point of the application will be app.py file

import logging

from flask import Flask
from flask_compress import Compress

from lib.logger import setup_logging
from lib.utils import CustomJSONEncoder
from modules.example import blueprint as example
from settings import LOG_LEVEL, ELK_APP, ELK_INDEX, ELK_PROCESS, LOG_PATH

logging.basicConfig(level=LOG_LEVEL)

setup_logging(app=ELK_APP,
              index=ELK_INDEX,
              process=ELK_PROCESS,
              log_path=LOG_PATH)

app = Flask(__name__)
app.json_encoder = CustomJSONEncoder
compress = Compress()
compress.init_app(app)

app.register_blueprint(example)

All application configuration is in settings.py file. I borrowed this pattern from Django applications. All my configuration is in this file and the particularities of the environment are loaded from dotenv files in settings.py

import os
from logging import INFO
from pathlib import Path

from dotenv import load_dotenv

BASE_DIR = Path(__file__).resolve().parent

APP_ID = 'dbapi'
APP_PATH = 'dbapi'
ENVIRONMENT = os.getenv('ENVIRONMENT', 'local')

load_dotenv(dotenv_path=Path(BASE_DIR).resolve().joinpath('env', ENVIRONMENT, '.env'))

PROCESS_ID = os.getenv('PROCESS_ID', APP_ID)
LOG_LEVEL = os.getenv('LOG_LEVEL', INFO)
ELK_APP = f'{APP_ID}.{PROCESS_ID}'
ELK_INDEX = f'{APP_ID}_{ENVIRONMENT}'
ELK_PROCESS = APP_ID
LOG_PATH = f'./logs/{APP_ID}.log'

BEARER = os.getenv('BEARER')

# Database configuration
DEFAULT = 'default'

DATABASES = {
    DEFAULT: f"dbname='{os.getenv('DEFAULT_DB_NAME')}' user='{os.getenv('DEFAULT_DB_USER')}' host='{os.getenv('DEFAULT_DB_HOST')}' password='{os.getenv('DEFAULT_DB_PASS')}' port='{os.getenv('DEFAULT_DB_PORT')}'"
}

In this example we’re using one blueprint called example. I register blueprints manually. The blueprint has a set or routes. Those routes are within routes.py file:

from .actions import foo, bar

routes = [
    dict(route='', action=lambda: True),
    dict(route='foo', action=foo),
    dict(route='bar', action=bar),
]

Here we map url path to actions. For example, foo action is like that

from datetime import datetime

from lib.decorators import use_schema
from .schemas import FooSchema


@use_schema(FooSchema)
def foo(name, email=False):
    now = datetime.now()
    return dict(name=name, email=email, time=now)

To validate user input, we’re using schemas (using marshmallow library). In this example our validation schema is:

from marshmallow import fields, Schema


class FooSchema(Schema):
    name = fields.String(required=True)
    email = fields.Email(required=False)

We’re hiding Flask infrastructure path in module’s __init__.py file

import os

from flask import Blueprint

from lib.auth import authorize_bearer
from lib.utils import call_action, get_response
from settings import BEARER
from .routes import routes

NAME = os.path.basename(os.path.dirname(__file__))
blueprint = Blueprint(NAME, __name__, url_prefix=f'/{NAME}')


@authorize_bearer(bearer=BEARER)
@blueprint.post('/')
@blueprint.post('/<path:name>')
def action(name=''):
    return get_response(NAME, name, routes, call_action)

Another route with a database connection is the following one:

from dbutils import transactional

from lib.db import get_db_from_conn, get_conn_from_dbname
from lib.decorators import use_schema, inject_conn
from settings import DEFAULT
from .schemas import FooSchema
from .sql import SQL_USERS


@use_schema(FooSchema)
@inject_conn(DEFAULT, named=True, autocommit=False)
def bar(conn, name, email=False):
    # Create new transaction from connection injected with a decorator
    with transactional(conn) as db:
        db.upsert('users', dict(email=email), dict(name=name))

    # Example of how to obtain new connection from database name.
    conn2 = get_conn_from_dbname(DEFAULT)
    db2 = get_db_from_conn(conn2)

    return db2.fetch_all(SQL_USERS, dict(name=name))

We can obtain our database connection in diverse ways. For example, we can use a function decorator to inject the connection (in this case the connection named DEFAULT) in the function signatura. We also can create the connection using a constructor. This connection is a raw psycopg2 connection. I also like to use a library to help me to work with psycopg2: a library (https://github.com/gonzalo123/dbutils) created by me a long time ago.

And that’s all. I normally deploy it in production using a nginx as a reverse proxy and n replicas of my api. Logs are also ready to send to ELK using a filebeat.

version: '3.6'

x-logging: &logging
  logging:
    options:
      max-size: 10m


services:
  api:
    image: dbapi:production
    <<: *logging
    deploy:
      replicas: 10
      restart_policy:
        condition: any
    volumes:
      - logs_volume:/src/logs
    environment:
      - ENVIRONMENT=production
    command: /bin/bash ./start.sh

  nginx:
    image: nginx-dbapi:${VERSION}
    deploy:
      restart_policy:
        condition: any
    environment:
      ENVIRON: ${VERSION}
    ports:
      - ${EXPOSED_PORT}:8000
    depends_on:
      - api

volumes:
  logs_volume:

Source code in my github account

Listen to PostgreSQL events with pg_notify and Python

With PostgreSQL we can easily publish and listen events from one connection to another. It’s cool because those notifications belong on a transaction. In this example I’m going to create a wrapper to help me to listen the events with Python.

To notify events I only need to use pg_notify function. For example:

select pg_notify('channel', 'xxx')

To listen the events

import psycopg2

from pg_listener import on_db_event

dsn = f"dbname='gonzalo123' user='username' host='localhost' password='password'"

conn = psycopg2.connect(dsn)
conn.set_isolation_level(psycopg2.extensions.ISOLATION_LEVEL_AUTOCOMMIT)

for payload in on_db_event(conn, 'channel'):
    print(payload)

The magic resides in on_db_event. We need to pass a psycopg2 connection, and the channel name. We can iterate over the function and retrieve the payload when someone triggers the event on that channel

def on_db_event(conn: connection, channel: str):
    with conn:
        with conn.cursor() as cursor:
            cursor.execute(f"LISTEN {channel};")
            logger.info(f"Waiting for notifications on channel '{channel}'.")

            while True:
                if select.select([conn], [], [], 5) != ([], [], []):
                    conn.poll()
                    while conn.notifies:
                        notify = conn.notifies.pop(0)
                        yield notify.payload

As I often use Django and Django uses one connection wrapper I need to create a native psycopg2 connection. Maybe it’s possible to retrieve it from Django connection (show me if you know how to do it).

def conn_from_django(django_connection):
    db_settings = django_connection.settings_dict
    dsn = f"dbname='{db_settings['NAME']}' " \
          f"user='{db_settings['USER']}' " \
          f"host='{db_settings['HOST']}' " \
          f"password='{db_settings['PASSWORD']}'"

    conn = psycopg2.connect(dsn)
    conn.set_isolation_level(ISOLATION_LEVEL_AUTOCOMMIT)

    return conn

You can install the library using pip

pip install pglistener-gonzalo123

Source code available in my github

Database utils for psycopg2

I normally need to perform raw queries when I’m working with Python. Even when I’m using Django and it’s ORM I need to execute sql against the database. As I use (almost always) PostgreSQL and I use (as we all do) psycopg2. Psycopg2 is very complete and easy to use but sometimes I need a few helpers to make my usual tasks easier. I don’t want to create a complex library on top of psycopg2, only a helper.

Something that I miss from PHP and DBAL library is the way that DBAL helps me to create simple CRUD operations. The idea of this helper functions is to do something similar. Let’s start

I’ve created procedural functions to do all and also a Db class. Normally all functions needs the cursor parameter.

def fetch_all(cursor, sql, params=None):
    cursor.execute(
        query=sql,
        vars={} if params is None else params)

    return cursor.fetchall()

The Db class accepts cursor in the constructor

db = Db(cursor=cursor)
data = db.fetch_all("SELECT * FROM table")

Connection

Nothing especial in the connection. I like to use "connection_factory=NamedTupleConnection" to allow me to access to the recordset as an Object. I’ve created simple factory helper to create connections:

def get_conn(dsn, named_tuple=False, autocommit=False):
    conn = psycopg2.connect(
        dsn=dsn,
        connection_factory=NamedTupleConnection if named_tuple else None,
    )
    conn.autocommit = autocommit

    return conn

Sometimes I use NamedTuple in the cursor instead connection, so I’ve created a simple helper

def get_cursor(conn, named_tuple=True):
    return conn.cursor(cursor_factory=NamedTupleCursor if named_tuple else None)

Fetch all

db = Db(cursor)
for reg in db.fetch_all(sql="SELECT email, name from users"):
    assert 'user1' == reg.name
    assert 'user1@email.com' == reg.email

Fetch one

data == db.fetch_one(sql=SQL)

Select

data = db.select(
        table='users',
        where={'email': 'user1@email.com'}

This helper only allows me to perform simple where statements (joined with AND). If I need one complex Where, then I use fetch

Insert

Insert one row

db.insert(
        table='users',
        values={'email': 'user1@email.com', 'name': 'user1'})

Or insert multiple rows (using spycopg2’s executemany)

db.insert(
        table='users',
        values=[
            {'email': 'user2@email.com', 'name': 'user2'},
            {'email': 'user3@email.com', 'name': 'user3'}
        ])

We also can use insert_batch to insert all rows within one command

db.insert_batch(
        table='users',
        values=[
            {'email': 'user2@email.com', 'name': 'user2'},
            {'email': 'user3@email.com', 'name': 'user3'}
        ])

Update

db.update(
        table='users',
        data={'name': 'xxxx'},
        identifier={'email': 'user1@email.com'},
    )

Delete

db.delete(table='users', where={'email': 'user1@email.com'})

Upsert

Sometimes we need to insert one row or update the row if the primary key already exists. We can do that with two statements: One select and if there isn’t any result one insert. Else on update. We can do that with one sql statement. I’ve created a helper to to that:

def _get_upsert_sql(data, identifier, table):
    raw_sql = """
        WITH
            upsert AS (
                UPDATE {tbl}
                SET {t_set}
                WHERE {t_where}
                RETURNING {tbl}.*),
            inserted AS (
                INSERT INTO {tbl} ({t_fields})
                SELECT {t_select_fields}
                WHERE NOT EXISTS (SELECT 1 FROM upsert)
                RETURNING *)
        SELECT * FROM upsert
        UNION ALL
        SELECT * FROM inserted
    """
    merger_data = {**data, **identifier}
    sql = psycopg2_sql.SQL(raw_sql).format(
        tbl=psycopg2_sql.Identifier(table),
        t_set=psycopg2_sql.SQL(', ').join(_get_conditions(data)),
        t_where=psycopg2_sql.SQL(' and ').join(_get_conditions(identifier)),
        t_fields=psycopg2_sql.SQL(', ').join(map(psycopg2_sql.Identifier, merger_data.keys())),
        t_select_fields=psycopg2_sql.SQL(', ').join(map(psycopg2_sql.Placeholder, merger_data.keys())))

    return merger_data, sql


def upsert(cursor, table, data, identifier):
    merger_data, sql = _get_upsert_sql(data, identifier, table)

    cursor.execute(sql, merger_data)
    return cursor.rowcount

Now we can execute a upsert in a simple way:

db.upsert(
        table='users',
        data={'name': 'yyyy'},
        identifier={'email': 'user1@email.com'})

Stored procedures

data = db.sp_fetch_one(
    function='hello',
    params={'name': 'Gonzalo'})
data = db.sp_fetch_all(
    function='hello',
    params={'name': 'Gonzalo'})

Transactions

In PHP and DBAL to create one transaction we can use this syntax

<?php
$conn->transactional(function($conn) {
    // do stuff
});

In Python we can do the same with context management, but I prefer to use this syntax:

with transactional(conn) as db:
    assert 1 == db.insert(
        table='users',
        values={'email': 'user1@email.com', 'name': 'user1'})

The transactional function is like that (I’ve created two functions. One with raw cursor and another one with my Db class):

def _get_transactional(conn, named_tuple, callback):
    try:
        with conn as connection:
            with get_cursor(conn=connection, named_tuple=named_tuple) as cursor:
                yield callback(cursor)
            conn.commit()
    except Exception as e:
        conn.rollback()
        raise e

@contextmanager
def transactional(conn, named_tuple=False):
    return _get_transactional(conn, named_tuple, lambda cursor: Db(cursor))


@contextmanager
def transactional_cursor(conn, named_tuple=False):
    return _get_transactional(conn, named_tuple, lambda cursor: cursor)

Return values

Select and fetch helpers returns the recordset, but insert, update, delete and upsert returns the number of affected rows. For example that’s the insert function:

def _get_insert_sql(table, values):
    keys = values[0].keys() if type(values) is list else values.keys()

    raw_sql = "insert into {tbl} ({t_fields}) values ({t_values})"
    return psycopg2_sql.SQL(raw_sql).format(
        tbl=psycopg2_sql.Identifier(table),
        t_fields=psycopg2_sql.SQL(', ').join(map(psycopg2_sql.Identifier, keys)),
        t_values=psycopg2_sql.SQL(', ').join(map(psycopg2_sql.Placeholder, keys)))


def insert(cursor, table, values):
    sql = _get_insert_sql(table=table, values=values)
    cursor.executemany(query=sql, vars=values) if type(values) is list else cursor.execute(sql, values)

    return cursor.rowcount

Unit tests

You can try the library running the unit tests. I’ve also provide one docker-compose.yml file to set up a PostgreSQL database to run the tests.

version: '3.6'

services:
  pg:
    build:
      context: .docker/pg
      dockerfile: Dockerfile
    ports:
      - 5432:5432
    environment:
      POSTGRES_PASSWORD: ${POSTGRES_PASSWORD}
      POSTGRES_USER: ${POSTGRES_USER}
      POSTGRES_DB: ${POSTGRES_DB}
      PGDATA: /var/lib/postgresql/data/pgdata

Install

You can install the library using pip

pip install dbutils-gonzalo123

Full code in my github

PHP application in SAP Cloud Platform. With PostgreSQL, Redis and Cloud Foundry

Keeping on with my study of SAP’s cloud platform (SCP) and Cloud Foundry today I’m going to build a simple PHP application. This application serves a simple Bootstrap landing page. The application uses a HTTP basic authentication. The credentials are validated against a PostgreSQL database. It also has a API to retrieve the localtimestamp from database server (just for play with a database server). I also want to play with Redis in the cloud too, so the API request will have a Time To Live (ttl) of 5 seconds. I will use a Redis service to do it.

First we create our services in cloud foundry. I’m using the free layer of SAP cloud foundry for this example. I’m not going to explain here how to do that. It’s pretty straightforward within SAP’s coopkit. Time ago I played with IBM’s cloud foundry too. I remember that it was also very simple too.

Then we create our application (.bp-config/options.json)

{
"WEBDIR": "www",
"LIBDIR": "lib",
"PHP_VERSION": "{PHP_70_LATEST}",
"PHP_MODULES": ["cli"],
"WEB_SERVER": "nginx"
}

If we want to use our PostgreSQL and Redis services with our PHP Appliacation we need to connect those services to our application. This operation can be done also with SAP’s Cockpit.

Now is the turn of PHP application. I normally use Silex framework within my backends, but now there’s a problem: Silex is dead. I feel a little bit sad but I’m not going to cry. It’s just a tool and there’re another ones. I’ve got my example with Silex but, as an exercise, I will also do it with Lumen.

Let’s start with Silex. If you’re familiar with Silex micro framework (or another microframework, indeed) you can see that there isn’t anything especial.

use Symfony\Component\HttpKernel\Exception\HttpException;
use Symfony\Component\HttpFoundation\Request;
use Silex\Provider\TwigServiceProvider;
use Silex\Application;
use Predis\Client;

if (php_sapi_name() == "cli-server") {
    // when I start the server my local machine vendors are in a different path
    require __DIR__ . '/../vendor/autoload.php';
    // and also I mock VCAP_SERVICES env
    $env   = file_get_contents(__DIR__ . "/../conf/vcap_services.json");
    $debug = true;
} else {
    require 'vendor/autoload.php';
    $env   = $_ENV["VCAP_SERVICES"];
    $debug = false;
}

$vcapServices = json_decode($env, true);

$app = new Application(['debug' => $debug, 'ttl' => 5]);

$app->register(new TwigServiceProvider(), [
    'twig.path' => __DIR__ . '/../views',
]);

$app['db'] = function () use ($vcapServices) {
    $dbConf = $vcapServices['postgresql'][0]['credentials'];
    $dsn    = "pgsql:dbname={$dbConf['dbname']};host={$dbConf['hostname']};port={$dbConf['port']}";
    $dbh    = new PDO($dsn, $dbConf['username'], $dbConf['password']);
    $dbh->setAttribute(PDO::ATTR_ERRMODE, PDO::ERRMODE_EXCEPTION);
    $dbh->setAttribute(PDO::ATTR_CASE, PDO::CASE_UPPER);
    $dbh->setAttribute(PDO::ATTR_DEFAULT_FETCH_MODE, PDO::FETCH_ASSOC);

    return $dbh;
};

$app['redis'] = function () use ($vcapServices) {
    $redisConf = $vcapServices['redis'][0]['credentials'];

    return new Client([
        'scheme'   => 'tcp',
        'host'     => $redisConf['hostname'],
        'port'     => $redisConf['port'],
        'password' => $redisConf['password'],
    ]);
};

$app->get("/", function (Application $app) {
    return $app['twig']->render('index.html.twig', [
        'user' => $app['user'],
        'ttl'  => $app['ttl'],
    ]);
});

$app->get("/timestamp", function (Application $app) {
    if (!$app['redis']->exists('timestamp')) {
        $stmt = $app['db']->prepare('SELECT localtimestamp');
        $stmt->execute();
        $app['redis']->set('timestamp', $stmt->fetch()['TIMESTAMP'], 'EX', $app['ttl']);
    }

    return $app->json($app['redis']->get('timestamp'));
});

$app->before(function (Request $request) use ($app) {
    $username = $request->server->get('PHP_AUTH_USER', false);
    $password = $request->server->get('PHP_AUTH_PW');

    $stmt = $app['db']->prepare('SELECT name, surname FROM public.user WHERE username=:USER AND pass=:PASS');
    $stmt->execute(['USER' => $username, 'PASS' => md5($password)]);
    $row = $stmt->fetch();
    if ($row !== false) {
        $app['user'] = $row;
    } else {
        header("WWW-Authenticate: Basic realm='RIS'");
        throw new HttpException(401, 'Please sign in.');
    }
}, 0);

$app->run();

Maybe the only especial thing is the way that autoloader is done. We are initializing autoloader in two different ways. One way when the application is run in the cloud and another one when the application is run locally with PHP’s built-in server. That’s because vendors are located in different paths depending on which environment the application lives in. When Cloud Foundry connect services to appliations it injects environment variables with the service configuration (credentials, host, …). It uses VCAP_SERVICES env var.

I use the built-in server to run the application locally. When I’m doing that I don’t have VCAP_SERVICES variable. And also my services information are different than when I’m running the application in the cloud. Maybe it’s better with an environment variable but I’m using this trick:

if (php_sapi_name() == "cli-server") {
    // I'm runing the application locally
} else {
    // I'm in the cloud
}

So when I’m locally I mock VCAP_SERVICES with my local values and also, for example, configure Silex application in debug mode.

Sometimes I want to run my application locally but I want to use the cloud services. I cannot connect directly to those services, but we can do it over ssh through our connected application. For example If our PostgreSQL application is running on 10.11.241.0:48825 we can map this remote port (in a private network) to our local port with this command.

cf ssh -N -T -L 48825:10.11.241.0:48825 silex

You can see more information about this command here.

Now we can use pgAdmin, for example, in our local machine to connect to cloud server.

We can do the same with Redis

cf ssh -N -T -L 54266:10.11.241.9:54266 silex

And basically that’s all. Now we’ll do the same with Lumen. The idea is create the same application with Lumen instead of Silex. It’s a dummy application but it cover task that I normally use. I also will re-use the Redis and PostgreSQL services from the previous project.

use App\Http\Middleware;
use Laravel\Lumen\Application;
use Laravel\Lumen\Routing\Router;
use Predis\Client;

if (php_sapi_name() == "cli-server") {
    require __DIR__ . '/../vendor/autoload.php';
    $env = 'dev';
} else {
    require 'vendor/autoload.php';
    $env = 'prod';
}

(new Dotenv\Dotenv(__DIR__ . "/../env/{$env}"))->load();

$app = new Application();

$app->routeMiddleware([
    'auth' => Middleware\AuthMiddleware::class,
]);

$app->register(App\Providers\VcapServiceProvider::class);
$app->register(App\Providers\StdoutLogServiceProvider::class);
$app->register(App\Providers\DbServiceProvider::class);
$app->register(App\Providers\RedisServiceProvider::class);

$app->router->group(['middleware' => 'auth'], function (Router $router) {
    $router->get("/", function () {
        return view("index", [
            'user' => config("user"),
            'ttl'  => getenv('TTL'),
        ]);
    });

    $router->get("/timestamp", function (Client $redis, PDO $conn) {
        if (!$redis->exists('timestamp')) {
            $stmt = $conn->prepare('SELECT localtimestamp');
            $stmt->execute();
            $redis->set('timestamp', $stmt->fetch()['TIMESTAMP'], 'EX', getenv('TTL'));
        }

        return response()->json($redis->get('timestamp'));
    });
});

$app->run();

I’ve created four servicer providers. One for handle Database connections (I don’t like ORMs)

namespace App\Providers;

use Illuminate\Support\ServiceProvider;
use PDO;

class DbServiceProvider extends ServiceProvider
{
    public function register()
    {
    }

    public function boot()
    {
        $vcapServices = app('vcap_services');

        $dbConf = $vcapServices['postgresql'][0]['credentials'];
        $dsn    = "pgsql:dbname={$dbConf['dbname']};host={$dbConf['hostname']};port={$dbConf['port']}";
        $dbh    = new PDO($dsn, $dbConf['username'], $dbConf['password']);
        $dbh->setAttribute(PDO::ATTR_ERRMODE, PDO::ERRMODE_EXCEPTION);
        $dbh->setAttribute(PDO::ATTR_CASE, PDO::CASE_UPPER);
        $dbh->setAttribute(PDO::ATTR_DEFAULT_FETCH_MODE, PDO::FETCH_ASSOC);

        $this->app->bind(PDO::class, function ($app) use ($dbh) {
            return $dbh;
        });
    }
}

Another one for Redis. I need to study a little bit more Lumen. I know that Lumen has a built-in tool to work with Redis.

namespace App\Providers;

use Illuminate\Support\ServiceProvider;
use Predis\Client;

class RedisServiceProvider extends ServiceProvider
{
    public function register()
    {
    }

    public function boot()
    {
        $vcapServices = app('vcap_services');
        $redisConf    = $vcapServices['redis'][0]['credentials'];

        $redis = new Client([
            'scheme'   => 'tcp',
            'host'     => $redisConf['hostname'],
            'port'     => $redisConf['port'],
            'password' => $redisConf['password'],
        ]);

        $this->app->bind(Client::class, function ($app) use ($redis) {
            return $redis;
        });
    }
}

Another one to tell monolog to send logs to Stdout

namespace App\Providers;

use Illuminate\Support\ServiceProvider;
use Monolog;

class StdoutLogServiceProvider extends ServiceProvider
{
    public function register()
    {
        app()->configureMonologUsing(function (Monolog\Logger $monolog) {
            return $monolog->pushHandler(new \Monolog\Handler\ErrorLogHandler());
        });
    }
}

And the last one to work with Vcap environment variables. Probably I need to integrate it with dotenv files

namespace App\Providers;

use Illuminate\Support\ServiceProvider;

class VcapServiceProvider extends ServiceProvider
{
    public function register()
    {
        if (php_sapi_name() == "cli-server") {
            $env = file_get_contents(__DIR__ . "/../../conf/vcap_services.json");
        } else {
            $env = $_ENV["VCAP_SERVICES"];
        }

        $vcapServices = json_decode($env, true);

        $this->app->bind('vcap_services', function ($app) use ($vcapServices) {
            return $vcapServices;
        });
    }
}

We also need to handle authentication (http basic auth in this case) so we’ll create a simple middleware

namespace App\Http\Middleware;

use Closure;
use Illuminate\Http\Request;
use PDO;

class AuthMiddleware
{
    public function handle(Request $request, Closure $next)
    {
        $user = $request->getUser();
        $pass = $request->getPassword();

        $db = app(PDO::class);
        $stmt = $db->prepare('SELECT name, surname FROM public.user WHERE username=:USER AND pass=:PASS');
        $stmt->execute(['USER' => $user, 'PASS' => md5($pass)]);
        $row = $stmt->fetch();
        if ($row !== false) {
            config(['user' => $row]);
        } else {
            $headers = ['WWW-Authenticate' => 'Basic'];
            return response('Admin Login', 401, $headers);
        }

        return $next($request);
    }
}

In summary: Lumen is cool. The interface is very similar to Silex. I can swap my mind from thinking in Silex to thinking in Lumen easily. Blade instead Twig: no problem. Service providers are very similar. Routing is almost the same and Middlewares are much better. Nowadays backend is a commodity for me so I don’t want to spend to much time working on it. I want something that just work. Lumen looks like that.

Both projects: Silex and Lumen are available in my github
Performing UPSERT (Update or Insert) with PostgreSQL and PHP

That’s a typical situation. Imagine you’ve got one table

CREATE TABLE PUBLIC.TBUPSERTEXAMPLE
(
  KEY1 CHARACTER VARYING(10) NOT NULL,
  KEY2 CHARACTER VARYING(14) NOT NULL,
  KEY3 CHARACTER VARYING(14) NOT NULL,
  KEY4 CHARACTER VARYING(14) NOT NULL,

  VALUE1 CHARACTER VARYING(20),
  VALUE2 CHARACTER VARYING(20) NOT NULL,
  VALUE3 CHARACTER VARYING(100),
  VALUE4 CHARACTER VARYING(400),
  VALUE5 CHARACTER VARYING(20),

  CONSTRAINT TBUPSERTEXAMPLE_PKEY PRIMARY KEY (KEY1, KEY2, KEY3, KEY4)
)

And you need to update one record. You can perform a simple UPDATE statement but what happens the first time?

You cannot update the record basically because the record doesn’t exists. You need to create an INSERT statement instead. We can do it following different ways. You can create first a SELECT statement and, if the record exists, perform an UPDATE. If it doesn’t exists you perform an INSERT. We also can perform an UPDATE and see how many records are affected. If no records are affected then we perform an INSERT. Finally we can perform one INSERT and it it throws an error then perform an UPDATE.

All of these techniques works in one way or another but PostgreSQL gives us one cool way of doing this operation with one SQL sentence. We can use CTE (Common Table Expression) and execute something like this:

WITH upsert AS (
    UPDATE PUBLIC.TBUPSERTEXAMPLE
    SET
        VALUE1 = :VALUE1,
        VALUE2 = :VALUE2,
        VALUE3 = :VALUE3,
        VALUE4 = :VALUE4,
        VALUE5 = :VALUE5
    WHERE
        KEY1 = :KEY1 AND
        KEY2 = :KEY2 AND
        KEY3 = :KEY3 AND
        KEY4 = :KEY4
    RETURNING *
)
INSERT INTO PUBLIC.TBUPSERTEXAMPLE(KEY1, KEY2, KEY3, KEY4, VALUE1, VALUE2, VALUE3, VALUE4, VALUE5)
SELECT
    :KEY1, :KEY2, :KEY3, :KEY4, :VALUE1, :VALUE2, :VALUE3, :VALUE4, :VALUE5
WHERE
    NOT EXISTS (SELECT 1 FROM upsert);

Since PostgreSQL 9.5 we also can do another technique to do this UPSERT operations. We can do something like this:

INSERT INTO PUBLIC.TBUPSERTEXAMPLE (key1, key2, key3, key4, value1, value2, value3, value4, value5)
  VALUES ('key2', 'key2', 'key3', 'key4', 'value1',  'value2',  'value3',  'value4',  'value5')
ON CONFLICT (key1, key2, key3, key4)
DO UPDATE SET 
  value1 = 'value1', 
  value2 = 'value2', 
  value3 = 'value3', 
  value4 = 'value4', 
  value5 = 'value5'
WHERE 
  TBUPSERTEXAMPLE.key1 = 'key2' AND 
  TBUPSERTEXAMPLE.key2 = 'key2' AND 
  TBUPSERTEXAMPLE.key3 = 'key3' AND 
  TBUPSERTEXAMPLE.key4 = 'key4';

To help me writing this sentence I’ve created a simple PHP wrapper:

Here one example using PDO

use G\SqlUtils\Upsert;

$conn = new PDO('pgsql:dbname=gonzalo;host=localhost', 'username', 'password');
$conn->setAttribute(PDO::ATTR_ERRMODE, PDO::ERRMODE_EXCEPTION);

$conn->beginTransaction();
try {
    Upsert::createFromPDO($conn)->exec('PUBLIC.TBUPSERTEXAMPLE', [
        'KEY1' => 'key1',
        'KEY2' => 'key2',
        'KEY3' => 'key3',
        'KEY4' => 'key4',
    ], [
        'VALUE1' => 'value1',
        'VALUE2' => 'value2',
        'VALUE3' => 'value3',
        'VALUE4' => 'value4',
        'VALUE5' => 'value5',
    ]);
    $conn->commit();
} catch (Exception $e) {
    $conn->rollback();
    throw $e;
}

And another one using DBAL

use Doctrine\DBAL\DriverManager;
use G\SqlUtils\Upsert;

$connectionParams = [
    'dbname'   => 'gonzalo',
    'user'     => 'username',
    'password' => 'password',
    'host'     => 'localhost',
    'driver'   => 'pdo_pgsql',
];

$dbh = DriverManager::getConnection($connectionParams);
$dbh->transactional(function ($conn) {
    Upsert::createFromDBAL($conn)->exec('PUBLIC.TBUPSERTEXAMPLE', [
        'KEY1' => 'key1',
        'KEY2' => 'key2',
        'KEY3' => 'key3',
        'KEY4' => 'key4',
    ], [
        'VALUE1' => 'value1',
        'VALUE2' => 'value2',
        'VALUE3' => 'value3',
        'VALUE4' => null,
        'VALUE5' => 'value5',
    ]);
});

And that’s all. Library is available in my github and it’s also at packagist.

Notify events from PostgreSQL to external listeners

Sometimes we need to call external programs from our PostgreSQL database. We can send sockets from SQL statements. I’ve written about it. The problem with this approach the following one. If user rollbacks the transaction the socket has been already emitted. That’s a problem (or not. Depending on our application). Nobody also guarantees that the process behind the socket server has access to the data of the transaction. If we’re very fast maybe the transaction isn’t commited yet. We can use one sleep function but sleep functions are always a bad idea. PostgreSQL gives us another tool to decouple processes: LISTEN and NOTIFY.

Let me show you and example. First we create a table:

CREATE TABLE PUBLIC.TBLEXAMPLE
(
  KEY1 CHARACTER VARYING(10) NOT NULL,
  KEY2 CHARACTER VARYING(14) NOT NULL,

  VALUE1 CHARACTER VARYING(20),
  VALUE2 CHARACTER VARYING(20) NOT NULL,

  CONSTRAINT TBLEXAMPLE_PKEY PRIMARY KEY (KEY1, KEY2)
)

Now we add a “after insert” trigger to our table

CREATE TRIGGER TBLEXAMPLE_AFTER
AFTER INSERT
ON PUBLIC.TBLEXAMPLE
FOR EACH ROW
EXECUTE PROCEDURE PUBLIC.NOTIFY();

And now, within the trigger function, we send a notify event (‘myEvent’ in this case) with the row information. We need to send plain text in the notify event so we’ll use JSON to encode our row data.

CREATE OR REPLACE FUNCTION PUBLIC.NOTIFY() RETURNS trigger AS
$BODY$
BEGIN
  PERFORM pg_notify('myEvent', row_to_json(NEW)::text);
  RETURN new;
END;
$BODY$
LANGUAGE 'plpgsql' VOLATILE COST 100;

Now we’re going to build a server side example that connects to our PostgreSQL database and listen to the event. In this case we’re going to use nodejs to build the prototype. This example also will enqueue events into a gearman server.

var pg = require('pg'),
    gearmanode = require('gearmanode'),
    gearmanClient,
    conString = 'tcp://username:password@localhost:5432/gonzalo',
    pgClient;

gearmanode.Client.logger.transports.console.level = 'error';

gearmanClient = gearmanode.client();

console.log('LISTEN myEvent');
pgClient = new pg.Client(conString);
pgClient.connect();
pgClient.query('LISTEN myEvent');
pgClient.on('notification', function (data) {
    console.log("\033[34m" + new Date + '-\033[0m payload', data.payload);
    gearmanClient.submitJob('sms.sender.one', data.payload);
});

And that’s all. Now we only need to perform an INSERT statement into our table. This process will trigger our event and our nodejs will enqueue the process into a gearman queue.

INSERT INTO PUBLIC.TBLEXAMPLE(KEY1, KEY2, VALUE1, VALUE2) VALUES ('k1', 'k2', 'v1', 'v2');

It’s good to remark that if our insert statement is inside a transaction and we rollback it, notify won’t send any message.

Foreign Data Wrappers with PostgreSQL and PHP

PostgreSQL is more than a relational database. It has many cool features. Today we’re going to play with Foreign Data Wrappers (FDW). The idea is crate a virtual table from an external datasource and use it like we use a traditional table.

Let me show you an example. Imagine that we’ve got a REST datasource on port 8888. We’re going to use this Silex application, for example

use Silex\Application;

$app = new Application();

$app->get('/', function(Application $app) {

    return $app->json([
        ['name' => 'Peter', 'surname' => 'Parker'],
        ['name' => 'Clark', 'surname' => 'Kent'],
        ['name' => 'Bruce', 'surname' => 'Wayne'],
    ]);
});

$app->run();

We want to use this datasource in PostgreSQL, so we need to use a “www foreign data wrapper”.

First we create the extension (maybe we need to compile the extension. We can follow the installation instructions here)

CREATE EXTENSION www_fdw;

Now with the extension we need to create a “server”. This server is just a proxy that connects to the real Rest service

CREATE SERVER myRestServer FOREIGN DATA WRAPPER www_fdw OPTIONS (uri 'http://localhost:8888');

Now we need to map our user to the server

CREATE USER MAPPING FOR gonzalo SERVER myRestServer;

And finally we only need our “Foreign table”

CREATE FOREIGN TABLE myRest (
    name text,
    surname text
) SERVER myRestServer;

Now we can perform SQL queries using our Foreign table

SELECT * FROM myRest

We must take care with one thing. We can use WHERE clauses but if we run

SELECT * FROM myRest WHERE name='Peter'

We’ll that the output is the same than “SELECT * FROM myRest”. That’s because if we want to filter something with WHERE clause within Foreign we need to do it in the remote service. WHERE name=‘Peter’ means that our Database will execute the following request:

http://localhost:8888?name=Peter

And we need to handle this parameter. For example doing something like that

use Silex\Application;
use Symfony\Component\HttpFoundation\Request;

$app = new Application();

$app->get('/', function(Application $app, Request $request) {
    $name = $request->get('name');

    $data = [
        ['name' => 'Peter', 'surname' => 'Parker'],
        ['name' => 'Clark', 'surname' => 'Kent'],
        ['name' => 'Bruce', 'surname' => 'Wayne'],
    ];
    return $app->json(array_filter($data, function($reg) use($name){
        return $name ? $reg['name'] == $name : true;
    }));
});

$app->run();

Building one HTTP client in PostgreSQL with PL/Python

Don’t ask me way, but I need to call to a HTTP server (one Silex application) from a PostgreSQL database.

I want to do something like this:

select get('http://localhost:8080?name=Gonzalo')->'hello';

PostgreSQL has a datatype for json. It’s really cool and it allows us to connect our HTTP server and our SQL database using same datatype.

PostgreSQL also allows us to create stored procedures using different languages. The default language is PL/pgSQL. PL/pgSQL is a simple language where we can embed SQL. But we also can use Python. With Python we can easily create HTTP clients, for example with urllib2. That means that develop our a HTTP client for a PostgreSQL database is pretty straightforward.

CREATE OR REPLACE FUNCTION get(uri character varying)
  RETURNS json AS
$BODY$
import urllib2

data = urllib2.urlopen(uri)

return data.read()

$BODY$
  LANGUAGE plpython2u VOLATILE
  COST 100;
ALTER FUNCTION get(character varying)
  OWNER TO gonzalo;

Ok that’s a GET client, but we also want a POST client to do something like this:

select post('http://localhost:8080', '{"name": "Gonzalo"}'::json)->'hello';

As you can see I want to use application/json instead of application/x-www-form-urlencoded to send request parameters. I wrote about it here time ago. So I will create one endpoint within my Silex server to handle my POST requests to:

<?php
include __DIR__ . '/../vendor/autoload.php';

use Silex\Application;
use Symfony\Component\HttpFoundation\Request;
use G\AngularPostRequestServiceProvider;

$app = new Application(['debug' => true]);

$app->register(new AngularPostRequestServiceProvider());

$app->post('/', function (Application $app, Request $request) {
    return $app->json(['hello' => $request->get('name')]);
});

$app->get('/', function (Application $app, Request $request) {
    return $app->json(['hello' => $request->get('name')]);
});

$app->run();

And now we only need to create one stored procedure to send POST requests

CREATE OR REPLACE FUNCTION post(
    uri character varying,
    paramenters json)
  RETURNS json AS
$BODY$
import urllib2

clen = len(paramenters)
req = urllib2.Request(uri, paramenters, {'Content-Type': 'application/json', 'Content-Length': clen})
f = urllib2.urlopen(req)
return f.read()

$BODY$
  LANGUAGE plpython2u VOLATILE
  COST 100;
ALTER FUNCTION post(character varying, json)
  OWNER TO gonzalo;

And that’s all. At least this simple script is exactly what I need.

Sending sockets from PostgreSQL triggers with Python

Picture this: We want to notify to one external service each time that one record is inserted in the database. We can find the place where the insert statement is done and create a TCP client there, but: What happens if the application that inserts the data within the database is a legacy application?, or maybe it is too hard to do?. If your database is PostgreSQL it’s pretty straightforward. With the “default” procedural language of PostgreSQL (pgplsql) we cannot do it, but PostgreSQL allows us to use more procedural languages than plpgsql, for example Python. With plpython we can use sockets in the same way than we use it within Python scripts. It’s very simple. Let me show you how to do it.

First we need to create one plpython with our TCP client

CREATE OR REPLACE FUNCTION dummy.sendsocket(msg character varying, host character varying, port integer)
  RETURNS integer AS
$BODY$
  import _socket
  try:
    s = _socket.socket(_socket.AF_INET, _socket.SOCK_STREAM)
    s.connect((host, port))
    s.sendall(msg)
    s.close()
    return 1
  except:
    return 0
$BODY$
  LANGUAGE plpython VOLATILE
  COST 100;
ALTER FUNCTION dummy.sendsocket(character varying, character varying, integer)
  OWNER TO username;

Now we create the trigger that use our socket client.

CREATE OR REPLACE FUNCTION dummy.myTriggerToSendSockets()
RETURNS trigger AS
$BODY$
   import json
   stmt = plpy.prepare("select dummy.sendSocket($1, $2, $3)", ["text", "text", "int"])
   rv = plpy.execute(stmt, [json.dumps(TD), "host", 26200])
$BODY$
LANGUAGE plpython VOLATILE
COST 100;

As you can see in my example we are sending all the record as a JSON string in the socket body.

And finally we attach the trigger to one table (or maybe we need to do it to more than one table)

CREATE TRIGGER myTrigger
  AFTER INSERT OR UPDATE OR DELETE
  ON dummy.myTable
  FOR EACH ROW
  EXECUTE PROCEDURE dummy.myTriggerToSendSockets();

And that’s all. Now we can use one simple TCP socket server to handle those requests. Let me show you different examples of TCP servers with different languages. As we can see all are different implementations of Reactor pattern. We can use, for example:

node.js:

var net = require('net');

var host = 'localhost';
var port = 26200;

var server = net.createServer(function (socket) {
    socket.on('data', function(buffer) {
        // do whatever that we want with buffer
    });
});

server.listen(port, host);

python (with Twisted):

from twisted.internet import reactor, protocol

HOST = 'localhost'
PORT = 26200

class MyServer(protocol.Protocol):
    def dataReceived(self, data):
        # do whatever that we want with data
        pass

class MyServerFactory(protocol.Factory):
    def buildProtocol(self, addr):
        return MyServer()

reactor.listenTCP(PORT, MyServerFactory(), interface=HOST)
reactor.run()

(I know that we can create the Python’s TCP server without Twisted, but if don’t use it maybe someone will angry with me. Probably he is angry right now because I put the node.js example first :))

php (with react):

<?php
include __DIR__ . '/vendor/autoload.php';

$host = 'localhost';
$port = 26200;

$loop   = React\EventLoop\Factory::create();
$socket = new React\Socket\Server($loop);

$socket->on('connection', function ($conn) {
    $conn->on('data', function ($data) {
        // do whatever we want with data
        }
    );
});

$socket->listen($port, $host);
$loop->run();

You also can use xinet.d to handle the TCP inbound connections.