Alexa and Raspberry Pi demo (Part 2). Listening to external events

Today I want to keep on with the previous example. This time I want to create one Alexa skill that listen to external events. The example that I’ve build is the following one:

I’ve got one ESP32 with a proximity sensor (one HC-SR04) that is sending the distance captured each 500ms to a MQTT broker (a mosquitto server).

I say “Alexa, use event demo” then Alexa tell me to put my hand close to the sensor and it will tell me the distance.

That’s the ESP32 code

#include <WiFi.h>
#include <PubSubClient.h>

const char* ssid = "MY_SSID";
const char* password = "MY_PASSWORD";
const char* server = "mqtt.server.ip";
const char* topic = "/alert";
const char* clientName = "com.gonzalo123.esp32";

WiFiClient wifiClient;
PubSubClient client(wifiClient);

int trigPin = 13;
int echoPin = 12;
int alert = 0;
int alertThreshold = 100;
long duration, distance_cm;

void wifiConnect() {
  Serial.print("Connecting to ");
  Serial.println(ssid);

  WiFi.begin(ssid, password);

  while (WiFi.status() != WL_CONNECTED) {
    delay(500);
    Serial.print("*");
  }

  Serial.print("WiFi connected: ");
  Serial.println(WiFi.localIP());
}

void mqttReConnect() {
  while (!client.connected()) {
    Serial.print("Attempting MQTT connection...");
    if (client.connect(clientName)) {
      Serial.println("connected");
    } else {
      Serial.print("failed, rc=");
      Serial.print(client.state());
      Serial.println(" try again in 5 seconds");
      delay(5000);
    }
  }
}

void mqttEmit(String topic, String value)
{
  client.publish((char*) topic.c_str(), (char*) value.c_str());
}

void setup() {
  Serial.begin(9600);
  pinMode(trigPin, OUTPUT);
  pinMode(echoPin, INPUT);

  wifiConnect();
  client.setServer(server, 1883);

  delay(1500);
}

void loop() {
  if (!client.connected()) {
    mqttReConnect();
  }

  client.loop();

  digitalWrite(trigPin, HIGH);
  delayMicroseconds(10);
  digitalWrite(trigPin, LOW);

  duration = pulseIn(echoPin, HIGH) / 2;
  distance_cm = duration / 29;

  if (distance_cm <= alertThreshold && alert == 0) {
      alert = 1;
      Serial.println("Alert!");
      mqttEmit("/alert", (String) distance_cm);
  } else if(distance_cm > alertThreshold && alert == 1) {
    alert = 0;
    Serial.println("No alert");
  }

  Serial.print("Distance: ");
  Serial.print(distance_cm);
  Serial.println(" cm ");

  delay(500);
}

And this is my alexa skill:

'use strict'

const Alexa = require('ask-sdk-core')

const RequestInterceptor = require('./interceptors/RequestInterceptor')
const ResponseInterceptor = require('./interceptors/ResponseInterceptor')
const LocalizationInterceptor = require('./interceptors/LocalizationInterceptor')
const GadgetInterceptor = require('./interceptors/GadgetInterceptor')

const YesIntentHandler = require('./handlers/YesIntentHandler')
const NoIntentHandler = require('./handlers/NoIntentHandler')
const LaunchRequestHandler = require('./handlers/LaunchRequestHandler')
const CancelAndStopIntentHandler = require('./handlers/CancelAndStopIntentHandler')
const SessionEndedRequestHandler = require('./handlers/SessionEndedRequestHandler')
const CustomInterfaceEventHandler = require('./handlers/CustomInterfaceEventHandler')
const CustomInterfaceExpirationHandler = require('./handlers/CustomInterfaceExpirationHandler')

const FallbackHandler = require('./handlers/FallbackHandler')
const ErrorHandler = require('./handlers/ErrorHandler')

let skill
exports.handler = function (event, context) {
  if (!skill) {
    skill = Alexa.SkillBuilders.custom().
      addRequestHandlers(
        LaunchRequestHandler,
        YesIntentHandler,
        NoIntentHandler,
        CustomInterfaceEventHandler,
        CustomInterfaceExpirationHandler,
        CancelAndStopIntentHandler,
        SessionEndedRequestHandler,
        FallbackHandler).
      addRequestInterceptors(
        RequestInterceptor,
        ResponseInterceptor,
        LocalizationInterceptor,
        GadgetInterceptor).
      addErrorHandlers(ErrorHandler).create()
  }
  return skill.invoke(event, context)
}

The process is similar to the previous example. There’s a GadgetInterceptor to find the endpointId of my Raspberry Pi. But now the Raspberry Pi must emit to the event to the skill, not the skill to the event. Now my rpi’s python script is a little bit more complicated. We need to start the main loop for the Alexa Gadget SDK but also we need to start another loop listening to a mqtt event. We need to use threads as we see in a previous post. That’s the script that I’m using.

from queue import Queue, Empty
import threading
import logging
import sys
import paho.mqtt.client as mqtt
from agt import AlexaGadget

logging.basicConfig(stream=sys.stdout, level=logging.DEBUG)
logger = logging.getLogger(__name__)


class Listener(threading.Thread):
    def __init__(self, queue=Queue()):
        super(Listener, self).__init__()
        self.queue = queue
        self.daemon = True

    def on_connect(self, client, userdata, flags, rc):
        print("Connected!")
        client.subscribe("/alert")

    def on_message(self, client, userdata, msg):
        self.on_event(int(msg.payload))

    def on_event(self, cm):
        pass

    def run(self):
        client = mqtt.Client()
        client.on_connect = self.on_connect
        client.on_message = self.on_message

        client.connect('192.168.1.87', 1883, 60)
        client.loop_forever()


class Gadget(AlexaGadget):
    def __init__(self):
        super().__init__()
        Listener.on_event = self._emit_event

    def _emit_event(self, cm):
        logger.info("_emit_event {}".format(cm))
        payload = {'cm': cm}
        self.send_custom_event('Custom.gonzalo123', 'sensor', payload)


l = Listener()
l.start()


def main():
    gadget = Gadget()
    gadget.main()


if __name__ == '__main__':
    main()

And that’s all. It’d be good if I could wake up my skill directly from my iot device, instead of waking up manually, but AFAIK that’s not possible.

Source code in my github

Opencv and esp32 experiment. Moving a servo with my face alignment

One saturday morning I was having a breakfast and I discovered face_recognition project. I started to play with the opencv example. I put my picture and, Wow! It works like a charm. It’s pretty straightforward to detect my face and also I can obtain the face landmarks. One of the landmark that I can get is the nose tip. Playing with this script I realized that with the nose tip I can determine the position of the face. I can see if my face is align to the center or if I move it to one side. As well as I have a new iot device (one ESP32) I wanted to do something with it. For example control a servo (SG90) and moving it from left to right depending on my face position.

First we have the main python script. With this script I detect my face, the nose tip and the position of my face. With this position I will emit an event to a mqtt broker (a mosquitto server running on my laptop).

import face_recognition
import cv2
import numpy as np
import math
import paho.mqtt.client as mqtt

video_capture = cv2.VideoCapture(0)

gonzalo_image = face_recognition.load_image_file("gonzalo.png")
gonzalo_face_encoding = face_recognition.face_encodings(gonzalo_image)[0]

known_face_encodings = [
    gonzalo_face_encoding
]
known_face_names = [
    "Gonzalo"
]

RED = (0, 0, 255)
GREEN = (0, 255, 0)
BLUE = (255, 0, 0)

face_locations = []
face_encodings = []
face_names = []
process_this_frame = True
status = ''
labelColor = GREEN

client = mqtt.Client()
client.connect("localhost", 1883, 60)

while True:
    ret, frame = video_capture.read()

    # Resize frame of video to 1/4 size for faster face recognition processing
    small_frame = cv2.resize(frame, (0, 0), fx=0.25, fy=0.25)

    # Convert the image from BGR color (which OpenCV uses) to RGB color (which face_recognition uses)
    rgb_small_frame = small_frame[:, :, ::-1]

    face_locations = face_recognition.face_locations(rgb_small_frame)
    face_encodings = face_recognition.face_encodings(rgb_small_frame, face_locations)
    face_landmarks_list = face_recognition.face_landmarks(rgb_small_frame, face_locations)

    face_names = []
    for face_encoding, face_landmarks in zip(face_encodings, face_landmarks_list):
        matches = face_recognition.compare_faces(known_face_encodings, face_encoding)
        name = "Unknown"

        if True in matches:
            first_match_index = matches.index(True)
            name = known_face_names[first_match_index]

            nose_tip = face_landmarks['nose_tip']
            maxLandmark = max(nose_tip)
            minLandmark = min(nose_tip)

            diff = math.fabs(maxLandmark[1] - minLandmark[1])
            if diff < 2:
                status = "center"
                labelColor = BLUE
                client.publish("/face/{}/center".format(name), "1")
            elif maxLandmark[1] > minLandmark[1]:
                status = ">>>>"
                labelColor = RED
                client.publish("/face/{}/left".format(name), "1")
            else:
                status = "<<<<"
                client.publish("/face/{}/right".format(name), "1")
                labelColor = RED

            shape = np.array(face_landmarks['nose_bridge'], np.int32)
            cv2.polylines(frame, [shape.reshape((-1, 1, 2)) * 4], True, (0, 255, 255))
            cv2.fillPoly(frame, [shape.reshape((-1, 1, 2)) * 4], GREEN)

        face_names.append("{} {}".format(name, status))

    for (top, right, bottom, left), name in zip(face_locations, face_names):
        # Scale back up face locations since the frame we detected in was scaled to 1/4 size
        top *= 4
        right *= 4
        bottom *= 4
        left *= 4

        if 'Unknown' not in name.split(' '):
            cv2.rectangle(frame, (left, top), (right, bottom), labelColor, 2)
            cv2.rectangle(frame, (left, bottom - 35), (right, bottom), labelColor, cv2.FILLED)
            cv2.putText(frame, name, (left + 6, bottom - 6), cv2.FONT_HERSHEY_DUPLEX, 1.0, (255, 255, 255), 1)
        else:
            cv2.rectangle(frame, (left, top), (right, bottom), BLUE, 2)

    cv2.imshow('Video', frame)

    if cv2.waitKey(1) & 0xFF == ord('q'):
        break

video_capture.release()
cv2.destroyAllWindows()

Now another Python script will be listening to mqtt events and it will trigger one event with the position of the servo. I know that this second Python script maybe is unnecessary. We can move its logic to esp32 and main opencv script, but I was playing with mqtt and I wanted to decouple it a little bit.

import paho.mqtt.client as mqtt

class Iot:
    _state = None
    _client = None
    _dict = {
        'left': 0,
        'center': 1,
        'right': 2
    }

    def __init__(self, client):
        self._client = client

    def emit(self, name, event):
        if event != self._state:
            self._state = event
            self._client.publish("/servo", self._dict[event])
            print("emit /servo envent with value {} - {}".format(self._dict[event], name))


def on_message(topic, iot):
    data = topic.split("/")
    name = data[2]
    action = data[3]
    iot.emit(name, action)


client = mqtt.Client()
iot = Iot(client)

client.on_connect = lambda self, mosq, obj, rc: self.subscribe("/face/#")
client.on_message = lambda client, userdata, msg: on_message(msg.topic, iot)

client.connect("localhost", 1883, 60)
client.loop_forever()

And finally the ESP32. Here will connect to my wifi and to my mqtt broker.

#include <WiFi.h>
#include <PubSubClient.h>

#define LED0 17
#define LED1 18
#define LED2 19
#define SERVO_PIN 5

// wifi configuration
const char* ssid = "my_ssid";
const char* password = "my_wifi_password";
// mqtt configuration
const char* server = "192.168.1.111"; // mqtt broker ip
const char* topic = "/servo";
const char* clientName = "com.gonzalo123.esp32";

int channel = 1;
int hz = 50;
int depth = 16;

WiFiClient wifiClient;
PubSubClient client(wifiClient);

void wifiConnect() {
  Serial.print("Connecting to ");
  Serial.println(ssid);

  WiFi.begin(ssid, password);

  while (WiFi.status() != WL_CONNECTED) {
    delay(500);
    Serial.print("*");
  }

  Serial.print("WiFi connected: ");
  Serial.println(WiFi.localIP());
}

void mqttReConnect() {
  while (!client.connected()) {
    Serial.print("Attempting MQTT connection...");
    if (client.connect(clientName)) {
      Serial.println("connected");
      client.subscribe(topic);
    } else {
      Serial.print("failed, rc=");
      Serial.print(client.state());
      Serial.println(" try again in 5 seconds");
      delay(5000);
    }
  }
}

void callback(char* topic, byte* payload, unsigned int length) {
  Serial.print("Message arrived [");
  Serial.print(topic);

  String data;
  for (int i = 0; i < length; i++) {
    data += (char)payload[i];
  }

  int value = data.toInt();
  cleanLeds();
  switch (value)  {
    case 0:
      ledcWrite(1, 3400);
      digitalWrite(LED0, HIGH);
      break;
    case 1:
      ledcWrite(1, 4900);
      digitalWrite(LED1, HIGH);
      break;
    case 2:
      ledcWrite(1, 6400);
      digitalWrite(LED2, HIGH);
      break;
  }
  Serial.print("] value:");
  Serial.println((int) value);
}

void cleanLeds() {
  digitalWrite(LED0, LOW);
  digitalWrite(LED1, LOW);
  digitalWrite(LED2, LOW);
}

void setup() {
  Serial.begin(115200);

  ledcSetup(channel, hz, depth);
  ledcAttachPin(SERVO_PIN, channel);

  pinMode(LED0, OUTPUT);
  pinMode(LED1, OUTPUT);
  pinMode(LED2, OUTPUT);
  cleanLeds();
  wifiConnect();
  client.setServer(server, 1883);
  client.setCallback(callback);

  delay(1500);
}

void loop()
{
  if (!client.connected()) {
    mqttReConnect();
  }

  client.loop();
  delay(100);
}

Here a video with the working prototype in action

The source code is available in my github account.

Pomodoro with ESP32. One “The Melee – Side by side” project

Last weekend there was a great event called The Melee – Side by side (Many thanks to @ojoven and @diversius).

The event was one kind of Hackathon where a group of people meet together one day, to share our side projects and to work together (yes. We also have a lunch and beers also :). The format of the event is just a copy of the event that our colleagues from Bilbao called “El Comité“.

@ibaiimaz spoke about one project to create one collaborative pomodoro where the people of one team can share their status and see the status of the rest of the team. When I heard pomodoro and status I immediately thought in one servo moving a flag and some LEDs turning on and off. We had a project. @penniath and @tatai also joined us. We also had a team.

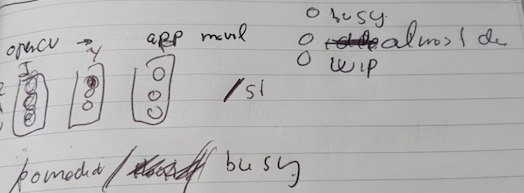
We had a project and we also had a deadline. We must show a working prototype at the end of the day. That means that we didn’t have too many time. First we decided the mockup of the project, reducing the initial scope (more ambitious) to fit it within our time slot. We discuss intensely for 10 minutes and finally we describe an ultra detailed blueprint. That’s the full blueprint of the project:

It was time to start working.

@penniath and @tatai worked in the Backend. It must be the responsible of the pomodoro timers, listen to MQTT events and create an API for the frontend. The backend also must provide a WebSockets interface to allow real time events within the frontend. They decided to use node and socket.io for the WebSockets. You can see the source code here.

@ibaiimaz started with the frontend. He decided to create an Angular web application listening to socket.io events to show the status of the pomodoro. You can see the source code here.

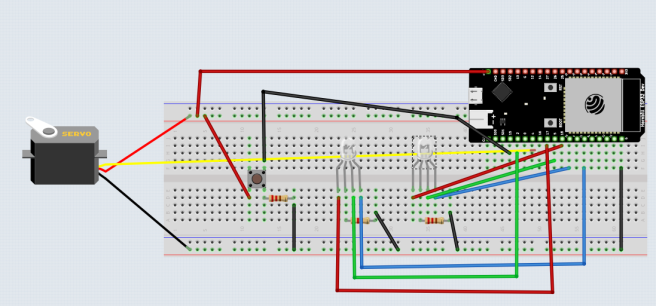
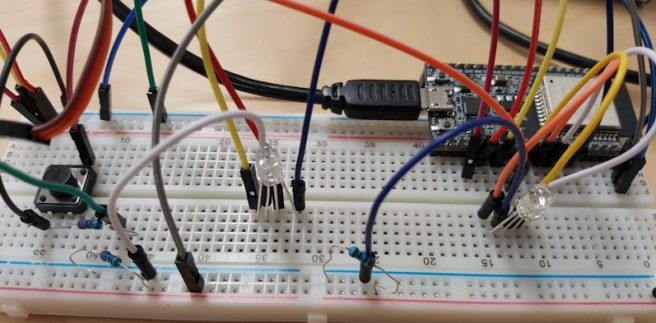
Finaly I worked with the hardware. I created a prototype with one ESP32, two RGB LEDs, one button, one servo and a couple of resistors.

That’s the source code.

#include <WiFi.h>
#include <PubSubClient.h>

int redPin_g = 19;
int greenPin_g = 17;
int bluePin_g = 18;

int redPin_i = 21;
int greenPin_i = 2;
int bluePin_i = 4;

#define SERVO_PIN 16

const int buttonPin = 15;
int buttonState = 0;

int channel = 1;
int hz = 50;
int depth = 16;

const char* ssid = "SSID";
const char* password = "password";
const char* server = "192.168.1.105";
const char* topic = "/pomodoro/+";
const char* clientName = "com.gonzalo123.esp32";

WiFiClient wifiClient;
PubSubClient client(wifiClient);

void wifiConnect() {
  Serial.print("Connecting to ");
  Serial.println(ssid);

  WiFi.begin(ssid, password);

  while (WiFi.status() != WL_CONNECTED) {
    delay(500);
    Serial.print("*");
  }

  Serial.print("WiFi connected: ");
  Serial.println(WiFi.localIP());
}

void mqttReConnect() {
  while (!client.connected()) {
    Serial.print("Attempting MQTT connection...");
    if (client.connect(clientName)) {
      Serial.println("connected");
      client.subscribe(topic);
    } else {
      Serial.print("failed, rc=");
      Serial.print(client.state());
      Serial.println(" try again in 5 seconds");
      delay(5000);
    }
  }
}

void callback(char* topic, byte* payload, unsigned int length) {
  Serial.print("Message arrived [");
  Serial.print(topic);

  String data;
  for (int i = 0; i < length; i++) {
    data += (char)payload[i];
  }

  int value = data.toInt();

  if (strcmp(topic, "/pomodoro/gonzalo") == 0) {
    Serial.print("[gonzalo]");
    switch (value) {
      case 1:
        ledcWrite(1, 3400);
        setColor_g(0, 255, 0);
        break;
      case 2:
        setColor_g(255, 0, 0);
        break;
      case 3:
        ledcWrite(1, 6400);
        setColor_g(0, 0, 255);
        break;
    }
  } else {
    Serial.print("[ibai]");
    switch (value) {
      case 1:
        setColor_i(0, 255, 0);
        break;
      case 2:
        setColor_i(255, 0, 0);
        break;
      case 3:
        setColor_i(0, 0, 255);  // green
        break;
    }
  }

  Serial.print("] value:");
  Serial.println(data);
}

void setup()
{
  Serial.begin(115200);

  pinMode(buttonPin, INPUT_PULLUP);
  pinMode(redPin_g, OUTPUT);
  pinMode(greenPin_g, OUTPUT);
  pinMode(bluePin_g, OUTPUT);

  pinMode(redPin_i, OUTPUT);
  pinMode(greenPin_i, OUTPUT);
  pinMode(bluePin_i, OUTPUT);

  ledcSetup(channel, hz, depth);
  ledcAttachPin(SERVO_PIN, channel);
  wifiConnect();
  client.setServer(server, 1883);
  client.setCallback(callback);

  delay(1500);
}

void mqttEmit(String topic, String value)
{
  client.publish((char*) topic.c_str(), (char*) value.c_str());
}

void loop()
{
  if (!client.connected()) {
    mqttReConnect();
  }

  client.loop();

  buttonState = digitalRead(buttonPin);
  if (buttonState == HIGH) {
    mqttEmit("/start/gonzalo", (String) "3");
  }

  delay(200);
}

void setColor_i(int red, int green, int blue)
{
  digitalWrite(redPin_i, red);
  digitalWrite(greenPin_i, green);
  digitalWrite(bluePin_i, blue);
}

void setColor_g(int red, int green, int blue)
{
  digitalWrite(redPin_g, red);
  digitalWrite(greenPin_g, green);
  digitalWrite(bluePin_g, blue);
}

The MQTT server (a mosquitto server) was initially running in my laptop but as well as I had one Raspberry Pi Zero also in my bag we decided to user the Pi Zero as a server and run mosquitto MQTT server with Raspbian. Everything is better with a Raspberry Pi. @tatai helped me to set up the server.

Here you can see the prototype in action

That’s the kind of side projects that I normally create alone but definitely it’s more fun to do it with other colleagues even it I need to wake up early one Saturday morning.

Source code of ESP32 here.