Today we’ll explore how to build a secure AI frontend using Chainlit. Chainlit is Python framework that allows us to create interactive AI applications. In this example we are going to reuse the weather tool created in a previous post. Also, we will implement OAuth2 authentication with a Nginx as a reverse proxy.
The project consists of four main components:
Nginx Reverse Proxy: Handles authentication via auth_request and routes traffic
Fake OAuth Server: Simple Flask app that simulates OAuth2 authentication
Chainlit Application: The main chat interface with AI capabilities
Strands AI Agent: Weather-focused AI assistant with custom tools
The Nginx configuration implements OAuth2 authentication using the auth_request module:
Every request to / triggers an authentication check via /oauth2/auth
JWT token is extracted from the OAuth response and forwarded to Chainlit
Unauthenticated users are redirected to the OAuth sign-in page
The JWT token is passed to Chainlit via the X-User-JWT header
A simple Flask application simulates an OAuth2 provider for demonstration purposes. In a production environment, you would replace this with a real OAuth2 provider or implemente the whole OAuth2 flow.
The weather functionality is implemented using custom Strands tools that fetch meteorological data:
class WeatherTools:
    def __init__(self, latitude: float, longitude: float):
        self.latitude = latitude
        self.longitude = longitude

    def get_tools(self, tools=None) -> List[tool]:
        @tool
        def get_hourly_weather_data(from_date: date, to_date: date) -> MeteoData:
            """
            Get hourly weather data for a specific date range in my city.

            Returns:
                MeteoData: Object containing weather readings for temperature,
                          humidity, precipitation, etc.
            """
            # Implementation details...
The weather tools provide:
Hourly weather data for specific date ranges
Temperature readings (actual and apparent)
Humidity and precipitation data
Surface pressure measurements
Evapotranspiration data
The Chainlit interface provides several starter prompts to help users interact with the weather agent:
@cl.set_starters
async def set_starters():
    return [
        cl.Starter(label="Is going to rain today?", message="Is going to rain today?"),
        cl.Starter(label="tomorrow's weather", message="What will the weather be like tomorrow?"),
        cl.Starter(label="Next 7 days weather", message="Make a weather forecast for the next 7 days."),
    ]
Chainlit also supports message history management, allowing users to see their previous interactions:
@cl.on_message
async def handle_message(message: cl.Message):
    message_history = cl.user_session.get("message_history")
    message_history.append({"role": "user", "content": message.content})

    msg = cl.Message(content="")
    await msg.send()

    app_user = cl.user_session.get("user")
    question = f"user: {app_user.display_name} Content: {message.content}"

    async for event in agent.stream_async(question):
        if "data" in event:
            await msg.stream_token(str(event["data"]))
        elif "message" in event:
            await msg.stream_token("\n")
            message_history.append(event["message"])

    await msg.update()
And that’s all. Thanks to Chainlit, we can build AI frontends and integrate them with OAuth2 authentication in a secure and efficient way. The combination of Chainlit’s interactive capabilities and Nginx’s robust authentication features provides a solid foundation for building AI applications that require user authentication.
Context 1: I like to go to the cinema. I normally go to the cinema on Saturday afternoons, at the first showing. In the city where I live there are three cinemas and all belong to the same company called Sade. I normally check the cinema schedules on their website, SadeCines.com, to see what’s playing. Also, I track the movies I see on Letterboxd. There I have my diary and also a list with the movies I see in the cinema. I rate the movies when I finish watching them. My first impression. I do that not to share with others, only to have a personal record of what I like and dislike.
Context 2: I’m on holidays and I like to code also, so I decided to build an AI agent that helps me decide what movie to watch on Saturday afternoons. This project is an example of over-engineering, I know, but I’ve done it as an exercise using Strands Agents, a framework for building multi-tool LLM agents that I’m using these days.
The aim of the project is to create an AI agent that can access the internet to check the cinema schedules, my Letterboxd profile, and then recommend me a movie to watch on Saturday afternoons. Normally the LLMs are good at reasoning, but they don’t have access to the internet. Also, they are not good at doing mathematical operations, but with agents we can use tools to do that. So I decided to build an agent that can access the internet (to check the cinema schedules, my Letterboxd profile and IMDb/Metacritic’s scores) and create the needed code to do the mathematical operations needed.
Strands Agents (it is similar to LangChain) allows us to build multi-tool LLM agents. In this example I’m using the pre-built tools provided by the framework, like:
calculator: for performing mathematical operations
think: for reasoning and decision-making
current_time: to get the current date and time
file_write: to write the recommendations to a file
batch: to execute multiple tools in parallel
code_interpreter: to execute Python code dynamically (sandboxed in an AWS environment)
browser: to scrape the cinema schedules from SadeCines.com and my Letterboxd profile (also sandboxed in an AWS environment)
Code interpreter is a powerful tool that allows us to execute Python code dynamically, which is useful for performing mathematical operations and data processing. For me it is the key to push the agents to the next level. LLMs can generate python code very well. They can generate code to build a Pandas dataframe, to filter the data, to calculate the average rating, etc. But they can also generate code that can be harmful, like deleting files, or accessing sensitive data. So we need to be careful with the code we execute. This issue is especially important when we are using prompts from users (in a chat, for example). Strands Agents provides a tool called python-repl that allows us to execute Python code locally within our environment. If you rely on your prompts it can be an option (I’ve sent a pull request to Strands Agents to make it a bit more safe). But in this project I’m using the code_interpreter tool, which is a sandboxed environment provided by AWS. This allows us to execute Python code safely without the risk of executing harmful code in your host environment.
In this project we need to scrape webpages to retrieve information from internet. Strands Agents provides us a built-in tool, called use_browser, to use a headless browser locally to access the Internet. In this project, I’m using the browser tool, which is also a sandboxed environment provided by AWS Bedrock. This allows us to scrape webs (using Playwright) and interact with web pages without the risk of executing harmful code in your host environment.
With this information, to build the agent is pretty straightforward. The idea of agents is not to code everything from scratch, but to provide to the agent the needed tools to solve the problem, and let the agent figure out how to use them using the prompts. When we work with LLM we have two kinds of prompts: the system prompt and the user prompt. The system prompt is used to define the agent’s behavior, while the user prompt is used to provide the input data.
In this project I’m using those prompts:
from settings import BASE_DIR

SYSTEM_PROMPT = f"""
You are an expert movie recommendation assistant to help me decide what to watch.

You have access to the following URLs and available movie analyses:
- https://sadecines.com/ With the movie schedules in my city's cinemas.
    Sadecines has a checkbox to filter the day of the week, so you can select Saturday.
- https://letterboxd.com/gonzalo123/films/diary/ Movies I have watched and rated.
- https://letterboxd.com/gonzalo123/list/cine-2025/detail/ Movies I have already seen in theaters in 2025.

You must take into account the user's preferences:
- Avoid movies in the "children" and "family" genres.
- I don't really like intimate or drama movies, except for rare exceptions.
- I like entertaining movies, action, science fiction, adventure, and comedies.

Take into account when making recommendations:
- The ratings of the movies on IMDb and Metacritic.
- But mainly consider my personal preferences,
    which can be seen in the list of movies I have watched and rated on Letterboxd.
"""

QUESTION = f"""
Analyze the movies showing this Saturday in the first session.

Present only those you recommend, excluding those not relevant according to my preferences,
and order them from best to worst according to your criteria.

Show the result in a table with the following columns:
- Title
- Genre
- IMDb Rating
- Metacritic Rating
- Summary
- Start Time
- End Time

Save the final report in a file named YYYYMMDD.md, following this structure:
{BASE_DIR}/
    └ reports/
        └ YYYYMMDD.md       # Movie analysis of the day, format `YYYYMMDD`
And the code of the agent is very simple (I’m using AWS Bedrock to run the agent)
The lines of code never is a goal (we only need to write readable and maintainable code), but in this example we have more code in the prompts than in the code itself. Maybe it’s the sigh of our times.
And that’s all. I must say again that this project is just an example. It is an over-engineering example. Scaling this project would be very expensive. Working a little bit in a custom scraper in addition to custom python code, can do the same to solve this specific problem without the usage, and paid, the IA (cheap for a single user usage, but expensive when scaled). I think it is a good example to show how Agents and the power of the code interpreter and the browser tools in a few lines of code. And remember, I’m on holidays and I like to code (don’t blame me for that).
Today we’re going to build an AI agent that can predict the weather using Strands-Agents framework and Python. This project is designed to show how to integrate external data sources, advanced computational tools, and AI capabilities into a cohesive system. For this experiment we’re going to use Strands-Agents framework, which provides a robust foundation for building intelligent agents that can interact with various tools and APIs. Strands-Agents comes with built-in tools that allow us to create agents that can perform complex tasks by orchestrating multiple tools and APIs. For this project we’re going to use the following tools:
calculator: for performing mathematical and financial calculations.
think: for reflecting on data and generating ideas.
file_write: for saving results and analyses to files.
python_repl: for executing Python code and performing advanced analyses.
The last one is particularly useful for overcoming the limitations of large language models (LLMs) when it comes to deterministic calculations. By using a Python REPL, we can ensure that our agent can perform precise computations without relying solely on the LLM’s probabilistic outputs. We have Pandas and Scikit-learn for statistical analysis, which allows us to perform advanced data manipulation and machine learning tasks, and the agent will be able to use these libraries to analyze weather data and generate forecasts. Also, I’ve created a custom tool to fetch hourly weather data from the Open-Meteo API, which provides real-time weather information for specific locations.
import logging
from datetime import datetime, date
from typing import List

import requests
from strands import tool

from modules.weather.models import (
    TemperatureReading, HumidityReading, ApparentTemperatureReading,
    PrecipitationReading, EvapotranspirationReading, SurfacePressureReading, MeteoData)

logger = logging.getLogger(__name__)


class Tools:
    def __init__(self, latitude: float, longitude: float):
        self.latitude = latitude
        self.longitude = longitude

    def get_tools(self) -> List[tool]:
        @tool
        def get_hourly_weather_data(from_date: date, to_date: date) -> MeteoData:
            """
            Get hourly weather data for a specific date range.
            Notes:
                - The response is a MeteoData object containing lists of readings for temperature, humidity,
                  apparent temperature, precipitation, evapotranspiration, and surface pressure.
                - Each reading has a timestamp and a value.

            Returns:
                MeteoData: Object containing weather readings for the specified date range
            """

            start_date = from_date.strftime('%Y-%m-%d')
            end_date = to_date.strftime('%Y-%m-%d')
            url = (f"https://api.open-meteo.com/v1/forecast?"
                   f"latitude={self.latitude}&"
                   f"longitude={self.longitude}&"
                   f"hourly=temperature_2m,relative_humidity_2m,apparent_temperature,precipitation,evapotranspiration,surface_pressure&"
                   f"start_date={start_date}&"
                   f"end_date={end_date}")
            response = requests.get(url)

            meteo = MeteoData(
                temperature=[],
                humidity=[],
                apparent_temperature=[],
                precipitation=[],
                evapotranspiration=[],
                surface_pressure=[]
            )
            data = response.json()

            weather_data_time = data['hourly']['time']

            logger.info(f"[get_hourly_weather_data] Fetched weather data from {start_date} to {end_date}. {len(weather_data_time)} records found.")
            for iso in weather_data_time:
                time = datetime.fromisoformat(iso)
                meteo.temperature.append(TemperatureReading(
                    time=time,
                    value=data['hourly']['temperature_2m'][data['hourly']['time'].index(iso)]))
                meteo.humidity.append(HumidityReading(
                    time=time,
                    value=data['hourly']['relative_humidity_2m'][data['hourly']['time'].index(iso)]))
                meteo.apparent_temperature.append(ApparentTemperatureReading(
                    time=time,
                    value=data['hourly']['apparent_temperature'][data['hourly']['time'].index(iso)]))
                meteo.precipitation.append(PrecipitationReading(
                    time=time,
                    value=data['hourly']['precipitation'][data['hourly']['time'].index(iso)]))
                meteo.evapotranspiration.append(EvapotranspirationReading(
                    time=time,
                    value=data['hourly']['evapotranspiration'][data['hourly']['time'].index(iso)]))
                meteo.surface_pressure.append(SurfacePressureReading(
                    time=time,
                    value=data['hourly']['surface_pressure'][data['hourly']['time'].index(iso)]))
            return meteo

        return [get_hourly_weather_data, ]
To allow the LLM to interact with this tool, we define a Pydantic model that describes the expected input and output formats. This ensures that the agent can correctly interpret the data it receives from the API and use it effectively in its analyses.
from datetime import datetime

from pydantic import BaseModel, Field


class TemperatureReading(BaseModel):
    """Temperature reading at 2 meters"""
    time: datetime = Field(..., description="Timestamp")
    value: float = Field(description="Temperature in °C")


class HumidityReading(BaseModel):
    """Relative humidity reading at 2 meters"""
    time: datetime = Field(..., description="Timestamp")
    value: int = Field(..., ge=0, le=100, description="Relative humidity in %")


class ApparentTemperatureReading(BaseModel):
    """Apparent temperature reading"""
    time: datetime = Field(..., description="Timestamp")
    value: float = Field(..., description="Apparent temperature in °C")


class PrecipitationReading(BaseModel):
    """Precipitation reading"""
    time: datetime = Field(..., description="Timestamp")
    value: float = Field(..., ge=0, description="Precipitation in mm")


class EvapotranspirationReading(BaseModel):
    """Evapotranspiration reading"""
    time: datetime = Field(..., description="Timestamp")
    value: float = Field(..., description="Evapotranspiration in mm")


class SurfacePressureReading(BaseModel):
    """Surface pressure reading"""
    time: datetime = Field(..., description="Timestamp")
    value: float = Field(..., gt=0, description="Surface pressure in hPa")


class MeteoData(BaseModel):
    """Model to store meteorological data"""
    temperature: list[TemperatureReading] = Field(..., description="List of temperature readings")
    humidity: list[HumidityReading] = Field(..., description="List of humidity readings")
    apparent_temperature: list[ApparentTemperatureReading] = Field(..., description="List of apparent temperature readings")
    precipitation: list[PrecipitationReading] = Field(..., description="List of precipitation readings")
    evapotranspiration: list[EvapotranspirationReading] = Field(..., description="List of evapotranspiration readings")
    surface_pressure: list[SurfacePressureReading] = Field(..., description="List of surface pressure readings")
The use of Strands-Agents is very simple. I’ve encapsulated the agent logic in a single function that initializes the agent with the necessary tools and prompts. The agent can then be used to generate weather forecasts or answer specific weather-related questions.
_ = ai(
    system_prompt=SYSTEM_PROMPT,
    user_prompt="What will the weather be like tomorrow?")
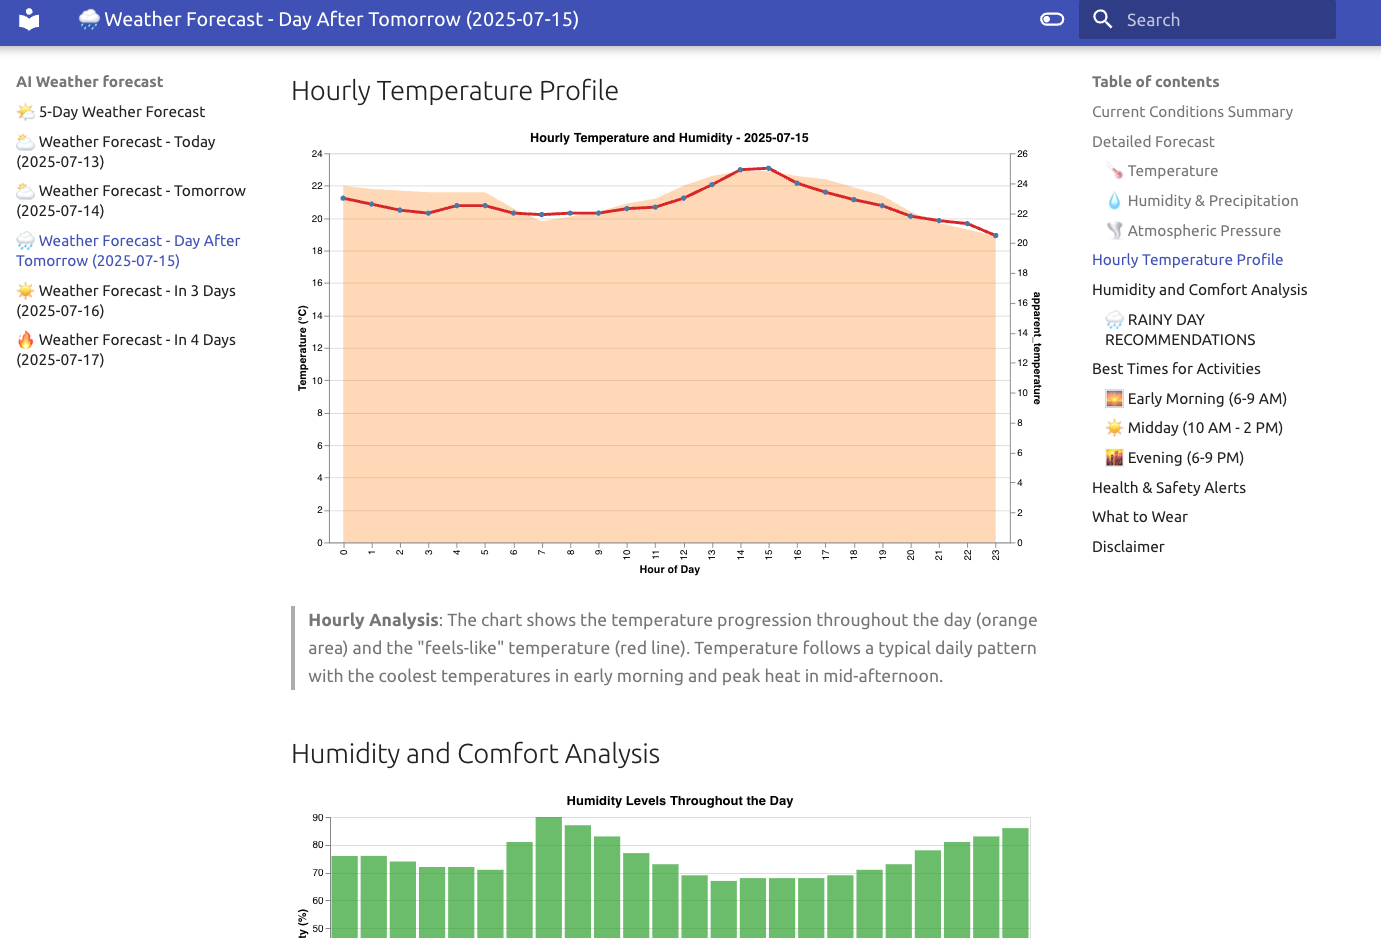
If I run this code, agent will use the provided tools to generate the answer. In the output of the command, you will see the agent’s reasoning, the tools it used, and the final answer. First it uses the current time tool to get the current date and time (using current_time tool), then it uses the get_hourly_weather_data tool to fetch the weather data, after that uses think tool to analyze the data, and finally it uses the python_repl tool to generate the needed calculations, using Pandas, and produce the final weather forecast. Here’s an example of the output you might see when running the agent:
12/07/2025 15:28:18 [INFO] Check agent weather.
12/07/2025 15:28:18 [INFO] Found credentials in shared credentials file: ~/.aws/credentials
12/07/2025 15:28:18 [INFO] Creating Strands MetricsClient
I'll help you get the weather forecast for tomorrow. First, let me get the current time to determine what "tomorrow" is, and then I'll fetch the weather data for you.
Tool #1: current_time
Now I'll get the hourly weather data for tomorrow (July 13, 2025):
Tool #2: get_hourly_weather_data
12/07/2025 15:28:24 [INFO] [get_hourly_weather_data] Fetched weather data from 2025-07-13 to 2025-07-13. 24 records found.
Let me analyze this weather data to provide you with a comprehensive forecast for tomorrow (July 13, 2025):
Tool #3: think
Let me analyze the weather data directly to provide you with tomorrow's forecast:
Tool #4: python_repl
WEATHER FORECAST FOR TOMORROW (July 13, 2025)
==================================================
Temperature Range: 20.5°C to 23.6°C
Average Temperature: 22.2°C
Feels Like Temperature: Up to 24.6°C

Humidity Range: 70% to 83%
Average Humidity: 77%

Total Precipitation: 1.0mm
Precipitation Timing: Brief shower 4-5 PM

Pressure: Rising from 1012.1 to 1019.9 hPa
Pressure Change: +7.8 hPa (improving conditions)

Tool #5: python_repl

DETAILED HOURLY BREAKDOWN
==============================

🌅 MORNING (6 AM - 12 PM):
Temperature: 20.6°C to 23.0°C
Humidity: 70% to 82%
Conditions: Clear, comfortable temperatures

☀️ AFTERNOON (12 PM - 6 PM):
Temperature: 22.6°C to 23.6°C
Humidity: 71% to 81%
Precipitation: 1.0mm (brief shower 4-5 PM)
Conditions: Warmest part of day, brief afternoon shower

🌙 EVENING (6 PM - 12 AM):
Temperature: 22.0°C to 22.4°C
Humidity: 75% to 82%
Conditions: Pleasant evening temperatures, increasing humidity

📋 SUMMARY & RECOMMENDATIONS:
• Mild and pleasant day with comfortable temperatures
• Brief shower expected between 4-5 PM (carry umbrella)
• Rising atmospheric pressure indicates stable weather
• High humidity in morning and evening - may feel muggy
• Good day for outdoor activities, except during afternoon shower
• Light layers recommended due to temperature variation
## Weather Forecast for Tomorrow (July 13, 2025)

**Overall Conditions:** A pleasant, mild day with mostly clear skies and a brief afternoon shower.

### 🌡️ **Temperature**
- **Range:** 20.5°C to 23.6°C (69°F to 74°F)
- **Feels like:** Up to 24.6°C (76°F)
- **Coolest:** Early morning around 2-6 AM
- **Warmest:** Mid-afternoon around 2 PM

### 🌧️ **Precipitation**
- **Total:** 1.0mm of rain
- **Timing:** Brief shower between 4-5 PM
- **Duration:** Short-lived, about 1 hour
- **Recommendation:** Carry an umbrella for the afternoon

### 💨 **Atmospheric Conditions**
- **Humidity:** 70-83% (higher in morning/evening)
- **Pressure:** Rising from 1012 to 1020 hPa (+7.8 hPa increase)
- **Trend:** Improving and stabilizing weather conditions

### ⏰ **Time-Based Breakdown**

**Morning (6 AM - 12 PM):** Clear and comfortable, 20.6-23°C
**Afternoon (12 PM - 6 PM):** Warmest period with brief shower, 22.6-23.6°C
**Evening (6 PM - 12 AM):** Pleasant and stable, 22-22.4°C

### 📝 **Recommendations**
- **Clothing:** Light layers, as temperatures vary throughout the day
- **Activities:** Great for outdoor plans, just avoid 4-5 PM for the shower
- **Comfort:** May feel slightly muggy due to higher humidity
- **Overall:** A very pleasant summer day with stable, improving weather conditions

The rising atmospheric pressure indicates this will be a stable weather day with good conditions for most outdoor activities!
Process finished with exit code 0
Here you can see the ai function.
import logging

from botocore.config import Config
from strands import Agent
from strands.agent import AgentResult
from strands.models import BedrockModel
from strands_tools import calculator, file_write, current_time, think, python_repl

from core.aws import get_aws_session
from modules.weather.tools import Tools
from settings import (
    IA_MODEL, IA_TEMPERATURE, LLM_READ_TIMEOUT, LLM_CONNECT_TIMEOUT,
    LLM_MAX_ATTEMPTS, MY_LATITUDE, MY_LONGITUDE, )

logger = logging.getLogger(__name__)


def get_agent(
        system_prompt: str,
        read_timeout: int = LLM_READ_TIMEOUT,
        connect_timeout: int = LLM_CONNECT_TIMEOUT,
        max_attempts: int = LLM_MAX_ATTEMPTS) -> Agent:
    config = Config(
        read_timeout=read_timeout,
        connect_timeout=connect_timeout,
        retries={'max_attempts': max_attempts}
    )
    session = get_aws_session()

    base_tools = [calculator, think, python_repl, file_write, current_time]
    custom_tools = Tools(latitude=MY_LATITUDE, longitude=MY_LONGITUDE).get_tools()
    all_tools = base_tools + custom_tools

    bedrock_model = BedrockModel(
        model_id=IA_MODEL,
        temperature=IA_TEMPERATURE,
        boto_session=session,
        boto_client_config=config,
    )
    return Agent(
        model=bedrock_model,
        tools=all_tools,
        system_prompt=system_prompt
    )


def ai(
        system_prompt: str,
        user_prompt: str,
        read_timeout: int = 300,
        connect_timeout: int = 60,
        max_attempts: int = 5) -> AgentResult:
    agent = get_agent(
        system_prompt=system_prompt,
        read_timeout=read_timeout,
        connect_timeout=connect_timeout,
        max_attempts=max_attempts)

    return agent(user_prompt)
As you can see, the agent is only a few lines of code. The magic is in the prompts and the tools that it uses. The agent can be used to generate weather forecasts, analyze historical weather data, and provide practical recommendations based on the weather conditions. This is the main prompt:
FORECAST_PROMPT = f"""
## Instructions for the weather forecast
Your mission is to analyze weather data and provide accurate and useful forecasts for the next {{days}} days.
You have access to a tool called `get_hourly_weather_data` that allows you to obtain hourly weather data.
As a meteorology expert, you must thoroughly analyze the data and provide accurate and useful forecasts.

Take into account possible extreme heat days, especially in summer.
Remember that extreme heat is considered when maximum and minimum temperatures exceed local temperature thresholds for several consecutive days,
often during a heatwave. These temperatures, along with humidity, can be harmful to health, especially for vulnerable groups.

## Report style
All reports must be written in English.
The report must be clear, concise, and easy to understand.
It should include:
- A summary of current weather conditions.
- A detailed forecast for the coming days, including temperature, precipitation, wind, and any other relevant data.
- Practical recommendations based on the forecast, such as precautions to take or recommended activities.
- Be creative and innovative in your approach, using advanced data visualization techniques to enhance the report.

## Data visualization
The report, in markdown, must be visually appealing and innovative.
You will use tables, lists, and other formatting elements to enhance readability.

### Graph format
- Generate the graph configuration in JSON format, compatible with the Vegalite library.
- Ensure the JSON is valid and compatible with the Vegalite library.
- The graphs must be innovative, leveraging the library's potential. Do not limit yourself to simple bar or line charts. Aim for a wow effect.

- Required JSON structure:
    * title: main title of the graph, at the top of the graph. The title must be brief and descriptive.
    * the title must be in the layout.title.text directive
    * layout.showlegend will be true/false, to show the graph legend. Some graphs do not need a legend, such as simple line charts.
- After each graph, generate a blockquote briefly explaining what the graph shows and its context.

...
For the visualization I’m using MkDocs , a simple static site generator for Markdown files. To have more advanced visualizations, I’m using the Vega-Lite library, which allows you to create interactive and visually appealing charts. The agent generates the JSON configuration for the graphs in a format compatible with Vega-Lite, which can then be rendered in the Markdown reports.
For AI, I’m using Claude 3.5 Sonnet, provided by Amazon Bedrock. For the experiment it’s enough, but if you create a cron job to run the agent every day, you’ll have your 5-day forecasting system ready to go. The project tries to show how to use AI agents to solve real-world problems, and how to integrate them with external data sources and tools. The agent can be extended to include more advanced features, such as integrating with other APIs or using more complex machine learning models for weather prediction.
Today we are going to build an agent with IA. It is just an example of how to build a agent with LangChain and AWS Bedrock and Claude 4 Sonnet. The agent will be a “mathematical expert” capable of performing complex calculations and providing detailed explanations of its reasoning process. The idea is to provide the agent with the ability to perform mathematical operations like addition, subtraction. In fact, with additions and subtractions, we can perform all the mathematical operations, like multiplication, division, exponentiation, square root, etc. The agent will be able to perform these operations step by step, providing a detailed explanation of its reasoning process. I know that we don’t need to use AI to perform these operations, but the idea is to show how to build an agent with LangChain and AWS Bedrock and Claude 4 Sonnet.
The mathematical agent implements the tool-calling pattern, allowing the LLM to dynamically select and execute mathematical operations:
Tools are defined using LangChain’s @tool decorator, providing automatic schema generation and type validation. Really we don’t need to create a class for the tools, but I have done it because I want to add an extra feature to the agent: the ability to keep a history of the operations performed. This will allow the agent to provide a detailed explanation of its reasoning process, showing the steps taken to arrive at the final result.
import logging
from typing import List

from langchain.tools import tool

logger = logging.getLogger(__name__)


class MathTools:

    def __init__(self):
        self.history = []

    def _diff_values(self, a: int, b: int) -> int:
        result = a - b
        self.history.append(f"{a} - {b} = {result}")
        return result

    def _sum_values(self, a: int, b: int) -> int:
        result = a + b
        self.history.append(f"{a} + {b} = {result}")
        return result

    def _get_history(self) -> str:
        if not self.history:
            return "No previous operations"
        return "\n".join(self.history[-5:])  # Last 5

    def get_tools(self) -> List:
        @tool
        def diff_values(a: int, b: int) -> int:
            """Calculates the difference between two numbers
            Args:
                a (int): first number
                b (int): second number
            Returns:
                int: difference of a - b
            """
            logger.info(f"Calculating difference: {a} - {b}")
            return self._diff_values(a, b)

        @tool
        def sum_values(a: int, b: int) -> int:
            """Sums two numbers
            Args:
                a (int): first number
                b (int): second number
            Returns:
                int: sum of a + b
            """
            logger.info(f"Calculating sum: {a} + {b}")
            return self._sum_values(a, b)

        @tool
        def get_history() -> str:
            """Gets the operation history
            Returns:
                str: last operations
            """
            logger.info("Retrieving operation history")
            return self._get_history()

        return [diff_values, sum_values, get_history]
The system prompt is carefully crafted to guide the agent’s behavior and establish clear operational boundaries:
AGENT_SYSTEM_PROMPT = """
You are an expert mathematical agent specialized in calculations.

You have access to the following tools:
- diff_values: Calculates the difference between two numbers
- sum_values: Sums two numbers
- get_history: Gets the operation history

Guidelines:
1. Only answer questions related to mathematical operations.
2. For complex operations, use step-by-step calculations:
   - Multiplication: Repeated addition
   - Division: Repeated subtraction
   - Exponentiation: Repeated multiplication
   - Square root: Use methods like Babylonian method or prime factorization.
"""
Now we can invoke our agent by asking questions such as ‘What’s the square root of 16 divided by two, squared?’. The agent will iterate using only the provided tools to obtain the result.
And that’s all. This project demonstrates how to build a production-ready AI agent using LangChain and AWS Bedrock. It’s just a boilerplate, but it can be extended to create more complex agents with additional capabilities and understand how AI agents work.