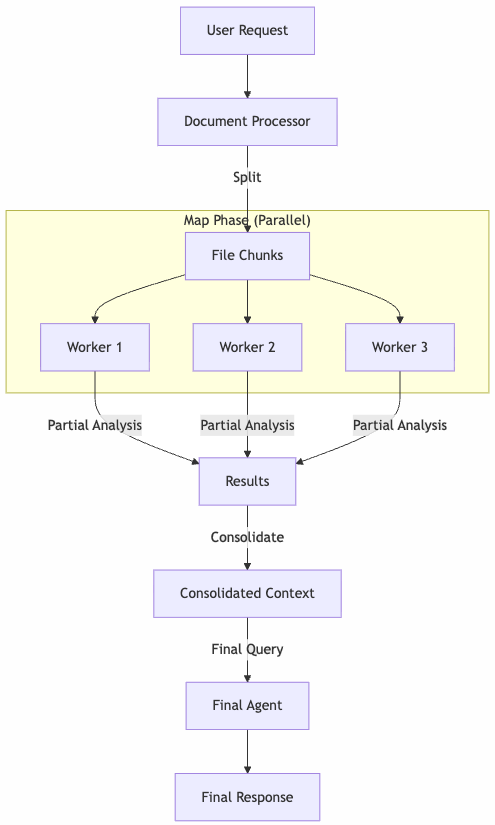
What if an AI could not only identify errors in your logs but actually fix them and create a pull request? I have done this experiment to do exactly that.
We can put or application logs in CloudWatch and use AI agents with a worker-coordinator pattern (I’ll share a post explaining this). Today the idea is going one step further. We will detecte errors in our logs, and for certain types of fixable errors, we will let an AI agent fix the code and create a pull request automatically.

The core of the system is a tool decorated with @tool from Strands Agents. This makes it available to any AI agent that needs to trigger a fix:
from strands import tool

@tool
async def register_error_for_fix(error: LogEntry) -> bool:
    """
    Register an error for automatic fixing.
    Clones repo, creates fix branch, uses Claude to fix, creates PR.
    """
    repo = _setup_repo()

    branch_name = _create_fix_branch(repo, error)
    if branch_name is None:
        return True  # Branch already exists, skip

    claude_response = await _invoke_claude_fix(error.message)
    if claude_response is None:
        return False

    pr_info = pr_title_generator(claude_response)
    _commit_and_push(repo, branch_name, pr_info)
    _create_pull_request(branch_name, pr_info)

    return True
Step by Step Implementation
1. Repository Setup with GitPython
The tool first clones the repo or pulls the latest changes:
from git import Repo

def _setup_repo() -> Repo:
    repo_url = f"https://x-access-token:{GITHUB_TOKEN}@github.com/{GITHUB_REPO}.git"

    if (WORK_DIR / ".git").exists():
        repo = Repo(WORK_DIR)
        repo.git.pull(repo_url)
    else:
        repo = Repo.clone_from(repo_url, WORK_DIR)

    return repo
2. Branch Creation with Deduplication
Each fix gets its own branch with a timestamp. If the branch already exists remotely, we skip it to avoid duplicate PRs:
def _create_fix_branch(repo: Repo, error: LogEntry) -> str | None:
    branch_name = f"autofix/{error.fix_short_name}_{error.timestamp.strftime('%Y%m%d-%H%M%S')}"

    remote_refs = [ref.name for ref in repo.remote().refs]
    if f"origin/{branch_name}" in remote_refs:
        logger.info(f"Branch {branch_name} already exists, skipping")
        return None

    new_branch = repo.create_head(branch_name)
    new_branch.checkout()
    return branch_name
3. The Magic: Claude Code SDK
This is where the actual fix happens. Claude Code SDK allows Claude to read and edit files in the codebase:
from claude_code_sdk import ClaudeCodeOptions, query

async def _invoke_claude_fix(error_message: str) -> str | None:
    prompt = f"Fix this error in the codebase: {error_message}"

    options = ClaudeCodeOptions(
        cwd=str(WORK_DIR),
        allowed_tools=["Read", "Edit"]  # Safe: no Write, no Bash
    )

    response = None
    async for response in query(prompt=prompt, options=options):
        logger.info(f"Claude response: {response}")

    return response.result if response else None
Note that we only allow Read and Edit tools – no Write (creating new files) or Bash (running commands). This keeps the fixes focused and safe.
4. PR Title Generation with Claude Haiku
For fast and cheap PR title generation, I use Claude Haiku with structured output:
from pydantic import BaseModel, Field

class PrTitleModel(BaseModel):
    pr_title: str = Field(..., description="Concise PR title")
    pr_description: str = Field(..., description="Detailed PR description")

def pr_title_generator(response: str) -> PrTitleModel:
    agent = create_agent(
        system_prompt=PR_PROMPT,
        model=Models.CLAUDE_45_HAIKU,
        tools=[]
    )

    result = agent(
        prompt=f"This is response from claude code: {response}\n\n"
               f"Generate a concise title for a GitHub pull request.",
        structured_output_model=PrTitleModel
    )

    return result.structured_output
The prompt enforces Conventional Commits style:
PR_PROMPT = """
You are an assistant expert in generating pull request titles for GitHub.
OBJECTIVE:
- Generate concise and descriptive titles for pull requests.
- IMPORTANT: Use Conventional Commits as a style reference.
CRITERIA:
- The title must summarize the main changes or fixes.
- Keep the title under 10 words.
5. Commit, Push, and Create PR
Finally, we commit everything, push to the remote, and create the PR via GitHub API:
def _commit_and_push(repo: Repo, branch_name: str, pr_info: PrTitleModel) -> None:
    repo.git.add(A=True)
    repo.index.commit(pr_info.pr_title)
    repo.git.push(get_authenticated_repo_url(), branch_name)

def _create_pull_request(branch_name: str, pr_info: PrTitleModel) -> None:
    gh = Github(GITHUB_TOKEN)
    gh_repo = gh.get_repo(GITHUB_REPO)
    gh_repo.create_pull(
        title=pr_info.pr_title,
        body=pr_info.pr_description,
        head=branch_name,
        base="main"
    )
The Triage Agent: Deciding What to Fix
The tool is exposed to a triage agent that analyzes logs and decides when to use it. The agent follows the ReAct pattern (Reasoning + Acting), where it explicitly reasons about each error before deciding to act:
TRIAGE_PROMPT = """
You are a senior DevOps engineer performing triage of production errors.

REGISTRATION CRITERIA:
- The error may be occurring frequently. Register ONLY ONCE.
- The error has a clear stacktrace that indicates the root cause.
- The error can be corrected with a quick fix.

DISCARD CRITERIA:
✗ Single/isolated errors (may be malicious input)
✗ Errors from external services (network, timeouts)
✗ Errors without a clear stacktrace
✗ Errors that require business decisions

Use the ReAct pattern:
Thought: [your analysis of the error]
Action: [register_error_for_fix if criteria met]
Observation: [tool result]
... (repeat for each error type)
Final Answer: [summary of registered errors]
This pattern forces the agent to reason explicitly before taking action, making decisions more transparent and debuggable.
The agent is given tools and makes the decision autonomously:
agent = create_agent(
    system_prompt=TRIAGE_PROMPT,
    model=Models.CLAUDE_45,
    tools=[register_error_for_fix]
)

result = agent(prompt=[
    {"text": f"Question: {question}"},
    {"text": f"Log context: {logs_json}"},
])
To test the system, I created a sample repository with intentional bugs and generated CloudWatch-like logs. The triage agent analyzes the logs, identifies fixable errors, and invokes the register_error_for_fix tool to create PRs automatically.
That’s the code (with the bug):
import logging
import traceback
from flask import Flask, jsonify
from lib.logger import setup_logging
from settings import APP, PROCESS, LOG_PATH, ENVIRONMENT
logger = logging.getLogger(__name__)
app = Flask(__name__)
setup_logging(
env=ENVIRONMENT,
app=APP,
process=PROCESS,
log_path=LOG_PATH)
for logger_name in ["werkzeug"]:
logging.getLogger(logger_name).setLevel(logging.CRITICAL)
@app.errorhandler(Exception)
def handle_exception(e):
logger.error(
"Unhandled exception: %s",
e,
extra={"traceback": traceback.format_exc()},
)
return jsonify(error=str(e)), 500
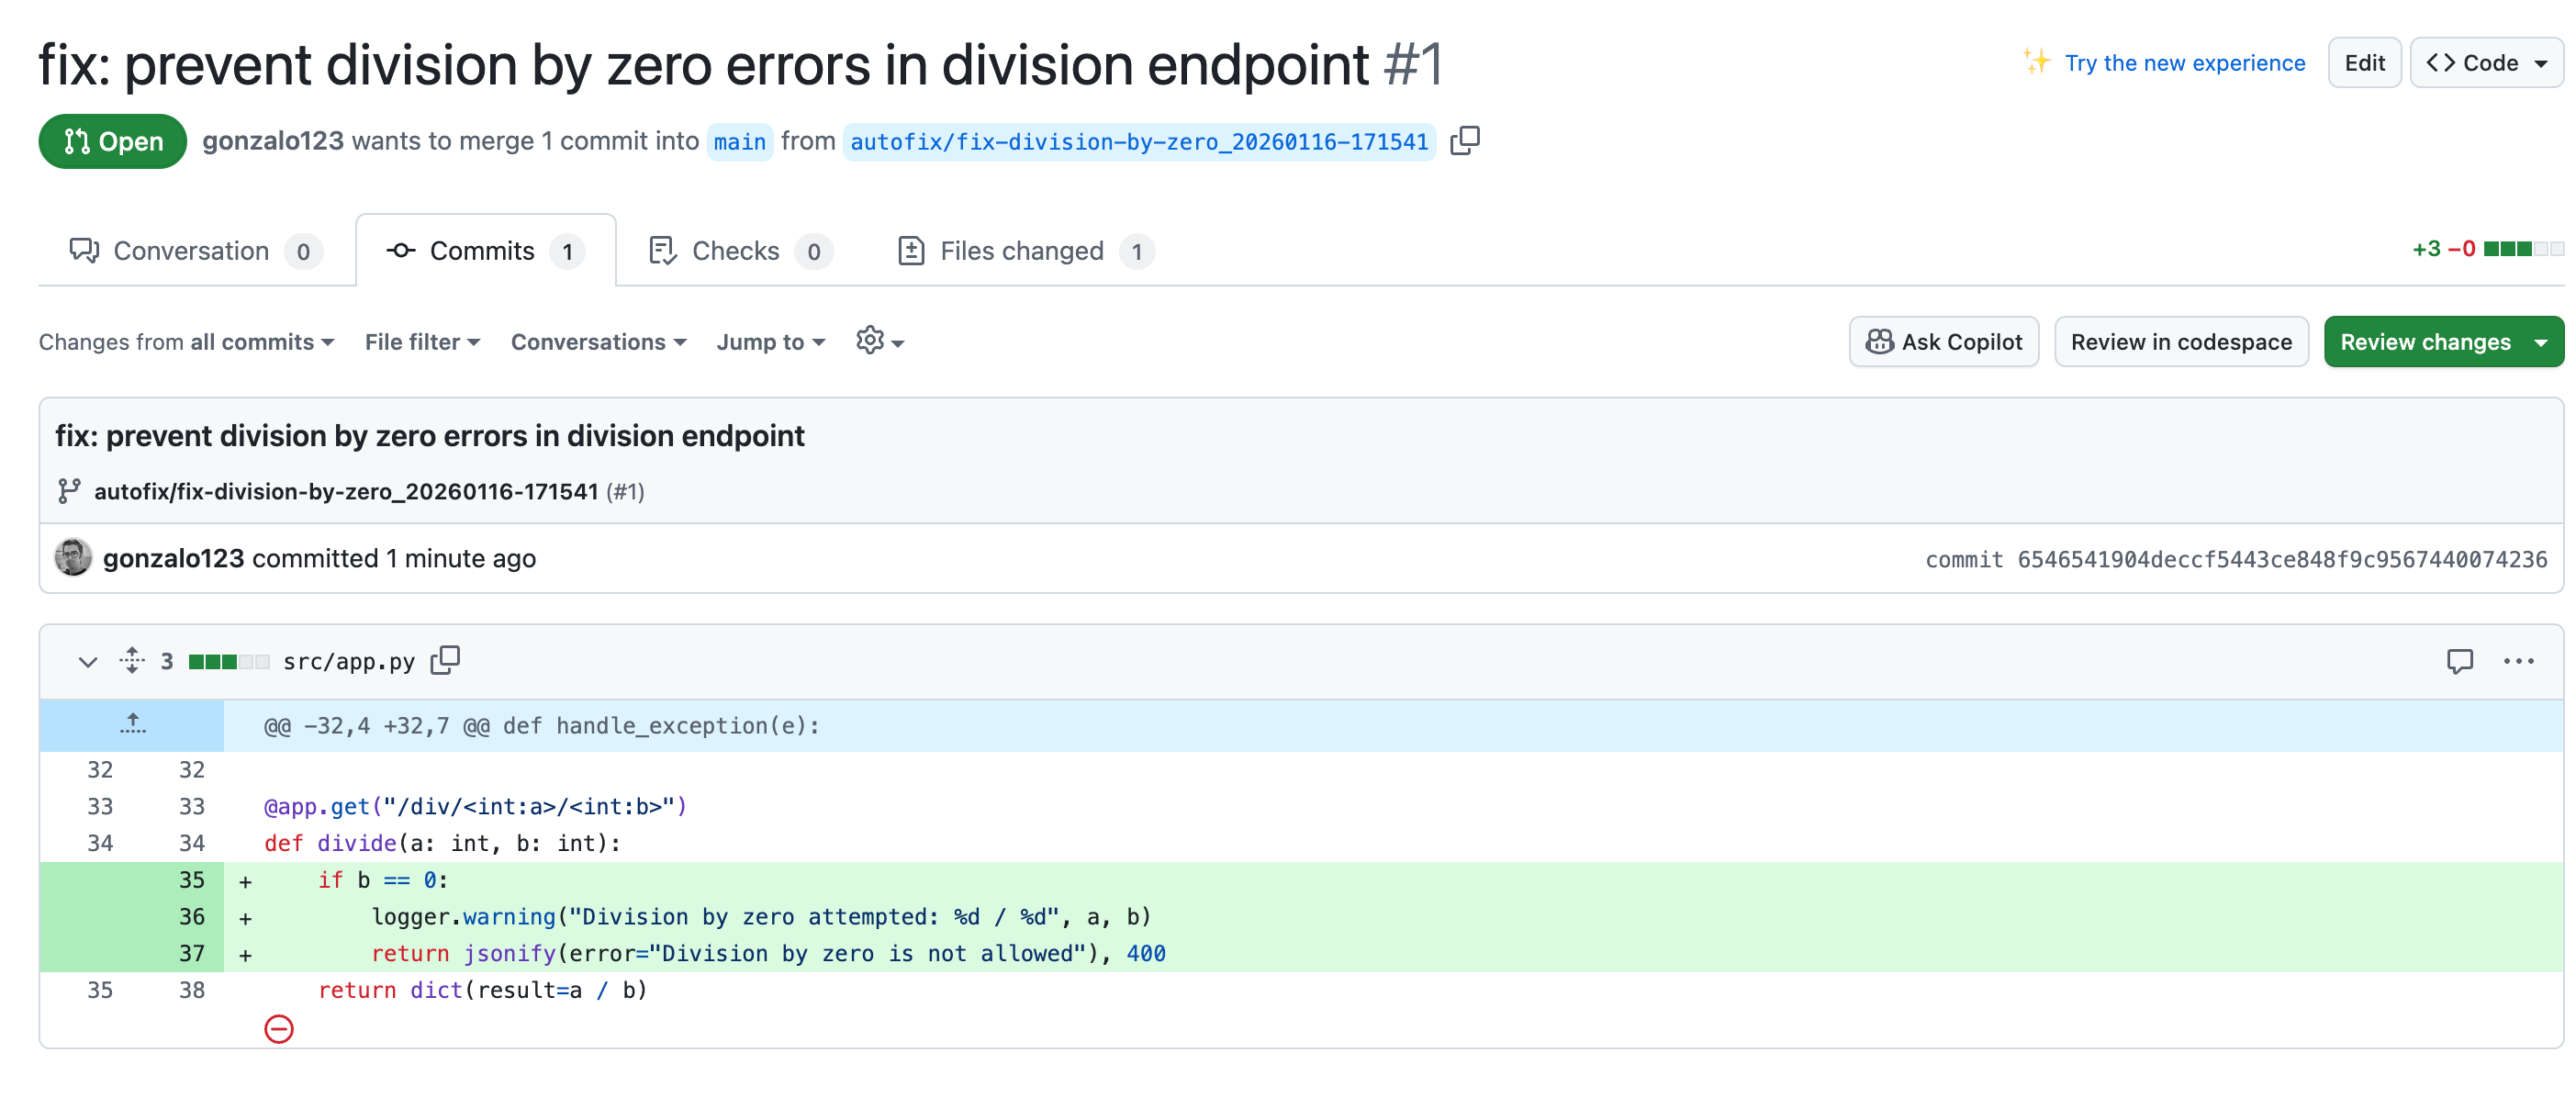
@app.get("/div/<int:a>/<int:b>")
def divide(a: int, b: int):
return dict(result=a / b)
As you can see, the /div// endpoint has a bug: it does not handle division by zero properly. We have executed the error and generated logs accordingly. As we have the logs in CloudWatch’s log group /projects/autofix we can execute a command to analyze them:
pyhon cli.py log --group /projects/autofix --question "Analyze those logs" --start 2026-01-16
The AI agent will identify the division by zero error, decide it is fixable, and create a PR that modifies the code (using claude code in headless mode) to handle this case properly.
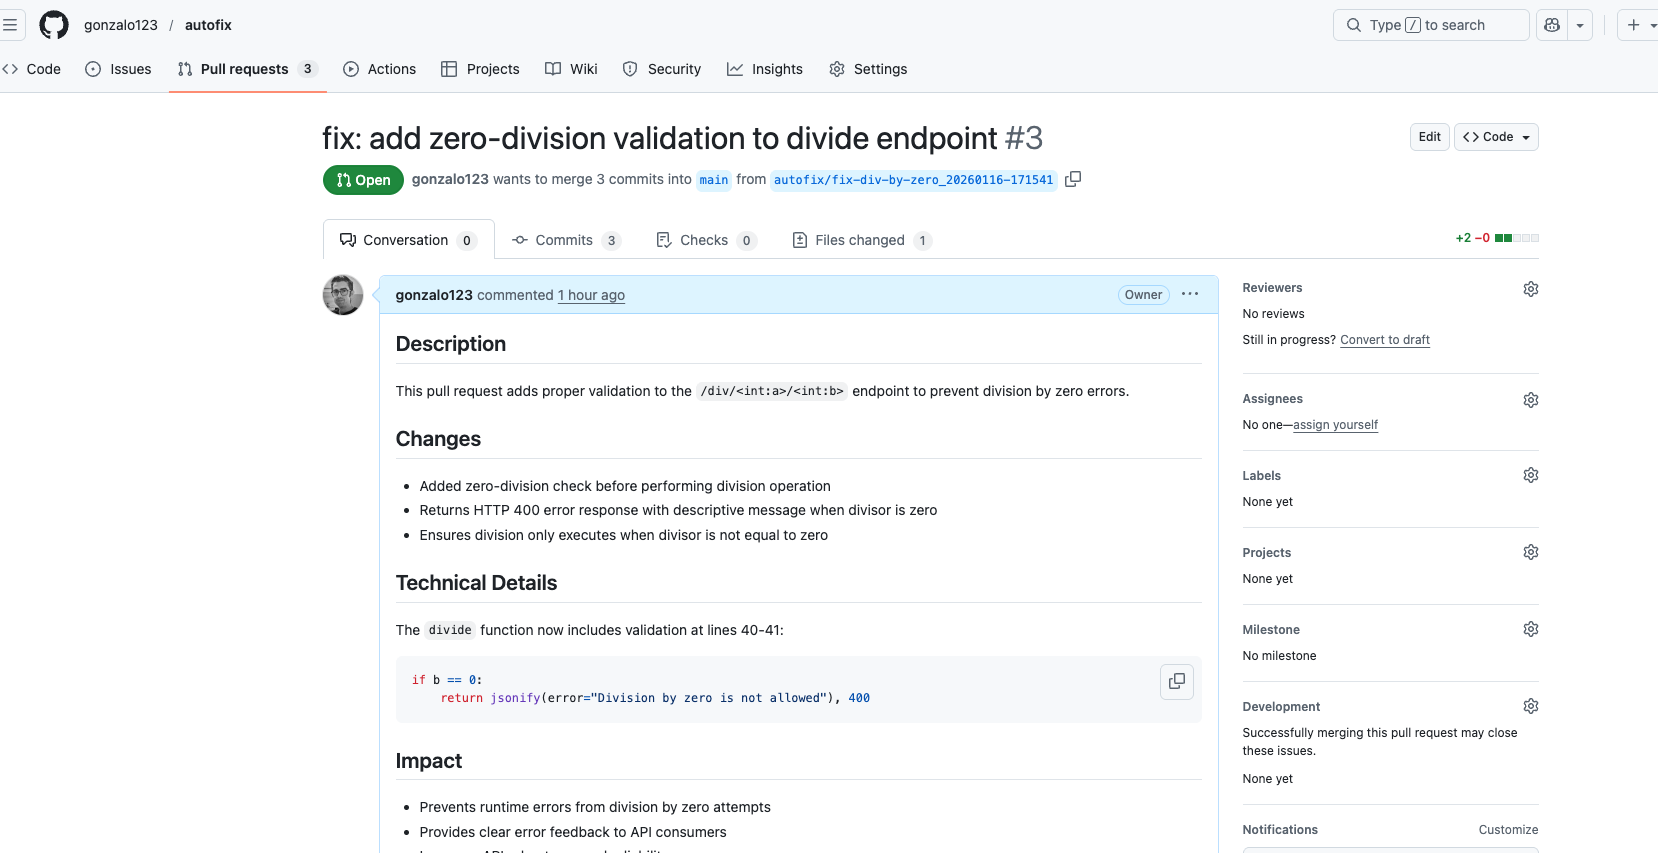
And that’s all! The AI agent has autonomously created a PR that fixes the bug. Now we can easily accept or reject the PR after human review. The bug has been fixed!
This experiment shows that AI agents can go beyond analysis to take action. By giving Claude Code SDK access to a sandboxed environment with limited tools (Read, Edit only), we get a system that can autonomously fix bugs while remaining controllable.
The key is setting clear boundaries: the triage agent decides what to fix based on strict criteria, and the fix agent is constrained to how it can modify code. This separation keeps the system predictable and safe.
Full code in my github